# The Templates
## "The Captain" Home Page
The [Home Page Template](/site-page-templates/the-captain-site-page-template-collection/full-page-templates/home-page-template) leads the way to a great home page for your site. Thiswill especially help site owners with many courses or memberships. It includes everything you need to demonstrate your site's superpowers.
[**Part of the "The Captain" Site Page Template Collection**](/site-page-templates/the-captain-site-page-template-collection)
## [**"The Captain" Video Funnel Page**](/site-page-templates/the-captain-site-page-template-collection/full-page-templates/video-funnel-page)
Capture more leads and sales with this Video Funnel Page that initially looks like a harmless "no sales" video, but then reveals other sections after a certain amount of time on the page. Perfect for micro-learning funnels, after purchase upsells, lead generation and much more.
[**Part of the "The Captain" Site Page Template Collection**](/site-page-templates/the-captain-site-page-template-collection)
## [SNAP Course Page (01)](/snap-course-page-templates/snap-design-templates/snap-course-page-01)
This SNAP Course Page Template main feature is a sticky sidebar that has the key information needed to convert your website visitors into paying customers.
[**Part of the SNAP Course Page Template Collection**](/snap-course-page-templates/getting-started-with-snap)
## [SNAP Course Page (0**2**)](/snap-course-page-templates/snap-design-templates/snap-course-page-02)
This SNAP Course Page Template main feature is large embedded video that is front and center, but still has all of the important information on the side. The call to action section of the sidebar also sticks to the top, making it easy for website visitors to purchase
[**Part of the SNAP Course Page Template Collection**](/snap-course-page-templates/getting-started-with-snap)
## [SNAP Course Page (03)](/snap-course-page-templates/snap-design-templates/snap-course-page-03)
In this SNAP Design Page Template, we have placed the video in the main banner section that spans across the full width of the page. The pricing and CTA buttons have also been moved to the banner. The main content area then follows below splitting the page with the small sidebar that contains the quick attributes for the course.
[**Part of the SNAP Course Page Template Collection**](/snap-course-page-templates/getting-started-with-snap)
## [SNAP Course Page (04)](/snap-course-page-templates/snap-design-templates/snap-course-page-04)
This SNAP Design Page Template is just like the Sticky Sidebar version, except the main content is grouped into tabs. This creates less "scroll" and causes the user to interact with the page in order to see some of the content.
[**Part of the SNAP Course Page Template Collection**](/snap-course-page-templates/getting-started-with-snap)
## [SNAP Course Page (05)](/snap-course-page-templates/snap-design-templates/snap-course-page-05)
This SNAP Course Page Template is just like SNAP Course page (02) with it's extra large video section front and center, but it moves the curriculum section over to the sidebar and below the sticky CTA section
[**Part of the SNAP Course Page Template Collection**](/snap-course-page-templates/getting-started-with-snap)
# Latest Updates
## SEP 23: New Home Page Template
{% embed url="" %}
[**"The Captain" Page Template**](/site-page-templates/the-captain-site-page-template-collection) will lead the way to a brand new home page for your Thinkific site that has been designed to help you get more students and increase your sales. Either SNAP in [one section](/site-page-templates/the-captain-site-page-template-collection#1-using-the-instant-one-section-method) to get a full page design added or use the [Build Your Own](/site-page-templates/the-captain-site-page-template-collection#2-building-your-own-method) sections to create the perfect combination that you are looking for.
## JUL 29: Multiple Instructors
{% embed url="" %}
:fire:**NEW FEATURE**: You can now add multiple instructors to a SNAP Design Template using the [new SNAP Instructors Information Section](/snap-course-page-templates/snap-information-sections/snap-instructors)
## JUL 28: Minor New Features and Bug Fixes
:fire:**NEW FEATURE**: Custom strikethrough text when having a sale
:fire:**NEW FEATURE**: SNAP 02 now has the course image on the sidebar at all times
:bug:**BUG Fixes:** The social share icons where not working when the page did not have a preview video. FAQ sections where not expanding when being used with Meganav.
## JUL 22: Minor New Features and Bug Fixes
{% embed url="" %}
* :fire:**NEW FEATURE**: Location of FAQ's in [SNAP Course Page (04) ](/snap-course-page-templates/snap-design-templates/snap-course-page-04#faq-section)Design template
* :fire:**NEW FEATURE:** Options in [SNAP Course Page (01-05) Design](/snap-course-page-templates/snap-design-templates) templates for size of heading and subheading in the banner
* :fire:**NEW FEATURE:** Positioning of the sticky sidebar when the page first loads for [SNAP Course Page (01) Template](/snap-course-page-templates/snap-design-templates/snap-course-page-01)
* :bug:**BUG Fixes:** Font families were not being inherited from the Thinkific Theme Settings, [SNAP Course Page 02 ](/snap-course-page-templates/snap-design-templates/snap-course-page-02)sidebar was not sticking properly
## JUL 21: SECRET SUPER POWER: LOOM VIDEOS
{% embed url="" %}
Are you using the "[secret Loom superpower](/frequently-asked-questions#how-do-i-use-the-loom-video-feature)" inside of SNAP Course Page Templates?\
With all of the recent video problems Thinkific is having lately, now is a good time to start using it.Why you ask?We love Loom because it has built in reactions and comments right inside the video player.This helps with conversions because people can see other reactions and it is like automatic social proof that you do not need to spend any time on. They can also comment in the video as wellHow do you use it?\
 Head over to [Loom.com](https://l.facebook.com/l.php?u=http%3A%2F%2FLoom.com%2F%3Ffbclid%3DIwAR1uXqLtgTotoOSJ4_qF81GMJLGoJ1lhzthL0-m0BX5CA4ByQu-6QVNEHyE\&h=AT21OkPS-LHShsI0S-J76NPrbUemzrBNRlxhloA2VRT-Xbo7ahRqtRcsemNl_NhZhgy6rmqf7N92kLVrHxLCYb90dh7hvK5k-aTWPKUnmG9fAaLrhC2wyFU2OuxF3-nsyy7ZkXGIEs17I16zW3w51etkpg&__tn__=-UK-R\&c\[0]=AT2OsBYsZ8ebSyBMm9m0kWh_yIzTKCJ4ACoJMomb3tVJ4NXIF2NasuQEH4_hENLAN56lbBCGe4TyVKUJfJP9v7ODTA4jB-D6YrVt4mf4UDtp5NBdbUV0rwCIF2FkRvtRVk-uuamJB3HVug7H6y91k5UeHtRHIfCMaVk) and create a free account (I have a pro account that I will never cancel because this tool is in my "can't live without bucket"\
 Create or upload a video to Loom\
 In the SNAP Course Information open up the Video Settings group and paste in your Loom Embed code and make sure the preview option is enabled\
 Pick a SNAP Course Page Template design that focuses on video
## JUL 20:  NEW SNAP FEATURE ALERT: AUTOMATED SALES
{% embed url="" %}
**July 20 - IN THIS UPDATE:**
* How to use automated sales
## JUL 14:  NEW SNAP FEATURE ALERT
{% embed url="" %}
**July 14 - IN THIS UPDATE:**
* New integrated help added to SNAP Sections
* Banner Image Support
* more color over-ride choices
* Online documentation resources
* Several bug fixes
## JUL 11:  NEW SNAP FEATURE ALERT
{% embed url="" %}
July 11 - SNAP not only helps you create your course pages quicker, but it also helps my team create new features more quickly as well (and I am drooling  over their queue right now). We just released a new [SNAP FAQ Section](/snap-course-page-templates/snap-information-sections/snap-faqs) that will had some superpowers to your SNAP pages:
## JUL 10  NEW SNAP FEATURE ALERT

July 10- The ["Quick" Attributes](/snap-course-page-templates/snap-information-sections/snap-course-information#quick-attributes) just got quicker. Now we have some "Smart Text" that will be automatically replaced with course information: \[VIDEO TIME] - shows total time in hours (must be using Thinkific Video lessons) \[LESSON COUNT] \[INSTRUCTOR NAME] \[PDF COUNT] \[QUIZ COUNT] \[DOWNLOAD COUNT]
## JUN 29: SNAP Released to PowerUp Pass Members
{% embed url="" %}
June 29th - The initial release of SNAP Course Page templates was rolled out to PowerUp Pass members. Early access to PowerUps is a huge perk for PowerUp Pass members as they get to use our latest superpowers before everyone else and their feedback is taken into account before we make it available to the general public for individual purchase
 5 new Course Page Templates Included Now - More Added Regularly
Put your sales page info in once and then swap out a design with the snap of a finger. No need to "rebuild" your pageSave time creating your course pages
Fully customizable, mobile responsive and built with conversion in mind
Available to PowerUp Pass members for early previewNot a PowerUp Pass Member - contact for a special upgrade price!!
# Frequently Asked Questions
## How are SNAP Course Page Templates different than SNAP Page Templates?
* [SNAP Course Page Templates](/snap-course-page-templates/getting-started-with-snap) are meant just for course pages
* [SNAP Course Page Templates](/snap-course-page-templates/getting-started-with-snap) include SNAP Information Sections and SNAP Design Sections
* [SNAP Page Templates](/site-page-templates/the-collections) are pre-built pages an include everything you need in one section
## How do I copy SNAP sections for all of my courses?
{% embed url="" %}
## How do I use the Preview Video feature?
{% embed url="" %}
* [ ] Inside the [SNAP Course Information ](/snap-course-page-templates/snap-information-sections/snap-course-information)section, be sure to open the Video settings group and enable the preview video option
* [ ] Select the type of video you want to use
* [ ] Inside the [SNAP Design Template](/snap-course-page-templates/snap-design-templates) of your choice, you can select if you want an inline video or a popup video
## How do I use multiple instructors on a SNAP page?
{% embed url="" %}
* Make sure you have the required [SNAP Course Overview](/snap-course-page-templates/snap-information-sections/snap-course-information) section on the page
* Add the [SNAP Instructors](/snap-course-page-templates/snap-information-sections/snap-instructors) section to the page and place it below the SNAP Course Overview section, but above any SNAP Design templates
* Add an instructor block setting for each instructor you wish to display. This will replace the content of the instructor section with the list of instructors
* Add a [SNAP Design Pag](/snap-course-page-templates/snap-design-templates)e template to the page. Adjust design settings as necessary
## How do I use the Loom Video feature?
{% embed url="" %}
Are you using the "secret Loom superpower" inside of SNAP Course Page Templates?
We love Loom because it has built in reactions and comments right inside the video player.This helps with conversions because people can see other reactions and it is like automatic social proof that you do not need to spend any time on. They can also comment in the video as wellHow do you use it?\
 Head over to [Loom.com](https://l.facebook.com/l.php?u=http%3A%2F%2FLoom.com%2F%3Ffbclid%3DIwAR1uXqLtgTotoOSJ4_qF81GMJLGoJ1lhzthL0-m0BX5CA4ByQu-6QVNEHyE\&h=AT21OkPS-LHShsI0S-J76NPrbUemzrBNRlxhloA2VRT-Xbo7ahRqtRcsemNl_NhZhgy6rmqf7N92kLVrHxLCYb90dh7hvK5k-aTWPKUnmG9fAaLrhC2wyFU2OuxF3-nsyy7ZkXGIEs17I16zW3w51etkpg&__tn__=-UK-R\&c\[0]=AT2OsBYsZ8ebSyBMm9m0kWh_yIzTKCJ4ACoJMomb3tVJ4NXIF2NasuQEH4_hENLAN56lbBCGe4TyVKUJfJP9v7ODTA4jB-D6YrVt4mf4UDtp5NBdbUV0rwCIF2FkRvtRVk-uuamJB3HVug7H6y91k5UeHtRHIfCMaVk) and create a free account (I have a pro account that I will never cancel because this tool is in my "can't live without bucket"\
 Create or upload a video to Loom\
 In the SNAP Course Information open up the Video Settings group and paste in your Loom Embed code and make sure the preview option is enabled\
 Pick a SNAP Course Page Template design that focuses on video
## How do I use the "Sale Feature"?
{% embed url="" %}
## How do I use SNAP for existing courses?
The SNAP sections are going to typically replace the page sections you already have, but you may be able to use the same information that you have on it.
You can work on your page in preview mode and then click save when you are ready to publish. Or if you have a lot of pages to update and want your new "look" to go live at once, then you will want to duplicate your Site theme and work in that version first before publishing it.
1. Add the [SNAP Course Information](/snap-course-page-templates/snap-information-sections) section to your page (make this the first section that appears in the list)
2. Add a [SNAP Course Page section ](/snap-course-page-templates/snap-design-templates)to your page (pick one of the 5 designs we have and make it the second section in the list)
3. Copy and paste the text you may already have in your other page sections into the SNAP Course Information section
4. Remove your existing Sections (as needed, - you may want to keep some of them if you want to)
## Can I use SNAP with any Thinkific Theme?
Yes, this PowerUp is a Thinkific App that makes new Site Builder sections available for you to use.
## Can I use SNAP on any Site Page?
Each SNAP PowerUp Pack will be built for certain pages. the SNAP Course Page Template are intended to be used just for Course Pages
## What do I need to add to my page?
At a minimum you just need to add the [Site Course Information](/snap-course-page-templates/snap-information-sections/snap-course-information) section and one of the [Site Design Sections](/snap-course-page-templates/snap-design-templates) to your course page.
## How long will it take me to build my page?
We intentionally made this PowerUp with speed in mind. We want you spending as little time on your site so that you can spend more time with your members or creating new products to sell. After adding the two sections, you will just need to fill in the blank for the text that is used in the sections. The SNAP sections inherit the theme settings for colors and fonts and you can also turn off sections that you may not need. The nice thing about the SNAP Course Information section is that it makes you focus on the "information" that you need to communicate and put you in a position for the best chances at selling your course. Then you just need to "snao" in a design choice and you are done!! If you already have a lot of this information (ex: what you will learn, who is this course for...) then it should only take a few minutes to build a page.
## How long will it take to change a page design?
In the current way you build a page, if you wanted to change the design and style of your site page, you would most likely have to re-build the entire thing. With SNAP, you load your "information" once and then you pick a design. If you decide to change the design or want to use a new one that we release, you just remove your current section and then drop in a new design section. Snap!!
## Can I use this as a template for all of my courses?
Yes, Since we have separated the information from the design, you can create "template sections" that can be easily copied using the built in Thinkific Section copy functionality.
## Can I use this for memberships or when a course is sold in both ways?
Yes, we have advanced controls over the call to action sections and include both primary and secondary calls to action
## Can I use it for "sales"?
Yes, we have a built in "sale" capability that is enabled with the click of a mouse. A 'strikethrough' price is automatically shown and the CTA button switches to the sale link
## What kind of videos are supported?
We include support for Thinkific Video Library, You Tube and also added advanced Loom support as well as any embeddable video that comes from any video platform. Most SNAP Design templates will give the option to display the video as a Popup or directly inline with the content
## How many design templates are included?
We have launched with 5 high converting, mobile optimized templates that really help you make sure the right information is placed on your page to give you the best chances at selling. We intended to release new designs on a regular basis.
## Do I have to pay for additional templates?
When you install a SNAP Page Template pack, you will get all new designs that have been added to that pack for no additional charge.
## How does it look on mobile devices?
We have optimized the designs to not only look great on mobile, but also to be high converting. On mobile, there is a sticky call to action at the bottom of he page keeping it close to being tapped at any moment. The page design also has been optimized to load quickly on mobile devices.
## What if I do not see a template I like?
We will be releasing new templates all of the time, and because we designed in so templates can be swapped out in a SNAP of your fingers, it will be easy to switch to new templates when they are ready. We also take requests for custom page templates. Share you idea/request inside our [SuperPowerUps Facebook Group](https://www.facebook.com/groups/superpowerups)
## How to get rid of the "flash" of old experience on the student dashboard or all courses page?
{% hint style="info" %}
You will need to make this change any time you update the Thinkific theme in the future
{% endhint %}
{% embed url="" %}
# Hero Spotlights
Get inspired by real members using their superpowers
## [This Hero is a Short and Sweet Winner](https://www.spillpiano.com/courses/thewinner)
{% embed url="" %}
* Love how he is using colors to make the sidebar "pop" and also the "what you will learn" section
* The course card image is spot on in communicating what the course is about
* The video is awesome in that I am drawn into seeing exactly how he will be teaching me to learn how to play the piano. And this is much better than having to sign up for a "free lesson"
* I can't find much more to recommend to change for this page besides maybe moving the sticky position down a bit with the [setting we have for this](/snap-course-page-templates/snap-design-templates/snap-course-page-01#sidebar)
## [Fellow Thinkific Expert Using His Superpowers](https://www.schudiotv.com/courses/school-website-compliance-workshop)
{% embed url="" %}
* Ian Richardson, a fellow Thinkific Expert uses our PowerUps to not only to improve his site, but his clients as well
* I really like how he is using a link in the CTA section to also try and attract group sales (he could also use the secondary CTA for this
* Nice use of clean colors and "just enough information" on the page. Nice job on bolding the What You'll Learn bullet lists
## Non English Site Using SNAP
{% embed url="" %}
* Love the use of colors in the site to make the sidebar pop
* Daniel is also using the Sale feature which will certainly help with conversions
* Also love that Daniel choose to use a video on this page. Video helps with conversions
* I would also add a SNAP FAQ section as well to put this page over the top!!
## Using Quick Course Attributes To Generate Leads With A Free Course
{% embed url="" %}
* Love the use of the sidebar here to quickly show the key "reasons to enroll"
* Juste enough information on this SNAP Course Page Template to increase enrollments - certain sections not needed were easily disabled
* Also using other Thinkific sections and embedded trust pilot
## Great use of video
{% embed url="" %}
* Great use of SNAP Course Page (02) with that large video front and center
* Put together by Thinkfic expert Tiffany
* Clean colors and love the sidebar list and quick attributes
## Great example of lead magnet using SNAP
{% embed url="" %}
* Sticky sidebar keeping key information on the side without having to scroll
* Great example of how to generate leads with a free course
* Love that they are using a popup video - video helps conversions for sure!!
* Using optional SNAP FAQ section to even further help with conversions
## Wow, tons of SuperPowers being used here
{% embed url="" %}
* Snap Course Page Template as the main attraction
* Like use of colors on the what you will learn section to make it stand out
* Also using Meganav and Sections Kit for other page sections including pricing for optional membership
# Help from Rob
Get some personalized guided help from Thinkific Expert Rob Galvin
{% embed url="" %}
Watch the video abve and select an option
{% endembed %}
# The Collections
Site Page Template Collections have been purposely built to make your live easier in building and maintaining your Thinkific site. Our goal is to reduce the amount of time it takes to create a page by packaging everything you need into one section. If you see a page template that you like, then just snap in that section and then add your text and media. Most of the collections will also come with a catalogue of individual sections that you can use to create your own page
{% hint style="warning" %}
**Site Page Templates** are different than SNAP Course Page Templates. The templates covered in this section are for the "rest of your site" including custom pages for purpose built templates.
{% endhint %}
## ["The Captain" Site Page Templates Collection](/site-page-templates/the-captain-site-page-template-collection)
This PowerUp contains both drop in [full page templates](/site-page-templates/the-captain-site-page-template-collection/full-page-templates) as well as a set of [build your own sections](/site-page-templates/the-captain-site-page-template-collection/build-your-own-sections) to construct different types of pages in any combination you want
# "The Captain" Site Page Template Collection
Included both full page templates and individual sections for those who like to build their own
There are two ways to create a site page using "The Captain" Page Template PowerUp:
[**1) Using the "instant" Full Page method:** ](#1-using-the-instant-one-section-method)With this method, you will get an instantly designed page that includes everything you need to quickly create a high converting page for your Thinkific site.
[**2): Using the "Build Your Own" method:** ](#building-your-own-method)With this method, you use "The Captain"'s superpower page sections in any order and with any other page section you wish.
## 1) Using the "instant" Full Page method:
{% embed url="" %}
* [ ] Navigate to a Site Page that you wish to customize
* [ ] Remove all sections. The Full Page Method is meant to give you everything you need in one section, but of course you can decide otherwise.
* [ ] Add one of the Full Page Template sections by searching for "Page" and then look for the bright pink images
* [ ] [**"Home Page Template"** ](/site-page-templates/the-captain-site-page-template-collection/full-page-templates/home-page-template): leads the way to a great home page for your site. This will especially help site owners with many courses or memberships. It includes everything you need to demonstrate your site's superpowers.
* [ ] [**Student Dashboard with Autogenerated Category Tracks:** ](/site-page-templates/the-captain-site-page-template-collection/full-page-templates/student-dashboard-tracks)This superpower will auto-arrange your students courses into category tracks and progress based tracks. You can also used the built-in announcements track to show off your latest content.
* [ ] [**Video Funnel Page:**](/site-page-templates/the-captain-site-page-template-collection/full-page-templates/video-funnel-page) Capture more leads and sales with this Video Funnel Page that initially looks like a harmless "no sales" video, but then reveals other sections after a certain amount of time on the page. Perfect for micro-learning funnels, after purchase upsells, lead generation and much more.
* [ ] [**All Courses Page**](/site-page-templates/the-captain-site-page-template-collection/full-page-templates/all-courses-page-category-images): This full page template will over-ride the default all courses page design that is provided by Thinkific's themes. The banner section contains a search bar and the background image will change based on the category that is being viewed. You also have more control over the course card designs as well as how many are displayed. At the bottom of the page is a category card selector that contains a list of category image cards
* [ ] [**Bundle Page (Sidebar):**](/site-page-templates/the-captain-site-page-template-collection/full-page-templates/bundle-page-sidebar) this full page template is perfect for memberships or bundles of courses. It contains a number of key page elements all wrapped up into one Site Builder section. The call to action sidebar contain the key " at a glance" information your reader needs to make a decision to join. It will stick as the user scrolls to keep the cta easily accessible.
## 2) Build Your Own Method
{% embed url="" %}
* [ ] Add [**"The Captain" Build Your Own section**](/site-page-templates/the-captain-site-page-template-collection/build-your-own-sections) to a Site Page. ***This section is required***
* [ ] Add other [Build Your Own sections](/site-page-templates/the-captain-site-page-template-collection/build-your-own-sections) to your page. Either sections that come with "The Captain" Page Template or other site page sections that you may have available
# Full Page Templates
Use these single sections to instantly create a fully designed fill in the blanks page
## [Home Page](/site-page-templates/the-captain-site-page-template-collection/full-page-templates/home-page-template)
The [Home Page Template](/site-page-templates/the-captain-site-page-template-collection/full-page-templates/home-page-template) leads the way to a great home page for your site. This will especially help site owners with many courses or memberships. It includes everything you need to demonstrate your site's superpowers.
## [Video Funnel Page](/site-page-templates/the-captain-site-page-template-collection/full-page-templates/video-funnel-page)
Capture more leads and sales with this [Video Funnel Page ](/site-page-templates/the-captain-site-page-template-collection/full-page-templates/video-funnel-page)that initially looks like a harmless "no sales" video, but then reveals other sections after a certain amount of time on the page. Perfect for micro-learning funnels, after purchase upsells, lead generation and much more.
## [All Courses Page (Category Images)](/site-page-templates/the-captain-site-page-template-collection/full-page-templates/all-courses-page-category-images)
This full page template will ovr-ride the default all courses page design that is provided by Thinkific's themes. The banner section contains a search bar and the background image will change based on the category that is being viewed. You also have more control over the course card designs as well as how many are displayed. At the bottom of the page is a category card selector that contains a list of category image cards
## [Bundle Page (Sidebar)](/site-page-templates/the-captain-site-page-template-collection/full-page-templates/bundle-page-sidebar)
This full page template is perfect for memberships or bundles of courses. It contains a number of key page elements all wrapped up into one Site Builder section. The call to action sidebar contain the key " at a glance" information your reader needs to make a decision to join. It will stick as the user scrolls to keep the cta easily accessible.
## [Student Dashboard Tracks](/site-page-templates/the-captain-site-page-template-collection/full-page-templates/student-dashboard-tracks)
This superpower will auto-arrange your students courses into category tracks and progress based tracks. You can also used the built-in announcements track to show off your latest content.
# Home Page Template
"Instantly" create a full site home page with just one section
This PowerUp leads the way to a great home page for your site. This SNAP Page Template will especially help site owners with many courses or memberships. It includes everything you need to demonstrate your site's superpowers.
### How to use "The Captain" Page Template
{% embed url="" %}
* [ ] Add "The Captain" Page Template to a Site Page (typically will be your site home page)
* [ ] Go through the section settings and update the information and style
* [ ] [**Banner Section**](/site-page-templates/the-captain-site-page-template-collection/full-page-templates/home-page-template#banner-section) - This is the "hook" portion of your page and allows your visitors to quickly search for what they are looking for.
* [ ] [**Icon Bar Section**](/site-page-templates/the-captain-site-page-template-collection/full-page-templates/home-page-template#icon-bar-section) - This helps grab your website visitors attention with 3 key selling points
* [ ] [**Video Section**](/site-page-templates/the-captain-site-page-template-collection/full-page-templates/home-page-template#video-section) - A video that gives potential members a sneak peek at what is inside, will certainly help with increasing your sales and conversions
* [ ] [**Icons Under Video Section**](/site-page-templates/the-captain-site-page-template-collection/full-page-templates/home-page-template#icons-under-video-section) - This helps communicate more detail about your site without being overwhelming
* [ ] [**Categories Section**](/site-page-templates/the-captain-site-page-template-collection/full-page-templates/home-page-template#categories-section) - This will help your website visitors browse your site more easily into a category they are interested in
* [ ] [**Course Tabs Section** ](/site-page-templates/the-captain-site-page-template-collection/full-page-templates/home-page-template#course-tabs-section)- Great way to feature sets of courses to draw visitors into your site.
* [ ] [**Testimonials Section**](/site-page-templates/the-captain-site-page-template-collection/full-page-templates/home-page-template#testimonials-section) - Add some social proof to your home page
* [ ] [**Site Owner Section**](/site-page-templates/the-captain-site-page-template-collection/full-page-templates/home-page-template#site-owner-section) - Create that personal connection with your site visitors and attract them even more to your courses
* [ ] [**CTA Section**](/site-page-templates/the-captain-site-page-template-collection/full-page-templates/home-page-template#cta-section) - Perfect spot for your lead magnet or free trial
## Banner Section
This is the "hook" portion of your page and allows your visitors to quickly search for what they are looking for.
{% embed url="" %}
## Icon Bar Section
This helps grab your website visitors attention with 3 key selling points
{% embed url="" %}
## Video Section
A video that gives potential members a sneak peek at what is inside, will certainly help with increasing your sales and conversions
{% embed url="" %}
## Icons Under Video Section
This helps communicate more detail about your site without being overwhelming
{% embed url="" %}
## Categories Section
This will help your website visitors browse your site more easily into a category they are interested in
{% embed url="" %}
## Course Tabs Section
Great way to feature sets of courses to draw visitors into your site.
{% embed url="" %}
## Testimonials Section
Add some social proof to your home page
{% embed url="" %}
## Site Owner Section
Create that personal connection with your site visitors and attract them even more to your courses
{% embed url="" %}
## CTA Section
Perfect spot for your lead magnet or free trial
{% embed url="" %}
# All Courses Page (Category Tracks)
{% embed url="" %}
# All Courses Page (Category Images)
This full page template will over-ride the default all courses page design that is provided by Thinkific's themes. The banner section contains a search bar and the background image will change based on the category that is being viewed. You also have more control over the course card designs as well as how many are displayed. At the bottom of the page is a category card selector that contains a list of category image cards
## Removing the "Default" Section
When loading the All Courses page using this superpower, you may notice a brief flash of the "old all courses page". This is because Thinkific has decided to force their version of the All Courses page. To remove this "sub second flash", we will go into the theme code and remove just a few lines of code.
{% embed url="" %}
* [ ] Go to Design your Site / Site Themes
* [ ] Click the three dots and click the "Duplicate" option - this will create a copy of your theme in case you need to "undo" what you did
* [ ] Click Edit Code
* [ ] Go to Site Pages / Collections Landing Page
* [ ] Remove lines 7-12
* [ ] Click Save
# Bundle Page (Sidebar)
A full site page template for Bundles that contains a sticky sidebar
{% embed url="" %}
# Student Dashboard (tracks)
{% hint style="warning" %}
WARNING: This is not intended for sites that have a very large set of courses (100+). Page load times may be unacceptable. Please see the option for loading courses in a new window so that the dashboard page only loads once.
{% endhint %}
{% embed url="" %}
This superpower will auto-arrange your students courses into category tracks and progress based tracks. You can also used the built-in announcements track to show off your latest content.
 Automatically generates a set of category tracks for your current students enrollments (just add the section and you are done)
Automatically creates "progress" based tracks so we are promoting course completion
Announcement track slider included to help promote new content or eventsEasily choose the order of every track in seconds
Exclude certain categories that you do not want appearing
 Courses will appear in multiple tracks if they are in multiple categories (ex: What's New\...). Tracks will not appear if they are not enrolled in them
Instantly blends in with your site colors, fonts, etc - but allows to you easily tweak everything
Auto "Buy me" links for courses that are in "free preview"
Auto "rate me" and "more info" links
Customizable Color coded progress indicators
Search bar included
Personalization with "SmartText" headings for the tracks
No pagination - all enrolled courses shown automatically
## How to use this superpower?
{% embed url="" %}
* [ ] Make sure you have your [categories created for your Thinkific site](https://support.thinkific.com/hc/en-us/articles/360030372094) and courses added to them
* [ ] Open up [Site Pages](https://support.thinkific.com/hc/en-us/articles/4407445466775#about) and navigate to the Student Dashboard page
* [ ] Add the "Student Dashboard (Tracks)" section to your page
* [ ] Hide or adjust the [announcements ](#announcements)settings
* [ ] Optionally adjust the [category track settings ](#category-tracks)to control track order and visibility
* [ ] Optionally adjust any of the [course card settings](#course-cards) for text, links and color settings
* [ ] Optionally change the position of the[ Communities track](#communities-track)
* [ ] Explore all of the [section settings](#section-settings) options below for additional options
## Section Settings
Below you will find all of the details on the configuration options for each of the section settings
### Welcome Banner
* **Use this section:** when checked the welcome banner section will be displayed
* **Heading:** This will determine what the heading text will be. \[AUTO] will use the default text from Thinkific theme, \[NAME] Will be replaced by the students first name.
* **Below Heading:**
* **Search (default)** - will show a search bar that searches the students enrolled courses (not "All Courses")
* **Button** - will show a button instead. This may be helpful for linking to a "get help" or "contact us" page
* Button Text, Button Page - When "Button" is used, these settings will control the text and the page of the button
* **None** - will show nothing below the heading
* **Padding Top & Bottom** - controls how much padding is used above and below the Banner section
* **Use theme settings page background color?** - when check it the section will use the theme page color settings for the background color. Otherwise a custom background color can be specified
* **Use theme settings color for heading?** - when checked, the heading will use the theme heading color setting, otherwise a custom color can be specified
* **Search Background & Search Text** - determines the color of the search entry
* **Use primary button color for search icon?** - when checked, the search icon will use the theme primary button color otherwise a custom color can be specified
### Announcements
Announcements can be added to the dashboard by using the Announcement blocks at the bottom of the settings. Each announcement is added to the announcement track and has the option of having just text and an image or to have the item linked to a call to action
* **Use this section:** when checked the announcement section will be displayed
* **Location:** this option will determine if the announcements are placed above or below the welcome banner
* **Heading** - This will determine the section's heading. \[NAME] will be replaced with the students first name
* **Automatically Advance slider?** - when checked this will auto advance the items in the announcement slider track
* **Delay to move slider (Default 5 seconds)** - this determines the delay in auto advancing the announcement slider track
#### Announcement Blocks
When using the Announcement track, you must add multiple announcement blocks at the bottom of the settings. The order is determined by the order of the block settings.
* **Image (570x320)** - this image will be used as the background image. The text will appear over it automatically. We do add a gradual gradient from the bottom towards the top of the image automatically. The image size is recommended, but it will auto crop and center the image with whatever size you provide.
* **Page-** Select a page to use as the call to action for the item. When a user clicks on the page, it will either open in the same window or a new window depending on the **Open link in** setting. Leave this blank if you do not want the item to be linked
* **Heading -** this is the text that will be placed over the image
* **Badge** - this determines the small "badge" text that is placed in the upper left of the card. It is useful for indicating different types of announcements. Use the **Badge Background** and **Badge Text** color options to also give some color coordination to your announcements.
### Course Cards
The course card settings group will give you the control over the text and icons that are used on the course cards. You can also specify if you want the course cards opening in a new window or the same.
* **Open card links in:** Use this setting to determine if you want the course cards to open in a new window or the same window. If you have a large # of courses, you may want to open the course in a new window to avoid having the reload the dashboard
* **Buy Course:** This is for setting the text to be displayed when the user is enrolled in a free trial. It will use the default purchase link for the product
* **Rate Course:** This is for the text to be displayed at the bottom of the card that will be linked for the course review. \[AUTO] will use the default text from Thinkific theme
* **Overview Course:** This is for the text to be displayed for the link to the course landing page. \[AUTO] will use the default text from Thinkific theme.
* **Presell Course:** This is for the text to be displayed in the badge section when the course is set to pre-sell status. \[AUTO] will use the default text from Thinkific theme
* **Status Icons:** Uses [Font Awesome 6.x ](https://fontawesome.com/icons)icon codes for indicating various progress and states of the course. Simply find an icon code on Font Awesome and copy and paste it into the settings.
* In Progress Icon - displayed when the student has progress between 1-99%
* Not Started Icon - displayed when the student has progress of 0%
* Completed Icon - displayed when the student has completed the course
* Rate Course Icon - displayed when the student can leave a course review and also progress is greater than 0%
* See Overview Icon - will always be displayed
* Purchase Icon - will be displayed when the student is in a free trial course and can purchase it
* Presell Icon - will be displayed when the course is set to presell status
### Category Tracks
By default automatically generated tracks for the various progress states will be generated in addition to all of your categories you [have configured inside of your Thinkific site](https://support.thinkific.com/hc/en-us/articles/360030372094). With this settings group, you can control what categories you would like to appear and also the order that they are shown.
* **Use auto generated 'In Progress' track:** when checked, a track will be shown with a list of courses that have a progress between 1-99%. You can control the heading of the track with the **In Progress auto generated track** setting.
* **Use auto generated 'Not Started' track:** when checked, a track will be shown with a list of courses that have a progress of 0%. You can control the heading of the track with the **Not started auto generated track** setting.
* **Use auto generated 'Completed' track:** when checked, a track will be shown with a list of courses that have a progress of 100%. You can control the heading of the track with the **Completed auto generated track** setting.
* **Preferred Order:** Copy and paste category names in the order you want them to appear. Leave blank for default order. One per line. Leave no blank lines. Any category name that you do not include in the list will be appended after the list you specify. [Watch this demo video on how to use this feature](https://www.loom.com/share/14984e6f939146ee96da004423fc0f34)
* **Excluded categories:** Copy and paste category names that you do NOT want to show here.One per line. Leave no blank lines.
{% hint style="info" %}
Category tracks will only show courses that the student is enrolled in. Site Builder does not always represent the actual state of a logged in student. Please be sure to check this page from the actual student dashboard page: yoursite.thinkific.com/enrollments
If a category track contains no elements to display for the currently logged in student, then it will automatically be hidden
{% endhint %}
### Communities Track
If you are using Thinkific Communities, then there will be a community track for your students. Use these settings to determine the location of the track as well as content settings.
* Community Heading - This will set the text for the heading of the communities track. \[AUTO] will use the default text from Thinkific theme
* Communities Icon - the Font Awesome icon code to use for the number of topics show on the community card
* Location - determine if you want the community track to appear above or below the categories section
### Styles & Colors
We always try to have the style of our page templates blend in instantly with whatever Theme style and color scheme you are using. Each color option indicates where the default color is coming from the [Thinkific Theme Settings](https://support.thinkific.com/hc/en-us/articles/360033673933). You can also over-ride these settings and select a color combination that works for you.
# Video Funnel Page
Capture more leads and sales with this Video Funnel Page that initially looks like a harmless "no sales" video, but then reveals other sections after a certain amount of time on the page. Perfect for micro-learning funnels, after purchase upsells, lead generation and much more.
### Example Usage: Lead Gen Video Funnel
In this funnel you would create a short educational video and then have the call to action connected to your free resource
1. Create a short education video that shows your audience something very "micro" result orientated.
2. In the video towards the end you will talk about how this can help them get started and how your free course or resource would help them take this knowledge even further
3. Add the Video Funnel Section to a page and change the Section Reveal settings to adjust the timing accordingly.
4. Update the CTA section settings with some brief info about your free course and then connect the button to the enroll link for the free course (or the course page)
5. Optionally add more sections to the page and setup the Section Reveal settings accordingly in the individual sections
6. Email out to your audience a link to this page and let them know about your free training. Share on social as well.
# Build Your Own Sections
{% embed url="" %}
* [ ] Add [Activation: Build Your Own](/site-page-templates/the-captain-site-page-template-collection/build-your-own-sections/activation-build-your-own-section) section to a Site Page. *This section is required*
* [ ] Add other sections to your page. Either sections that come with "The Captain" Page Template or other site page sections that you may have available
# Activation: Build Your Own Section
{% hint style="warning" %}
This section is required on any pages that are using "The Captain" Build Your Own sections. Place this section above other "The Captain" sections
{% endhint %}
## How to use this section
* [ ] Add [Activation: Build Your Own](/site-page-templates/the-captain-site-page-template-collection/build-your-own-sections/activation-build-your-own-section) section to a Site Page. *This section is required*
* [ ] Move this section to the top of your list of sections
* [ ] Add other sections to the page below the Activation: Build Your Own section
## Section Settings
### Behavior
This settings group controls how "The Captain" Build Your Own sections function.
#### Animate on Scroll:
Check this box to have animation enabled for "The Captain" Build Your Own sections. The animation will be triggered on scrolling into and out of view
#### Custom Code:
Place a code snippet that you would like to use on the page. *Note: this is an advanced feature and should only be used when instructed to do so (or you know what you are doing)*
### Section Reveal Timer
#### Use section reveal timer?
When checked will reveal sections that have been enabled to hide until timer expires. [Check the guide](/site-page-templates/the-captain-site-page-template-collection/special-super-powers) on how to use this feature
#### When to reveal (seconds)
This will reveal any section that has been enabled to hide until the reveal timer is expired.
# Anchor Link
Use this superpower for easy in-page linking
## How to use this section
* [ ] Add [Activation: Build Your Own](/site-page-templates/the-captain-site-page-template-collection/build-your-own-sections/activation-build-your-own-section) section to a Site Page. *This section is required*
* [ ] Add this section to the page below the Activation: Build Your Own section and right above the section you want to create an "in page" link for.
* [ ] Go into the Achor Links settings and update the Hyperlink Anchor ID setting to be an id that you will use in a step below. Be sure to not include any spaces as they will be replaced by dashes. ex: *call-to-action*
* [ ] Copy the current page link to your clipboard by clicking on the page link icon (this is not the same link that you see in your browser as a Site Admin)
* [ ] Edit another section on the page that is using a link or a button. Choose the Custom Url option and then paste the page link into the setting.
* [ ] Move your cursor to the end of the line for the page url that you just pasted and add **#your-anchor-id** *ex: *
## Video Walkthrough
{% embed url="" %}
# Banner Image On Side
## How to use this section
* [ ] Add [Activation: Build Your Own](/site-page-templates/the-captain-site-page-template-collection/build-your-own-sections/activation-build-your-own-section) section to a Site Page. *This section is required*
* [ ] Add this section to the page below the Activation: Build Your Own section
* [ ] Adjust the section settings for your text and media
* [ ] Optionally adjust the colors in the Style & Colors settings group
## Section Settings
### Headings
Use these settings to change the text that appears in the main part of the banner.
* **Sub Heading** - this is the text that appears above the heading
* **Heading** - this is the main part of the text. It allow for special highlghting by wrapping words in brackets ex: `[SINGLEWORD]`
* **Summary** - this is the text that appears below the heading
### Popup
### Search or Button
This is the settings group that controls the area below the subheading.
* **Below Heading:** Choose a search box or a button
* **Search Text:** The text that goes into the search box (when using Search)
* **Button Text:** The text that will be used for the button (when using a Button)
* **Button Page:** The page that will be used for the button (when using a Button)
### Images
This settings group controls the main image and accent image. Click the trashcan on the accent image to remove.
### Style & Colors
This settings group controls the colors that are used. By default we attempt to automatically use the colors that are found in your Thinkific Theme Settings. To over-ride the defaults, uncheck the appropriate box and set the color. Some items may bot use the default color scheme and rely on your setting them here.
* **Use page background color?** - when unchecked, choose the color you wish to use for the background color of this section
* **Use primary button color for subheading?** - when unchecked, choose the color you wish to use for the subheading color
* **Use theme settings color for heading?** - when unchecked, choose the color you wish to use for the heading
* **Use theme settings color for summary?**- when unchecked, choose the color you wish to use for the summary
* **Use primary button color for highlight?** - when unchecked, choose the color you wish to use for the highlight
* **Search Background** - set the color for the search area background
* **Search Text** - set the color for the search area text
* **Use primary button color for search icon?** - when unchecked, choose the color you wish to use for the search icon
* **Use primary button color for popup icon?**- when unchecked, choose the color you wish to use for the popup icon background and color
* **Popup Text** - set the color for the popup text
* **Popup Background** - set the color for the popup background
* **Padding Top** - change the slider to adjust the padding from the top of the page (Desktop only)
# Banner (Background Image)
# Banner Video On Side
# Bundle Courses
Use this on the Bundle Page to automatically show the courses included.
{% hint style="info" %}
This section only works on a Bundle Landing page
{% endhint %}
## How to use this section
* [ ] Add [Activation: Build Your Own](/site-page-templates/the-captain-site-page-template-collection/build-your-own-sections/activation-build-your-own-section) section to a Site Page. *This section is required*
* [ ] Add this section to the bundle page below the Activation: Build Your Own section
* [ ] Adjust the section settings for your text and media
* [ ] Optionally adjust the colors in the Style & Colors settings group
## Section Settings
### Headings
* **Heading** - this is the main part of the text. It allow for special highlghting by wrapping words in brackets ex: `[SINGLEWORD]`
* **Summary** - this is the text that appears below the heading
### Course Cards
#### Columns Across (Desktop)
Choose how many course cards you wish to show across the row. This is fo Desktop only. On mobile, we will stack the courses
#### Use course name?
When checked it will show the course name on the course card
#### Use course description?
When checked it will show the course description on the course card (limited to 2 lines)
#### Use course price?
When checked it will show the course price on the course card
#### Price Type
* Auto - will use the defaulty price for the course
* Manual - will use the text that is set in the Price Manual setting
#### Text before Price
Text that is displayed before the price
#### Text after Price
Text that is displayed after the price
#### Price Manual $197
When Manual Price Type is used, this value will be displayed for all courses in the bundle
#### Limit # of cards?
When checked the default number of courses shown will be what is set in the Size setting below. A button will appear to allow the rest of the courses to be unhidden
#### Size
The number of courses to limit, when option is checked above
#### Button (Unhide All)
This will be displayed below the course cards to allow the user to unhide all of them
# Categories (Icons)
## How to use this section
* [ ] Add [Activation: Build Your Own](/site-page-templates/the-captain-site-page-template-collection/build-your-own-sections/activation-build-your-own-section) section to a Site Page. *This section is required*
* [ ] Add this section to the page below the Activation: Build Your Own section
* [ ] Adjust the section settings for your text
* [ ] Add a block for each icon you wish to show (categories do not show up automatically)
* [ ] Optionally adjust the colors in the Style & Colors settings group
## Section Settings
### Headings
* **Heading** - this is the main part of the text. It allow for special highlghting by wrapping words in brackets ex: `[SINGLEWORD]`
### Color and Style
This settings group controls the colors that are used. By default we attempt to automatically use the colors that are found in your Thinkific Theme Settings. To over-ride the defaults, uncheck the appropriate box and set the color. Some items may bot use the default color scheme and rely on your setting them here.
* **Use page background color?** - when unchecked, choose the color you wish to use for the background color of this section
* **Use primary button color for subheading?** - when unchecked, choose the color you wish to use for the subheading color
* **Use theme settings color for heading?** - when unchecked, choose the color you wish to use for the heading
* **Use theme settings color for summary?**- when unchecked, choose the color you wish to use for the summary
* **Use primary button color for highlight?** - when unchecked, choose the color you wish to use for the highlight
* **Card Background** - sets the background color of the category card
* **Card Icon** - sets the icon color of the category card
* **Card Heading** - sets the heading color of the category card
* **Card Background (Hover)** - sets the hover background color of the category card
* **Card Text & Icon (Hover)**- sets the hover text and icon color of the category card
### Section Blocks
Add a block setting group for each icon that you wish to add to the page
#### Icon
Copy and paste an Icon code from Font Awesome
#### Category
Select one of your Thinkific categories. It will automatically be linked to the all courses page for that category
#### **Heading**
You can manually create a heading for the category by typing it in, or use the special SmartText *`[AUTO]`* for the categroy name to automatically be filled in.
#### Use a different url?
By default the item will be linked to the category url automatically, if you want to create a different link for that category, then enable this option and then choose an *Alternate Page*
# Categories (Images)
## How to use this section
* [ ] Add [Activation: Build Your Own](/site-page-templates/the-captain-site-page-template-collection/build-your-own-sections/activation-build-your-own-section) section to a Site Page. *This section is required*
* [ ] Add this section to the page below the Activation: Build Your Own section
* [ ] Adjust the section settings for your text and style
* [ ] Optionally adjust the colors in the Style & Colors settings group
## Section Settings
### Headings
* **Heading** - this is the main part of the text. It allow for special highlghting by wrapping words in brackets ex: `[SINGLEWORD]`
### Exclusion
By default, all of your course categories will appear on the page, but if you would like to hide some, then you can add them to the Exclusion list
**Excluded categories:** Copy and paste category names that you do NOT want to show here
### Color and Style
This settings group controls the colors that are used. By default we attempt to automatically use the colors that are found in your Thinkific Theme Settings. To over-ride the defaults, uncheck the appropriate box and set the color. Some items may bot use the default color scheme and rely on your setting them here.
#### Image Type
The image from the category settings will be used to fill the entire area as the background for the category card. The image will be automatically cropped
* Tall - this creates a tall aspect ratio
* Square - this creates a square aspect ratio
* Wide - this creates a 16x9 aspect ratio
#### Columns Across (Desktop)
Choose between 3,4 or 6 columns across
#### Colors
* **Use page background color?** - when unchecked, choose the color you wish to use for the background color of this section
* **Use primary button color for subheading?** - when unchecked, choose the color you wish to use for the subheading color
* **Use theme settings color for heading?** - when unchecked, choose the color you wish to use for the heading
* **Use theme settings color for summary?**- when unchecked, choose the color you wish to use for the summary
* **Use primary button color for highlight?** - when unchecked, choose the color you wish to use for the highlight
* **Card Overlay** - sets the background color of the category card
* **Card Text** - sets the text color of the category card
# Course Tabs
This provides a nice way to feature many courses in a small amount of "real estate". It will create "tabs" of courses and is great for "special" lists for example: "What's New", "Featured Courses", "Popular Courses". The content is manually managed and will be automatically populated from specific "bundles" that you specify.
## How to use this section
* [ ] Add [Activation: Build Your Own](/site-page-templates/the-captain-site-page-template-collection/build-your-own-sections/activation-build-your-own-section) section to a Site Page. *This section is required*
* [ ] Add this section to the page below the Activation: Build Your Own section
* [ ] Create "bundles" to be used for courses that will be displayed here. The bundles do not need to be a product that you sell and can be in draft mode. The bundle can be used just for the intent of controlling the order and what is displayed here
* [ ] Add a Bundle Block Setting and choose a bundle to display all courses in that bundle
* [ ] Repeat for additional bundles that you would like to display
* [ ] Adjust the section settings for your text and media
* [ ] Optionally adjust the colors in the Style & Colors settings group
## Section Settings
### Headings
* **Heading** - this is the main part of the text. It allow for special highlghting by wrapping words in brackets ex: `[SINGLEWORD]`
* **Heading (All Courses Tab)** - the all courses link will be used as a link on the far right, above the tabbed content. This setting controls the text for the link
### Course Cards
* **Use course name?** - enables or disables the course name to appear on the course card
* **Use course description?** - enables or disables the course description from appear on the course card
* **Use course price?** enables or disables the course price from appearing on the course card
* **Left Attribute** - This will determine what will be shown on the lower left hand corner of the card. Choose between ratings, # of lessons, instructor name, price, category or nothing.
* **Right Attribute** - This will determine what will be shown on the lower right hand corner of the card.Choose between ratings, # of lessons, instructor name, price, category or nothing.
* **Ratings Icon** - this determines the icon to use for the rating attribute when used
* **Lessons Icon** - this determines the icon to use for the rating attribute when used
* **Instructor Icon** - this determines the icon to use for the rating attribute when used
* **Category Icon** - this determines the icon to use for the rating attribute when used
{% hint style="info" %}
For icons, we have included Font Awesome 6.x icons library. Copy and paste a [Font Awesome icon code](https://fontawesome.com/icons) into a setting that is expecting an icon code
{% endhint %}
### Style & Colors
* **Use page background color?** - when unchecked, choose the color you wish to use for the background color of this section
* **Use theme heading color?** - when unchecked, choose the color you wish to use for the heading
* **Use theme button color for highlight?** - when unchecked, choose the color you wish to use for the color of the highlighted active tab
* **Course Card Background** - when unchecked, choose the color of the course card background
* **Course Card Heading** - when unchecked, choose the color of the course card heading
* **Course Card Sub Heading** - when unchecked, choose the color of the course card subheading
* **Course Card Price**- when unchecked, choose the color of the course card price
### Bundle Block Settings
Having at least one of these block settings is required.
* **Bundle:** Create "bundles" to be used for courses that will be displayed here. The bundles do not need to be a product that you sell and can be in draft mode. The bundle can be used just for the intent of controlling the order and what is displayed here
# Curriculum
{% hint style="info" %}
This section is only supported on the Course Page only
{% endhint %}
## How to use this section
* [ ] Add [Activation: Build Your Own](/site-page-templates/the-captain-site-page-template-collection/build-your-own-sections/activation-build-your-own-section) section to a Site Page. *This section is required*
* [ ] Add this section to the page below the Activation: Build Your Own section
* [ ] Adjust the section settings for your section heading
* [ ] Optionally adjust the colors in the Style & Colors settings group
# CTA
## Section Settings
### Headings
Use these settings to change the text that appears in the main part of the banner.
* **Heading** - this is the main part of the text. It allow for special highlghting by wrapping words in brackets ex: `[SINGLEWORD]`
* **Summary** - this is the text that appears below the heading
* **Button Text** - this is the text that appears on the button
* **Button Page** - choose a page that will be loaded when the button is selected
### Image
The image will be shown to the right of the text and will be shown in its entirety. Below the setting is a link to a Canva template that we used to create the image.
### Style & Colors
* **Background (section)**
* **Background (content)** - this color determines the background color of the main content area
* **Heading** - this color determines the color of the heading
* **Summary** - this color determines the color of the subheading
* **Button (background)** - this color determines the background color of the button
* **Button (text) -** this color determines the color of the text to be used on the button
## How to use this section
* [ ] Add [Activation: Build Your Own](/site-page-templates/the-captain-site-page-template-collection/build-your-own-sections/activation-build-your-own-section) section to a Site Page. *This section is required*
* [ ] Add this section to the page below the Activation: Build Your Own section
* [ ] Adjust the section settings for your text and media
* [ ] Optionally adjust the colors in the Style & Colors settings group
# CTA Countdown
## Section Settings
### Headings
Use these settings to change the text that appears in the main part of the banner.
* **Heading** - this is the main part of the text. It allow for special highlghting by wrapping words in brackets ex: `[SINGLEWORD]`
* **Summary** - this is the text that appears below the heading
### Image
The image will be shown in between the headings and the button. It is recommended to use the size shown, but it will always show the entire image
### Call to Action
* **Course Includes Heading**
* **Course Includes List Text**
* **Button Text**
* **Button Page**
* **Background Color**
* **Heading & List text Color**
* **Use primary button color for icon?**
### Countdown
* **Use countdown section?**
* **Countdown to Date: (UTC)**
* **Text for years, months, days, hours, seconds**
### Style & Colors
This settings group controls the colors that are used. By default we attempt to automatically use the colors that are found in your Thinkific Theme Settings. To over-ride the defaults, uncheck the appropriate box and set the color. Some items may bot use the default color scheme and rely on your setting them here.
* **Use page background color?** - when unchecked, choose the color you wish to use for the background color of this section
* **Use theme settings color for heading?** - when unchecked, choose the color you wish to use for the heading
* **Use theme settings color for summary?**- when unchecked, choose the color you wish to use for the summary
* **Use primary button color for highlight?** - when unchecked, choose the color you wish to use for the highlight
## How to use this section
* [ ] Add [Activation: Build Your Own](/site-page-templates/the-captain-site-page-template-collection/build-your-own-sections/activation-build-your-own-section) section to a Site Page. *This section is required*
* [ ] Add this section to the page below the Activation: Build Your Own section
* [ ] Adjust the section settings for your text and media
* [ ] Optionally adjust the colors in the Style & Colors settings group
# CTA Side Image
## How to use this section
* [ ] Add [Activation: Build Your Own](/site-page-templates/the-captain-site-page-template-collection/build-your-own-sections/activation-build-your-own-section) section to a Site Page. *This section is required*
* [ ] Add this section to the page below the Activation: Build Your Own section
* [ ] Adjust the section settings for your text and media
* [ ] Optionally adjust the colors in the Style & Colors settings group
# CTA Small
## How to use this section
* [ ] Add [Activation: Build Your Own](/site-page-templates/the-captain-site-page-template-collection/build-your-own-sections/activation-build-your-own-section) section to a Site Page. *This section is required*
* [ ] Add this section to the page below the Activation: Build Your Own section
* [ ] Adjust the section settings for your text and media
* [ ] Optionally adjust the colors in the Style & Colors settings group
# Icon Bar
## How to use this section
* [ ] Add [Activation: Build Your Own](/site-page-templates/the-captain-site-page-template-collection/build-your-own-sections/activation-build-your-own-section) section to a Site Page. *This section is required*
* [ ] Add this section to the page below the Activation: Build Your Own section
* [ ] Adjust the section settings for your text and media
* [ ] Optionally adjust the colors in the Style & Colors settings group
# Inline Video With Icons
## How to use this section
* [ ] Add [Activation: Build Your Own](/site-page-templates/the-captain-site-page-template-collection/build-your-own-sections/activation-build-your-own-section) section to a Site Page. *This section is required*
* [ ] Add this section to the page below the Activation: Build Your Own section
* [ ] Adjust the section settings for your text and media
* [ ] Optionally adjust the colors in the Style & Colors settings group
# Image Only
## How to use this section
* [ ] Add [Activation: Build Your Own](/site-page-templates/the-captain-site-page-template-collection/build-your-own-sections/activation-build-your-own-section) section to a Site Page. *This section is required*
* [ ] Add this section to the page below the Activation: Build Your Own section
* [ ] Replace the placeholder image with an image of your choice. The image will be shown in its entirety and depending on your goal, it can be any size. The aspect ratio will determine how much height the image takes up.
* [ ] Determine the image type you wish to use
* [ ] Optionally make the image clickable and set the page url
* [ ] Adjust the Section Settings to control the padding of the section based on the desired effect
## Video Walkthrough
{% embed url="" %}
# Module Cards
## How to use this section
* [ ] Add [Activation: Build Your Own](/site-page-templates/the-captain-site-page-template-collection/build-your-own-sections/activation-build-your-own-section) section to a Site Page. *This section is required*
* [ ] Add this section to the page below the Activation: Build Your Own section
* [ ] Adjust the section settings for your text and media
* [ ] Optionally adjust the colors in the Style & Colors settings group
# Pricing All Product Prices
## How to use this section
* [ ] Add [Activation: Build Your Own](/site-page-templates/the-captain-site-page-template-collection/build-your-own-sections/activation-build-your-own-section) section to a Site Page. *This section is required*
* [ ] Add this section to the page below the Activation: Build Your Own section
* [ ] Adjust the section settings for your text and media
* [ ] Optionally adjust the colors in the Style & Colors settings group
# Pricing Overlap Cards
## How to use this section
* [ ] Add [Activation: Build Your Own](/site-page-templates/the-captain-site-page-template-collection/build-your-own-sections/activation-build-your-own-section) section to a Site Page. *This section is required*
* [ ] Add this section to the page below the Activation: Build Your Own section
* [ ] Adjust the section settings for your text and media
* [ ] Optionally adjust the colors in the Style & Colors settings group
# Pricing Tabbed Overlapped Cards
## How to use this section
* [ ] Add [Activation: Build Your Own](/site-page-templates/the-captain-site-page-template-collection/build-your-own-sections/activation-build-your-own-section) section to a Site Page. *This section is required*
* [ ] Add this section to the page below the Activation: Build Your Own section
* [ ] Adjust the section settings for your text and media
* [ ] Optionally adjust the colors in the Style & Colors settings group
# Pricing Outlined Cards
## How to use this section
* [ ] Add [Activation: Build Your Own](/site-page-templates/the-captain-site-page-template-collection/build-your-own-sections/activation-build-your-own-section) section to a Site Page. *This section is required*
* [ ] Add this section to the page below the Activation: Build Your Own section
* [ ] Adjust the section settings for your text and media
* [ ] Optionally adjust the colors in the Style & Colors settings group
## How To Walkthroughs:
### How to create a solid color card instead of an outline:
* [ ] Open up the Style & Colors
* [ ] Uncheck the setting for the card background default color
* [ ] Choose the background color you wish to use
* [ ] Uncheck and adjust the other color settings for the text so that is visible on the card
{% embed url="" %}
# Pricing Tabbed Outlined Cards
## How to use this section
* [ ] Add [Activation: Build Your Own](/site-page-templates/the-captain-site-page-template-collection/build-your-own-sections/activation-build-your-own-section) section to a Site Page. *This section is required*
* [ ] Add this section to the page below the Activation: Build Your Own section
* [ ] Adjust the section settings for your text and media
* [ ] Optionally adjust the colors in the Style & Colors settings group
## How To Walkthroughs:
### How to create a solid color card instead of an outline:
* [ ] Open up the Style & Colors
* [ ] Uncheck the setting for the card background default color
* [ ] Choose the background color you wish to use
* [ ] Uncheck and adjust the other color settings for the text so that is visible on the card
{% embed url="" %}
# Site Owner
## How to use this section
* [ ] Add [Activation: Build Your Own](/site-page-templates/the-captain-site-page-template-collection/build-your-own-sections/activation-build-your-own-section) section to a Site Page. *This section is required*
* [ ] Add this section to the page below the Activation: Build Your Own section
* [ ] Adjust the section settings for your text and media
* [ ] Optionally adjust the colors in the Style & Colors settings group
# Testimonials Slider
## How to use this section
* [ ] Add [Activation: Build Your Own](/site-page-templates/the-captain-site-page-template-collection/build-your-own-sections/activation-build-your-own-section) section to a Site Page. *This section is required*
* [ ] Add this section to the page below the Activation: Build Your Own section
* [ ] Adjust the section settings for your text and media
* [ ] Optionally adjust the colors in the Style & Colors settings group
# Special Super Powers
## Section Reveals
In each of the Build Your Own sections there is a settings group for Section Reveal settings. When checked, the section will start as hidden and then when the section reveal timer is over, the section will be shown. To be used with another section that contains a section reveal timer. ex: [The Captain Video Funnel](/site-page-templates/the-captain-site-page-template-collection/full-page-templates/video-funnel-page). This allows you to create a "hidden" sales page or special offer that will be revealed at just the right time.
# Getting Started With SNAP
Build Your Site Pages Faster & With Less Effort. Select A High Converting Design In a Snap.
### **STEP 1: Watch The Overview Video**
{% embed url="" %}
The SNAP technology **superpower is a game changer.** Be sure to watch this video so that you learn how building your Thinkific site will never be the same. Don't skip this video.
**In this video**
* Learn why SNAP will make your life easier
* Understand the only two sections you need for your page
* See how you can change your page design in a SNAP!
* Stuck? [Get some personalized guidance from Rob](/help-from-rob)
{% hint style="info" %}
**PRO TIP:** Adding a [SNAP FAQ section](/snap-course-page-templates/snap-information-sections/snap-faqs) to your page will help increase sales. People always have questions about some pretty common things and if they go unanswered, then that is a reason for them *not to buy*.
{% endhint %}
### **STEP 2: Understand the Course Information Section**
{% embed url="" %}
The SNAP Course Information will contain all of the text, image, videos, i.e. "content" that you will need for your page. No matter what design you choose, **you only have to enter the page information once**
**In this video:**
* Learn how to use the course information section to store the details that will be shown on your page
* Learn how to create a "Sale" by using a secondary price option
* Explore new Video options including how using an embedded Loom video can help your conversions
### **STEP 3: Add a SNAP Course Page Design**
{% embed url="" %}
The SNAP Course Page design uses the information that you provided in the previous step without having to retype it.
**In this video:**
* See how quickly it is to swap out a page design with the "snap" of your fingers
* Learn how to tweak the colors and hide sections and content
* 5 page designs included, more on the way
###
# Installing SNAP
### Before Installation: Create an account and purchase a SNAP PowerUp
SNAP PowerUps **do not require a monthly subscription.** We do however require you to create an account on [SuperPowerUps.com ](https://www.superpowerups.com/)and purchase a Snap PowerUp before you can install it into any site. If you are a [PowerUp Pass member](https://www.superpowerups.com/cart/add_product/1596829?price_id=2254107), then you will have instant access to any Snap PowerUp without having to purchase it.
{% hint style="warning" %}
After your purchase you will be able to install the Snap PowerUp app from the [member portal](https://powerups.thinkific.com/pages/playeah-activation). Depending on the license that was purchased, you may be able to install this app on many Thinkific sites or just one site.
{% endhint %}
{% hint style="info" %}
Be sure to have your Thinkific Site Admin login details handy in order to install a Snap PowerUp into your site.
{% endhint %}
### STEP 1: Login as a Site Admin & Locate your Thinkific Subdomain
%20\(1\)%20\(1\).png?alt=media\&token=e9f1c43c-61b5-460f-8f12-687cd7d16ca1)
### STEP 2: Enter your Subdomain on the Activation Page
Once you have your subdomain for the Thinkific site you wish to install a Snap PowerUp just enter it into the input field
{% hint style="info" %}
During the **purchase process you will already be directed to this page automatically after purchase**. You should also be already logged in to the member portal at this time, but in case you need to revisit the page, or if you were rudely interrupted :triumph: during the process, you can restart the process by just logging back into the [member portal](https://powerups.thinkific.com/enrollments).
{% endhint %}
### STEP 3: Accept the App Installation
After entering your subdomain, you will see a screen that looks like below. Be sure to click on the **ACCEPT & INSTALL** button. :point\_down: It's that big dark blue-ish / purple-ish button at the bottom of the page

{% hint style="warning" %}
Snap PowerUp's do not actually use any API's or access any of your Thinkific site data. Currently Thinkific's app screen that you see above is the same for all applications. The clause noted "Access and modify your Thinkific data" is applied to all Apps by Thinkific, however Snap PowerUp does not use any such requests.
{% endhint %}
### STEP 4: Watch the Getting Started Videos
After you install a SNAP PowerUp, nothing will happen to your site until you decide to add SNAP sections to your site pages. Head over to the [Getting Started training ](/snap-course-page-templates/getting-started-with-snap)to begin using SNAP.
# Overview
SNAP Course Page Templates have been purposely built to make your live easier in building and maintaining your Thinkific Course pages.
{% hint style="warning" %}
**SNAP Course Page Templates** can only be used on your course pages. We will be releasing additional page template for other site pages in the future.
{% endhint %}
### Types of SNAP Page Sections:
#### [✍️ SNAP Information sections](/snap-course-page-templates/snap-information-sections)
[✍️ SNAP Information sections ](/snap-course-page-templates/snap-information-sections)will contain all of the content "text, images, media". This will allow you to focus on the information your page needs and not worry about the design. It will also give you the ability to swap out a design that will use this same information but laid out in a different way. You will not have to re-build the page if you want to change the design.
{% hint style="info" %}
[SNAP Course Information](/snap-course-page-templates/snap-information-sections/snap-course-information) section must exist on the page. Additional SNAP Information Sections are optional
{% endhint %}
#### [🎨 SNAP Design Sections ](/snap-course-page-templates/snap-design-templates)
[🎨 SNAP Design Sections](/snap-course-page-templates/snap-design-templates) will use the content inside the ✍️ SNAP Information sections in a specific way. Inside these sections, you will be able to alter the behavior or change the default styles.
{% hint style="info" %}
At least one SNAP Design section should be placed on a page and be placed after the SNAP Information Section. We will be adding new SNAP Design Sections over time. Please be sure to check the [latest updates page](/latest-updates).
{% endhint %}
# SNAP Information Sections
These sections hold the content that the SNAP Design sections will use
{% hint style="info" %}
[**SNAP Course Information**](/snap-course-page-templates/snap-information-sections/snap-course-information) **section must exist on the page.** Additional SNAP Information Sections are optional. Place this section above all other SNAP sections on your site page
{% endhint %}
{% content-ref url="/pages/yq3CedFQu7PJVRTKF4Kp" %}
[SNAP Course Information ✍️](/snap-course-page-templates/snap-information-sections/snap-course-information)
{% endcontent-ref %}
This section is required and will contain the basic information that most of the designs will use. Place this section on your page above all other SNAP sections
{% content-ref url="/pages/BHYfRTOpML9Qx1598RYN" %}
[SNAP FAQs ✍](/snap-course-page-templates/snap-information-sections/snap-faqs)
{% endcontent-ref %}
This section is optional (but highly recommended). It will contain the content for faqs. Place this section above any SNAP Design section.
# SNAP Course Information ✍️
This section is required and will contain the basic information that most of the designs will use. Place this section on your page above all other SNAP sections

{% hint style="danger" %}
**This section must exist on the page and also be placed above other SNAP sections**
{% endhint %}
{% embed url="" %}
### Using the SNAP Course Information Section
* [ ] Go to your list of Site Pages in your site and look for a course page that you want to add SNAP to. *Course pages are only supported for this SNAP PowerUp. Additional page templates for other page types will be provided in the future*
* [ ] Add a section by searching for SNAP Course Information. Place it above other sections (we recommend that this be the very first section on the page so that it performs the best)
* [ ] Add a [SNAP Design section](/snap-course-page-templates/snap-design-templates) to the page so you can see how the information changes when you are editing the page. Don't worry which design you will use for now, you can always change out the design in a "Snap"
* [ ] Open the SNAP Course Information settings and enter your text, images, etc. See the details below on the options
## Pricing & Buttons Settings Group

This settings group will control how your pricing and main calls to action will be displayed and effected. In many of the designs there will be a primary and secondary call to action as well as a way to indicate that there is a sale for the current price.
* **Price & Main CTA Button :** this controls what is used for the price, primary button text and link
* *Auto* : this will cause the primary button to use the link to the default price for the course. The price will be shown based on the courses default price settings. The primary button text will also be the default button text based on the price setting. This is the default option
* *Custom* : allows you to over-ride the price, primary button text and link used:
* **Custom Price** - this text will be displayed in the price area of the design when Custom is chosen
* **Custom CTA Text** - this text will be displayed in the primary button text of the design when Custom is chosen
* **Custom CTA Page** - this will be the link that the primary button is used when custom is set
* **Use Price Subheading?** - when checked it will enable some subheading text to be displayed around the call to action buttons.
* **Price Subheading** - this is the test that will appear around the call to action buttons. For example: "Sale ends Sep 22"
* **Secondary CTA** - the secondary call to action is a second button that will appear based on the settings below.
* *Auto (Free Trial)* - if the course has a free preview lesson, then this option will be shown
* *Custom* - when this option is selected it will activate the custom page and text that is used for the second button. When enable it will always show.
* **Custom Secondary CTA Page** - the link to use for the secondary button
* **Custom Secondary CTA Text** - the text to use for the secondary button
* **When to Hide Custom Secondary CTA** - this controls automatic hiding of the secondary button when it is a 'Custom' type
* *User is enrolled in this course* - will hide the secondary button if the user is enrolled in the course
* *User is enrolled in another product* - will hide the secondary button if the user is enrolled in the product selected
* **'Other product' Enrollment Check** - choose the product (bundle or course)
{% hint style="info" %}
The primary and secondary buttons will inherit the style that you have selected in your Theme settings.
{% endhint %}
## Sale Settings Group
{% embed url="" %}
This settings group controls the sale feature of SNAP which also includes a countdown timer.
**On Sale?** - when checked this will activate the "on sale mode" of the design and use the sale information below. This will effect the primary button link - so be sure to configure this properly
* **Sale Price -** select alternate price for the same course. This will cause the sale price to be displayed in the main price section of the design and put the default price in the "strikeout" area of the price.

* **Customized Regular Price:** This will over ride the strikethrough price text. When left blank, the text will be the default price of the course
* **Automatically End Sale?** - When enabled, this will automatically remove the sale information on the page and reset the Primary CTA button (link and text0 back to the default. So this way you do not have to remember to manually edit the page.
{% hint style="warning" %}
Be sure to set the date and time in the ***Return to normal price on date and time setting*** to a day in time in UTC. Your website visitors will see the proper countdown for their location. You can [search Google for "UTC Convertor"](https://savvytime.com/converter/utc) to get the proper time.
{% endhint %}
* **Saving Text** - This is manually entered and meant to reflect the savings ex: "Save 50%
* **Countdown Heading and Labels** - this is used in the SNAP Design Templates where the countdown is shown. *Be sure to set the labels for days,hours, minutes, seconds for your locale. In some designs the area to display this is small, so try to abbreviate as possible.*
{% hint style="warning" %}
When changing the countdown timer date, you may not see it reflected until you refresh the page
{% endhint %}
## **Quick Attributes Settings Group**

The quick attributes offers a way for your website readers to quickly understand key information about your course. Each attribute contains an icon, heading and sometimes a subheading. The [SNAP Design Section](/snap-course-page-templates/snap-design-templates) will determine what information it will use.
* **Icon List Heading** - this will set the text that is used for the heading of this section
* **List Icons** - [Font Awesome 6 Pro](https://fontawesome.com/icons) icon codes to be copied and pasted. Be sure to place an icon code on a single line and have the same number of items in the below settings
* **List Text (Heading)** - Put in your text for this attribute. You can also use some "Smart Attributes" that will get replaced by the course information automatically
* Smart Attributes: \[VIDEO TIME] \[LESSON COUNT] \[INSTRUCTOR NAME] \[PDF COUNT] \[QUIZ COUNT] \[DOWNLOAD COUNT]
* **List Text (Sub Heading)** - This is intended to be a short suheading for the corresponding item. It is usually used in designs that contain larger icon list page elements
* **Course Includes Heading** - This lis the heading for the Includes text list. This is just another way to indicate what the coutse includes but to use a checklist instead of custom icons and text
* **Course Includes List Text** - a short (few words) text listing. One line of text will equal one item on the list. Note: in Site Builder it may "look" like two lines depending on the length of text used.
{% hint style="info" %}
These are meant to be short and sweet. Do not get too wordy as it may not "work" in the design and also mis-uses the intention of this being "quick for your readers to read"
{% endhint %}
## Banner **Settings Group**

The Banner settings control the "main" headline and subheadline of the design. It defaults to use the course name and description, but can be changed to anything.
* **Heading** - enter in what you would like to display or use the SmartText: **\[COURSE NAME]** to automatically inject the course name.
* Sub Heading - enter in what you would like to display or use the SmartText: **\[COURSE DESCRIPTION]** to automatically inject the course description that is set from your course settings page.
## Images **Settings Group**

This setting grouo will provide the main images to be used on the [SNAP Design page template](/snap-course-page-templates/snap-design-templates)
* **Use Course Image** - when enabled the course card image will be automatically used for the design section that is displaying the course image thumbnail.
* **Alternate Image** - when Use Course Image is unchecked, this image will be used instead.
* **Banner Image** - when the design calls for a banner image, then this image will be used.
## Video:fire: **Settings Group**

A video on your course page will definitely increase your conversion rates, because you can show so much more information in a controlled way that keeps your website visitors attention on you and your page longer.
* **Use Preview Video** - when checked this will enable the video feature of the SNAP Design page template. You must also provide your video information below
* **Video Type** - choose the type of video you would like to use
* *Thinkific or Youtube* - when selected, an option to select the video from the Thinkific video library will be show or you can provide a Youtube link
* *Loom* 🔥 - We love Loom because it increases conversions by providing an animated GIF of the video without the user having to do anything, and it also allows the user to leave emoji reactions and comments (which helps with automatic social proof). Anyways.... Record or Upload your video to Loom.com, then copy and paste the embed code (not the link to the video)
* *None* - wil not show any video
* *Custom* - provide a responsive embed code from your video platform provider of choice ex: Wistia, Vimeo, etc.
* **Video** - used when Thinkific Video type is selected
* **Custom Video Embed or Loom Embed** - paste in your custom video embed code (make it responsive if it is not already) or the embed code for the Loom video
* **Hide Loom Top bar? -** when checked this will hide the Loom branding (recommended)
.gif?alt=media\&token=e443db1e-a3ed-4888-b01e-9ddf92811aee)
{% hint style="info" %}
The SNAP Design page will determine how to use the video and often will provide options to have the video display in popup mode or inline mode. That option will be found inside the SNAP Design section
{% endhint %}
## Course Overview **Settings Group**

The course overview section is a generic section that is used to describe your course and give a deeper summary in text form of what it is. It contains three pieces of information
* **Section Heading** - simple text field for the title of the section
* **Section Sub Heading** - simple text field for the subheading of the section
* **Summary** - rich text field for the summary portion of this section. you can use colors, lists, images, etc to make this area interesting.
## Requirements **Settings Group**

This section gives you the opportunity to provide a checklist of items that the student may need in order to take this course.
* **Heading** - simple text entry field for the title of this section
* **Summary** - rich text field for the summary portion of this section. you can use colors, lists, images, etc to make this area interesting.
* **List** - a list of sentences that will appear in a checklist. Put an entry on each line. Be aware that Site Builder does not "scroll" this entry field, so a long line of text on "one actual line" appears like it is on many lines. Be sure to check the preview to make sure there are no "extra checkmarks"
{% hint style="info" %}
This section can really be used for anything and just give you another section that contains a check lists. The design will determine the location of this section and you will have the opportunity to hide this section with a setting from the SNAP Design Page template
{% endhint %}
## Who is this course for **Settings Group**

This section gives you the opportunity to provide information about who this course is really for. This is especially helpful in raising your sales conversion rate.
* **Heading** - simple text entry field for the title of this section
* **Summary** - rich text field for the summary portion of this section. you can use colors, lists, images, etc to make this area interesting.
* **List** - a list of sentences that will appear in a checklist. Put an entry on each line. Be aware that Site Builder does not "scroll" this entry field, so a long line of text on "one actual line" appears like it is on many lines. Be sure to check the preview to make sure there are no "extra checkmarks"
{% hint style="info" %}
This section can really be used for anything and just give you another section that contains a check lists. The design will determine the location of this section and you will have the opportunity to hide this section with a setting from the SNAP Design Page template
{% endhint %}
## What you will learn **Settings Group**

This section gives you the opportunity to quickly show what the major outcomes will be for the course
* **Heading** - simple text entry field for the title of this section
* **Summary** - rich text field for the summary portion of this section. you can use colors, lists, images, etc to make this area interesting.
* **List** - a list of sentences that will appear in a checklist. Put an entry on each line. Be aware that Site Builder does not "scroll" this entry field, so a long line of text on "one actual line" appears like it is on many lines. Be sure to check the preview to make sure there are no "extra checkmarks"
{% hint style="info" %}
This section can really be used for anything and just give you another section that contains a check lists. The design will determine the location of this section and you will have the opportunity to hide this section with a setting from the SNAP Design Page template
{% endhint %}
## Curriculum **Settings Group**

This setting group will control the information that is used in the auto-generated curriculum section of the SNAP Design Page Template
* **Heading** - the text used for the section heading
* **#Lessons Heading** - the text that is displayed *after* the number of lessons (auto generated)
* **Course Duration** - freeform text that will be used for course duration
* **Show Chapter Duration** -when enabled it will show the chapter time in the SNAP Design page template. This only works automatically if you have Thinkific video lessons

## Reviews **Settings Group**
.png?alt=media\&token=c7f71c4d-fb13-46ed-8bd0-cf39b29042df)
* **Automatically show approved reviews** - when enabled the SNAP Design Page template will show up to 100 approved reviews. It also controls if review summaries are shown in the design.
* **Heading** - the text to be used as the heading for this section
* **Hide Review Sections If None?** - When enabled, the reviews section in the SNAP Design page template will be hidden if there are no reviews (recommended)
## Instructor **Settings Group**

{% hint style="info" %}
Are you looking to display multiple instructors? Be sure to add the [SNAP Instructors section](/snap-course-page-templates/snap-information-sections/snap-instructors) to the page and add the list of instructors to show
{% endhint %}
The Instructor settings will control what instructor is shown on the main instructor sections of the SNAP Design page. By default, the associated course instructor will be shown
* Heading - the text for the section heading
* Use Alternate Course Instructor? - when enabled, an alternate instructor can be chosen
* Alternate Instructor (1) - Choose an alternate instructor you wish to use
* Link Bio Read More - This is the text that will be used to expand the bio section when the instructor bio is "too long"
* Link Bio Read Less - This is the text that will be used to collapse the bio section when the instructor bio is "too long"
{% hint style="info" %}
The SNAP Design Page determines the location of the instructor and may display it in multiple places. You will have options to disable or change this inside the SNAP Design section settings.
{% endhint %}
# SNAP FAQs ✍
This section is optional (but highly recommended). It will contain the content for faqs. Place this section above any SNAP Design section.
{% embed url="" %}
This section is a "SNAP Information" section - it will contain the text that is neded for any SNAP Design Page template that will use the SNAP FAQ content.
FAQ's 100% will increase your conversions.
People always have questions and unanswered will lead to them abandoning your page and not purchasing.They usually are related to:
Is this really worth it? Can I get my money back? Can I cancel my subscription? When is the second payment?
I do not have time for this? I tried this before? This will take too long? When do I see results
I still have questions, who can help me? Can I talk to someone about this?What is the "crazy named thing" you listed really do for me?
## How to use SNAP FAQ's
* [ ] Make sure you have the required [SNAP Course Overview](/snap-course-page-templates/snap-information-sections/snap-course-information) section on the page
* [ ] Add the SNAP FAQ section to the page and place it below the SNAP Course Overview section
* [ ] Add a FAQ block setting for each FAQ you wish to display
* [ ] Add a [SNAP Design Pag](/snap-course-page-templates/snap-design-templates)e template to the page and make sure the FAQ section is enabled
## SNAP FAQ's Settings

### Heading
This setting will control the text that is used for the FAQ Section

### Frequently asked question
Add a FAQ block for each FAQ you wish to display. You can drag and reorder the FAQ's as you wish
{% hint style="info" %}
The SNAP Page Design will control how the FAQ's are displayed. To change the style of this section,
{% endhint %}
# SNAP Instructors ✍
This section is optional (but recommended if you have multiple instructors for your course). Place this section above any SNAP Design section.
{% embed url="" %}
## How to use SNAP Instructors
* [ ] Make sure you have the required [SNAP Course Overview](/snap-course-page-templates/snap-information-sections/snap-course-information) section on the page
* [ ] Add the SNAP Instructors section to the page and place it below the SNAP Course Overview section, but above any SNAP Design templates
* [ ] Add an instructor block setting for each instructor you wish to display. This will replace the content of the instructor section with the list of instructors
* [ ] Add a [SNAP Design Pag](/snap-course-page-templates/snap-design-templates)e template to the page. Adjust design settings as necessary
## SNAP Instructors Settings
### Headings
* Link Bio Read More - This is the text that will be used to expand the bio section when the instructor bio is "too long"
* Link Bio Read Less - This is the text that will be used to collapse the bio section when the instructor bio is "too long"
### Colors

When you hover over the image, it will display the instructors name. Use the color settings to control the color of the hover information tooltip
# SNAP Design Templates 🎨
{% embed url="" %}
SNAP Design Sections take all of the information inside the SNAP Information Sections and then apply it to a design. Inside these sections you will see settings to change the style (color, layout) as well as if you would like to hide a particular area of the design.
### Important SNAP Usage notes
* There must be one [SNAP Course Information](/snap-course-page-templates/snap-information-sections/snap-course-information) section on the page and it must be placed above the SNAP Design sections
* If you are using optional SNAP Information sections like SNAP FAQ's, then that section must also be placed above the SNAP Design Sections
* Not all information in the SNAP Information sections may be used in the design. The Design may only apply certain elements depending on it's goal
* SNAP uses the default color settings that you have chosen with your Thinkific Theme Settings. In some cases there may be some "conflict" with colors in the design. If you see missing content or hard to see content, then adjust the Theme settings or set a custom color setting in this section. The setting will indicate what color setting is being used by default.
## [SNAP Course Page (01)](/snap-course-page-templates/snap-design-templates/snap-course-page-01)

This SNAP Course Page Template main feature is a sticky sidebar that has the key information needed to convert your website visitors into paying customers.
{% content-ref url="/pages/CSy4ES7Il7WxMBU86rPf" %}
[SNAP Course Page (01) 🎨](/snap-course-page-templates/snap-design-templates/snap-course-page-01)
{% endcontent-ref %}
## [SNAP Course Page (02)](/snap-course-page-templates/snap-design-templates/snap-course-page-02)

This SNAP Course Page Template main feature is large embedded video that is front and center, but still has all of the important information on the side. The call to action section of the sidebar also sticks to the top, making it easy for website visitors to purchase
{% content-ref url="/pages/Y2faEY7S7ajxqroZitc3" %}
[SNAP Course Page (02) 🎨](/snap-course-page-templates/snap-design-templates/snap-course-page-02)
{% endcontent-ref %}
## [SNAP Course Page (03)](#undefined)

In this SNAP Design Page Template, we have placed the video in the main banner section that spans across the full width of the page. The pricing and CTA buttons have also been moved to the banner. The main content area then follows below splitting the page with the small sidebar that contains the quick attributes for the course.
{% content-ref url="/pages/RKSMDcIrNA3KlVOLyx0m" %}
[SNAP Course Page (03) 🎨](/snap-course-page-templates/snap-design-templates/snap-course-page-03)
{% endcontent-ref %}
## SNAP COURSE PAGE (04)
.png?alt=media\&token=8ad2b505-9103-4935-bfa4-02df3945d2ae)
This SNAP Design Page Template is just like the Sticky Sidebar version, except the main content is grouped into tabs. This creates less "scroll" and causes the user to interact with the page in order to see some of the content.
{% content-ref url="/pages/cuFaU4xaQEhJmbM5xl0z" %}
[SNAP Course Page (04) 🎨](/snap-course-page-templates/snap-design-templates/snap-course-page-04)
{% endcontent-ref %}
## SNAP Course Page (05)

This SNAP Course Page Template is just like SNAP Course page (02) with it's extra large video section front and center, but it moves the curriculum section over to the sidebar and below the sticky CTA section.
{% content-ref url="/pages/leyWXefah4Lctp0jkbz9" %}
[SNAP Course Page (05) 🎨](/snap-course-page-templates/snap-design-templates/snap-course-page-05)
{% endcontent-ref %}
## More templates coming soon
We will be adding more templates on a regular basis making this PowerUp one of the most powerful superpowers we have created. All new templates are included with your purchase
Have an idea or looking for a custom page template? Post your request inside of the [SuperPowerups Facebook group](https://www.facebook.com/groups/superpowerups) so we can talk and collaborate about it with the rest of our members. We are all better together!!
# SNAP Course Page (01) 🎨
Sticky Sidebar

## About This Section
This SNAP Course Page Template main feature is a sticky sidebar that has the key information needed to convert your website visitors into paying customers.
{% hint style="warning" %}
SNAP Design Page templates will use the information provided inside the SNAP Information sections. The settings in this section will allow you to change the default styles, hide sections and content and other design options\
\ **SNAP uses the default color settings that you have chosen with your Thinkific Theme Settings. In some cases there may be some "conflict" with colors in the design. If you see missing content or hard to see content, then adjust the Theme settings or set a custom color setting in this section. The setting will indicate what color setting is being used by default.**
{% endhint %}

## Settings
### Sidebar

* **Background** - this controls the color of the background for the sidebar
* **Custom Color Price?** - checking this box will enable the custom color option. By default, this color will be the Theme Button Background
* **Custom Color Savings?** - this controls the color of the savings area (when enabled)
* **Strike Price** - the price that is displayed with a strikethrough
* **Show quick attributes** - when enabled, this will show the quick attributes section
* Attributes Text - color of the quick attributes text
* Attributes Icon - color of the quick attributes icon
* **Show includes list** - when enabled, this will show the includes section
* Includes List Heading - the color of the includes list heading
* Includes List Text - the color of the includes list text
* Custom Color Includes List Icon? - when enabled, you can change the default color that the list icon uses
* **Show social share icons** - when enabled, it will show the social share icons. These icons will trigger a social "share this page" popup on the social platform that was clicked

* **Start Position From Top** - this will control how far down the position of the sidebar will start off at. Moving it to the left will lower the sidebar and moving to the right will raise it (desktop only). The size of the banner content will effect the position as well.
* **Stick Position From Top** - this will control the position from the top of the page that the sidebar will stick (Desktop only). This is really important when you have a sticky navigation bar. It also depend on the amount of content you may have inside the sidebar based on the options
### Banner Section

* **Custom Background Color Heading?** - when enabled this will use the custom color settings
* Background - the custom color used for the background
* **Custom Color Heading?** - when enabled, the heading color will change based on the color you choose
* **Custom Color SubHeading?** when enabled, the subheading color will change based on the color you choose
* **Show Instructor?** - when enabled, the instructor will be shown in the banner section
* **Use SNAP Course Information Banner Image?** - when checked this will enable the background image provided in the [SNAP Course Information banner](/snap-course-page-templates/snap-information-sections/snap-course-information#banner-settings-group) instead of the background color. You can also set the Image Focal Point to position the image properly
{% hint style="info" %}
When using background images - please be sure to not select any images where text is included. These images will automatically be cropped to fill the space provided. You will see different parts of the image on different size screens. Also, be sure to darken/lighten the image so that the text stand out.
{% endhint %}
* **Heading Size (Desktop), Heading Size (Mobile), SubHeading Size (Desktop), SubHeading Size (Mobile)** - this will control the size of the text used for the heading and subheadings in both desktop and mobile sizes
### Video Section

* **Video Type** - this setting will control the type of video that is used in the SNAP Design.
* *Inline* - will show the video within the content area
* *Popup* - will show the video in a popup when the play icon is clicked
{% hint style="info" %}
The video that is used is controlled by the [SNAP Course Information](/snap-course-page-templates/snap-information-sections/snap-course-information#video) setting. be sure to set this in order to enable this feature
{% endhint %}
### Overview Section

* **Use this section?** -when enabled the[ Course Overview section](/snap-course-page-templates/snap-information-sections/snap-course-information#course-overview) will be shown
* **Custom Color Heading?** - when enabled, a custom color will be used for the section heading
* **Custom Color SubHeading?** - when enabled a custom color will be used for the summary content. Any custom color used in the rich text editor will be used when specified

### What You Will Learn Section
* **Use this section?** - when enabled, the [What you will learn section](/snap-course-page-templates/snap-information-sections/snap-course-information#what-you-will-learn) will be shown
* **Custom Background Color?** - when enabled the background color can be changed
* **Custom Color Heading?** - when enabled the section heading color can be changed
* **Custom Color SubHeading?** - when enabled the section subheading color can be changed
* **Custom Color List Text?** - when enabled the section list text color can be changed
* **Custom Color List Icon?** - when enabled the section list icon color can be changed
### Requirements Section

* **Use this section?** - when enabled, the [Requirements section](/snap-course-page-templates/snap-information-sections/snap-course-information#requirements) will be shown
* **Custom Background Color?** - when enabled the background color can be changed
* **Custom Color Heading?** - when enabled the section heading color can be changed
* **Custom Color SubHeading?** - when enabled the section subheading color can be changed
* **Custom Color List Text?** - when enabled the section list text color can be changed
* **Custom Color List Icon?** - when enabled the section list icon color can be changed
### Who is this course for Section

* **Use this section?** - when enabled, the [Who is this course for section ](/snap-course-page-templates/snap-information-sections/snap-course-information#who-is-this-course-for)will be shown
* **Custom Background Color?** - when enabled the background color can be changed
* **Custom Color Heading?** - when enabled the section heading color can be changed
* **Custom Color SubHeading?** - when enabled the section subheading color can be changed
* **Custom Color List Text?** - when enabled the section list text color can be changed
* **Custom Color List Icon?** - when enabled the section list icon color can be changed
### Curriculum Section

* **Use this section?** - when enabled, the Curriclumn section will be shown
* **Custom Color Heading?** - when enabled the section heading color can be changed
* **Curriculum List** - when enabled the section list text color can be changed
* **Curriculum Icon** - when enabled the section list icon color can be changed
### Instructor Section

* **Use this section?** - when enabled, the Instructor section will be shown
* **Custom Color Heading?** - when enabled the section heading color can be changed
* **Custom Color Summary?** - when enabled the section summary color can be changed
### Reviews Section

* **Use this section?** - when enabled, the Reviews section will be shown
### FAQ Section

* **Use this section?** - when enabled, the Instructor section will be shown
* **Custom Color Section Heading?** - when enabled the section heading color can be changed
* **Custom Color Section Question?** - when enabled the faq question color can be changed
* **Custom Color Answer?** - when enabled the faq answer color can be changed
# SNAP Course Page (02) 🎨
Large Video - Instructor on the Side

## About This Section
This SNAP Course Page Template main feature is large embedded video that is front and center, but still has all of the important information on the side. The call to action section of the sidebar also sticks to the top, making it easy for website visitors to purchase
{% hint style="warning" %}
SNAP Design Page templates will use the information provided inside the SNAP Information sections. The settings in this section will allow you to change the default styles, hide sections and content and other design options\
\ **SNAP uses the default color settings that you have chosen with your Thinkific Theme Settings. In some cases there may be some "conflict" with colors in the design. If you see missing content or hard to see content, then adjust the Theme settings or set a custom color setting in this section. The setting will indicate what color setting is being used by default.**
{% endhint %}

## Settings
### Sidebar

* **Background** - this controls the color of the background for the sidebar
* **Custom Color Price?** - checking this box will enable the custom color option. By default, this color will be the Theme Button Background
* **Custom Color Savings?** - this controls the color of the savings area (when enabled)
* **Strike Price** - the price that is displayed with a strikethrough
* **Show includes list** - when enabled, this will show the includes section
* Includes List Heading - the color of the includes list heading
* Includes List Text - the color of the includes list text
* Custom Color Includes List Icon? - when enabled, you can change the default color that the list icon uses
* **Show social share icons** - when enabled, it will show the social share icons. These icons will trigger a social "share this page" popup on the social platform that was clicked
* **Stick Position From Top** - this will control the position from the top of the page that the sidebar will stick (Desktop only). This is really important when you have a sticky navigation bar. It also depend on the amount of content you may have inside the sidebar based on the options
### Banner Section

* **Custom Background Color Heading?** - when enabled this will use the custom color settings
* Background - the custom color used for the background
* **Custom Color Heading?** - when enabled, the heading color will change based on the color you choose
* **Custom Color SubHeading?** when enabled, the subheading color will change based on the color you choose
* **Show quick attributes** - when enabled, this will show the quick attributes section
* Attributes Text - color of the quick attributes text
* Attributes Icon - color of the quick attributes icon
* **Heading Size (Desktop), Heading Size (Mobile), SubHeading Size (Desktop), SubHeading Size (Mobile)** - this will control the size of the text used for the heading and subheadings in both desktop and mobile sizes
### Video Section

* **Video Type** - this setting will control the type of video that is used in the SNAP Design.
* *Inline* - will show the video within the content area
* *Popup* - will show the video in a popup when the play icon is clicked
{% hint style="info" %}
The video that is used is controlled by the [SNAP Course Information](/snap-course-page-templates/snap-information-sections/snap-course-information#video) setting. be sure to set this in order to enable this feature
{% endhint %}
### Overview Section

* **Use this section?** -when enabled the[ Course Overview section](/snap-course-page-templates/snap-information-sections/snap-course-information#course-overview) will be shown
* **Custom Color Heading?** - when enabled, a custom color will be used for the section heading
* **Custom Color SubHeading?** - when enabled a custom color will be used for the summary content. Any custom color used in the rich text editor will be used when specified
### What You Will Learn Section

* **Use this section?** - when enabled, the [What you will learn section](/snap-course-page-templates/snap-information-sections/snap-course-information#what-you-will-learn) will be shown
* **Custom Background Color?** - when enabled the background color can be changed
* **Custom Color Heading?** - when enabled the section heading color can be changed
* **Custom Color SubHeading?** - when enabled the section subheading color can be changed
* **Custom Color List Text?** - when enabled the section list text color can be changed
* **Custom Color List Icon?** - when enabled the section list icon color can be changed
### Requirements Section

* **Use this section?** - when enabled, the [Requirements section](/snap-course-page-templates/snap-information-sections/snap-course-information#requirements) will be shown
* **Custom Background Color?** - when enabled the background color can be changed
* **Custom Color Heading?** - when enabled the section heading color can be changed
* **Custom Color SubHeading?** - when enabled the section subheading color can be changed
* **Custom Color List Text?** - when enabled the section list text color can be changed
* **Custom Color List Icon?** - when enabled the section list icon color can be changed
### Who is this course for Section

* **Use this section?** - when enabled, the [Who is this course for section ](/snap-course-page-templates/snap-information-sections/snap-course-information#who-is-this-course-for)will be shown
* **Custom Background Color?** - when enabled the background color can be changed
* **Custom Color Heading?** - when enabled the section heading color can be changed
* **Custom Color SubHeading?** - when enabled the section subheading color can be changed
* **Custom Color List Text?** - when enabled the section list text color can be changed
* **Custom Color List Icon?** - when enabled the section list icon color can be changed
### Curriculum Section

* **Use this section?** - when enabled, the Curriclumn section will be shown
* **Custom Color Heading?** - when enabled the section heading color can be changed
* **Curriculum List** - when enabled the section list text color can be changed
* **Curriculum Icon** - when enabled the section list icon color can be changed
### Instructor Section

* **Use this section?** - when enabled, the Instructor section will be shown
* **Custom Color Heading?** - when enabled the section heading color can be changed
* **Custom Color Summary?** - when enabled the section summary color can be changed
### Reviews Section

* **Use this section?** - when enabled, the Reviews section will be shown
### FAQ Section

* **Use this section?** - when enabled, the Instructor section will be shown
* **Custom Color Section Heading?** - when enabled the section heading color can be changed
* **Custom Color Section Question?** - when enabled the faq question color can be changed
* **Custom Color Answer?** - when enabled the faq answer color can be changed
# SNAP Course Page (03) 🎨
Banner CTA and Video

## About This Section
In this SNAP Design Page Template, we have placed the video in the main banner section that spans across the full width of the page. The pricing and CTA buttons have also been moved to the banner. The main content area then follows below splitting the page with the small sidebar that contains the quick attributes for the course.
{% hint style="warning" %}
SNAP Design Page templates will use the information provided inside the SNAP Information sections. The settings in this section will allow you to change the default styles, hide sections and content and other design options\
\ **SNAP uses the default color settings that you have chosen with your Thinkific Theme Settings. In some cases there may be some "conflict" with colors in the design. If you see missing content or hard to see content, then adjust the Theme settings or set a custom color setting in this section. The setting will indicate what color setting is being used by default.**
{% endhint %}

## Settings
### Sidebar

* **Background** - this controls the color of the background for the sidebar
* **Show quick attributes** - when enabled, this will show the quick attributes section
* Attributes Text - color of the quick attributes text
* Attributes Icon - color of the quick attributes icon
* **Show includes list** - when enabled, this will show the includes section
* Includes List Heading - the color of the includes list heading
* Includes List Text - the color of the includes list text
* Custom Color Includes List Icon? - when enabled, you can change the default color that the list icon uses
* **Show social share icons** - when enabled, it will show the social share icons. These icons will trigger a social "share this page" popup on the social platform that was clicked
* **Stick Position From Top** - this will control the position from the top of the page that the sidebar will stick (Desktop only). This is really important when you have a sticky navigation bar. It also depend on the amount of content you may have inside the sidebar based on the options
### Banner Section

* **Custom Background Color Heading?** - when enabled this will use the custom color settings
* Background - the custom color used for the background
* **Custom Color Heading?** - when enabled, the heading color will change based on the color you choose
* **Custom Color SubHeading?** when enabled, the subheading color will change based on the color you choose
* **Custom Color Price?** - checking this box will enable the custom color option. By default, this color will be the Theme Button Background
* **Custom Color Savings?** - this controls the color of the savings area (when enabled)
* **Strike Price** - the price that is displayed with a strikethrough
* **Use SNAP Course Information Banner Image?** - when checked this will enable the background image provided in the [SNAP Course Information banner](/snap-course-page-templates/snap-information-sections/snap-course-information#banner-settings-group) instead of the background color. You can also set the Image Focal Point to position the image properly

{% hint style="info" %}
When using background images - please be sure to not select any images where text is included. These images will automatically be cropped to fill the space provided. You will see different parts of the image on different size screens. Also, be sure to darken/lighten the image so that the text stand out.
{% endhint %}
* **Heading Size (Desktop), Heading Size (Mobile), SubHeading Size (Desktop), SubHeading Size (Mobile)** - this will control the size of the text used for the heading and subheadings in both desktop and mobile sizes
### Video Section

* **Video Type** - this setting will control the type of video that is used in the SNAP Design.
* *Inline* - will show the video within the content area
* *Popup* - will show the video in a popup when the play icon is clicked
{% hint style="info" %}
The video that is used is controlled by the [SNAP Course Information](/snap-course-page-templates/snap-information-sections/snap-course-information#video) setting. be sure to set this in order to enable this feature
{% endhint %}
### Overview Section

* **Use this section?** -when enabled the[ Course Overview section](/snap-course-page-templates/snap-information-sections/snap-course-information#course-overview) will be shown
* **Custom Color Heading?** - when enabled, a custom color will be used for the section heading
* **Custom Color SubHeading?** - when enabled a custom color will be used for the summary content. Any custom color used in the rich text editor will be used when specified
### What You Will Learn Section

* **Use this section?** - when enabled, the [What you will learn section](/snap-course-page-templates/snap-information-sections/snap-course-information#what-you-will-learn) will be shown
* **Custom Background Color?** - when enabled the background color can be changed
* **Custom Color Heading?** - when enabled the section heading color can be changed
* **Custom Color SubHeading?** - when enabled the section subheading color can be changed
* **Custom Color List Text?** - when enabled the section list text color can be changed
* **Custom Color List Icon?** - when enabled the section list icon color can be changed
### Requirements Section

* **Use this section?** - when enabled, the [Requirements section](/snap-course-page-templates/snap-information-sections/snap-course-information#requirements) will be shown
* **Custom Background Color?** - when enabled the background color can be changed
* **Custom Color Heading?** - when enabled the section heading color can be changed
* **Custom Color SubHeading?** - when enabled the section subheading color can be changed
* **Custom Color List Text?** - when enabled the section list text color can be changed
* **Custom Color List Icon?** - when enabled the section list icon color can be changed
### Who is this course for Section

* **Use this section?** - when enabled, the [Who is this course for section ](/snap-course-page-templates/snap-information-sections/snap-course-information#who-is-this-course-for)will be shown
* **Custom Background Color?** - when enabled the background color can be changed
* **Custom Color Heading?** - when enabled the section heading color can be changed
* **Custom Color SubHeading?** - when enabled the section subheading color can be changed
* **Custom Color List Text?** - when enabled the section list text color can be changed
* **Custom Color List Icon?** - when enabled the section list icon color can be changed
### Curriculum Section

* **Use this section?** - when enabled, the Curriclumn section will be shown
* **Custom Color Heading?** - when enabled the section heading color can be changed
* **Curriculum List** - when enabled the section list text color can be changed
* **Curriculum Icon** - when enabled the section list icon color can be changed
### Instructor Section

* **Use this section?** - when enabled, the Instructor section will be shown
* **Custom Color Heading?** - when enabled the section heading color can be changed
* **Custom Color Summary?** - when enabled the section summary color can be changed
### Reviews Section

* **Use this section?** - when enabled, the Reviews section will be shown
### FAQ Section

* **Use this section?** - when enabled, the Instructor section will be shown
* **Custom Color Section Heading?** - when enabled the section heading color can be changed
* **Custom Color Section Question?** - when enabled the faq question color can be changed
* **Custom Color Answer?** - when enabled the faq answer color can be changed
# SNAP Course Page (04) 🎨
Tabbed Content
.png?alt=media\&token=8ad2b505-9103-4935-bfa4-02df3945d2ae)
## About This Section
This SNAP Design Page Template is just like the Sticky Sidebar version, except the main content is grouped into tabs. This creates less "scroll" and causes the user to interact with the page in order to see some of the content..
{% hint style="warning" %}
SNAP Design Page templates will use the information provided inside the SNAP Information sections. The settings in this section will allow you to change the default styles, hide sections and content and other design options\
\ **SNAP uses the default color settings that you have chosen with your Thinkific Theme Settings. In some cases there may be some "conflict" with colors in the design. If you see missing content or hard to see content, then adjust the Theme settings or set a custom color setting in this section. The setting will indicate what color setting is being used by default.**
{% endhint %}

## Settings
### Sidebar

* **Background** - this controls the color of the background for the sidebar
* **Custom Color Price?** - checking this box will enable the custom color option. By default, this color will be the Theme Button Background
* **Custom Color Savings?** - this controls the color of the savings area (when enabled)
* **Strike Price** - the price that is displayed with a strikethrough
* **Show quick attributes** - when enabled, this will show the quick attributes section
* Attributes Text - color of the quick attributes text
* Attributes Icon - color of the quick attributes icon
* **Show includes list** - when enabled, this will show the includes section
* Includes List Heading - the color of the includes list heading
* Includes List Text - the color of the includes list text
* Custom Color Includes List Icon? - when enabled, you can change the default color that the list icon uses
* **Show social share icons** - when enabled, it will show the social share icons. These icons will trigger a social "share this page" popup on the social platform that was clicked
* **Stick Position From Top** - this will control the position from the top of the page that the sidebar will stick (Desktop only). This is really important when you have a sticky navigation bar. It also depend on the amount of content you may have inside the sidebar based on the options
### Banner Section

* **Custom Background Color Heading?** - when enabled this will use the custom color settings
* Background - the custom color used for the background
* **Custom Color Heading?** - when enabled, the heading color will change based on the color you choose
* **Custom Color SubHeading?** when enabled, the subheading color will change based on the color you choose
* **Show Instructor?** - when enabled, the instructor will be shown in the banner section
* **Heading Size (Desktop), Heading Size (Mobile), SubHeading Size (Desktop), SubHeading Size (Mobile)** - this will control the size of the text used for the heading and subheadings in both desktop and mobile sizes
### Video Section

* **Video Type** - this setting will control the type of video that is used in the SNAP Design.
* *Inline* - will show the video within the content area
* *Popup* - will show the video in a popup when the play icon is clicked
{% hint style="info" %}
The video that is used is controlled by the [SNAP Course Information](/snap-course-page-templates/snap-information-sections/snap-course-information#video) setting. be sure to set this in order to enable this feature
{% endhint %}
### Tabs

* Background of Tab Bar - controls the background color of the tab bar
* Text (Not Selected) - the color of the tab heading that is not selected
* Custom Color Active Tab - when enabled this will change the color of the active tab background and text
{% hint style="info" %}
The Tabs are not clickable inside of Site Builder due to Site Builder limitations. You will have to preview the actual page after saving outside of Site Builder.
{% endhint %}
### Overview Section

* **Use this section?** -when enabled the[ Course Overview section](/snap-course-page-templates/snap-information-sections/snap-course-information#course-overview) will be shown
* **Custom Color Heading?** - when enabled, a custom color will be used for the section heading
* **Custom Color SubHeading?** - when enabled a custom color will be used for the summary content. Any custom color used in the rich text editor will be used when specified
### What You Will Learn Section

* **Use this section?** - when enabled, the [What you will learn section](/snap-course-page-templates/snap-information-sections/snap-course-information#what-you-will-learn) will be shown
* **Custom Background Color?** - when enabled the background color can be changed
* **Custom Color Heading?** - when enabled the section heading color can be changed
* **Custom Color SubHeading?** - when enabled the section subheading color can be changed
* **Custom Color List Text?** - when enabled the section list text color can be changed
* **Custom Color List Icon?** - when enabled the section list icon color can be changed
### Requirements Section

* **Use this section?** - when enabled, the [Requirements section](/snap-course-page-templates/snap-information-sections/snap-course-information#requirements) will be shown
* **Custom Background Color?** - when enabled the background color can be changed
* **Custom Color Heading?** - when enabled the section heading color can be changed
* **Custom Color SubHeading?** - when enabled the section subheading color can be changed
* **Custom Color List Text?** - when enabled the section list text color can be changed
* **Custom Color List Icon?** - when enabled the section list icon color can be changed
### Who is this course for Section

* **Use this section?** - when enabled, the [Who is this course for section ](/snap-course-page-templates/snap-information-sections/snap-course-information#who-is-this-course-for)will be shown
* **Custom Background Color?** - when enabled the background color can be changed
* **Custom Color Heading?** - when enabled the section heading color can be changed
* **Custom Color SubHeading?** - when enabled the section subheading color can be changed
* **Custom Color List Text?** - when enabled the section list text color can be changed
* **Custom Color List Icon?** - when enabled the section list icon color can be changed
### Curriculum Section
.png?alt=media\&token=c2081890-f237-4912-9aea-7e40a7d94c98)
This is contained in the second tab and can only be viewed on the actual course page.
* **Use this section?** - when enabled, the Curriclumn section will be shown
* **Custom Color Heading?** - when enabled the section heading color can be changed
* **Curriculum List** - when enabled the section list text color can be changed
* **Curriculum Icon** - when enabled the section list icon color can be changed
### Instructor Section
.png?alt=media\&token=012c925d-4340-465e-8b93-ec95d20f65d8)
* **Use this section?** - when enabled, the Instructor section will be shown
* **Custom Color Heading?** - when enabled the section heading color can be changed
* **Custom Color Summary?** - when enabled the section summary color can be changed
### Reviews Section

* **Use this section?** - when enabled, the Reviews section will be shown
### FAQ Section

* **Use this section?** - when enabled, the Instructor section will be shown
* **Add this to the Tabs?** - when enabled this will move the FAQ section to be a tab instead of showing in the overview section
* **Custom Color Section Heading?** - when enabled the section heading color can be changed
* **Custom Color Section Question?** - when enabled the faq question color can be changed
* **Custom Color Answer?** - when enabled the faq answer color can be changed
# SNAP Course Page (05) 🎨
Large Video - Instructor on the Side

## About This Section
This SNAP Course Page Template is just like SNAP Course page (02) with it's extra large video section front and center, but it moves the curriculum section over to the sidebar and below the sticky CTA section
{% hint style="warning" %}
SNAP Design Page templates will use the information provided inside the SNAP Information sections. The settings in this section will allow you to change the default styles, hide sections and content and other design options\
\ **SNAP uses the default color settings that you have chosen with your Thinkific Theme Settings. In some cases there may be some "conflict" with colors in the design. If you see missing content or hard to see content, then adjust the Theme settings or set a custom color setting in this section. The setting will indicate what color setting is being used by default.**
{% endhint %}

## Settings
### Sidebar

* **Background** - this controls the color of the background for the sidebar
* **Custom Color Price?** - checking this box will enable the custom color option. By default, this color will be the Theme Button Background
* **Custom Color Savings?** - this controls the color of the savings area (when enabled)
* **Strike Price** - the price that is displayed with a strikethrough
* **Show quick attributes** - when enabled, this will show the quick attributes section
* Attributes Text - color of the quick attributes text
* Attributes Icon - color of the quick attributes icon
* **Show includes list** - when enabled, this will show the includes section
* Includes List Heading - the color of the includes list heading
* Includes List Text - the color of the includes list text
* Custom Color Includes List Icon? - when enabled, you can change the default color that the list icon uses
* **Show social share icons** - when enabled, it will show the social share icons. These icons will trigger a social "share this page" popup on the social platform that was clicked
* **Stick Position From Top** - this will control the position from the top of the page that the sidebar will stick (Desktop only). This is really important when you have a sticky navigation bar. It also depend on the amount of content you may have inside the sidebar based on the options
### Banner Section

* **Custom Background Color Heading?** - when enabled this will use the custom color settings
* Background - the custom color used for the background
* **Custom Color Heading?** - when enabled, the heading color will change based on the color you choose
* **Custom Color SubHeading?** when enabled, the subheading color will change based on the color you choose
* **Show Instructor?** - when enabled, the instructor will be shown in the banner section
* **Heading Size (Desktop), Heading Size (Mobile), SubHeading Size (Desktop), SubHeading Size (Mobile)** - this will control the size of the text used for the heading and subheadings in both desktop and mobile sizes
### Video Section

* **Video Type** - this setting will control the type of video that is used in the SNAP Design.
* *Inline* - will show the video within the content area
* *Popup* - will show the video in a popup when the play icon is clicked
{% hint style="info" %}
The video that is used is controlled by the [SNAP Course Information](/snap-course-page-templates/snap-information-sections/snap-course-information#video) setting. be sure to set this in order to enable this feature
{% endhint %}
### Overview Section

* **Use this section?** -when enabled the[ Course Overview section](/snap-course-page-templates/snap-information-sections/snap-course-information#course-overview) will be shown
* **Custom Color Heading?** - when enabled, a custom color will be used for the section heading
* **Custom Color SubHeading?** - when enabled a custom color will be used for the summary content. Any custom color used in the rich text editor will be used when specified
### What You Will Learn Section

* **Use this section?** - when enabled, the [What you will learn section](/snap-course-page-templates/snap-information-sections/snap-course-information#what-you-will-learn) will be shown
* **Custom Background Color?** - when enabled the background color can be changed
* **Custom Color Heading?** - when enabled the section heading color can be changed
* **Custom Color SubHeading?** - when enabled the section subheading color can be changed
* **Custom Color List Text?** - when enabled the section list text color can be changed
* **Custom Color List Icon?** - when enabled the section list icon color can be changed
### Requirements Section

* **Use this section?** - when enabled, the [Requirements section](/snap-course-page-templates/snap-information-sections/snap-course-information#requirements) will be shown
* **Custom Background Color?** - when enabled the background color can be changed
* **Custom Color Heading?** - when enabled the section heading color can be changed
* **Custom Color SubHeading?** - when enabled the section subheading color can be changed
* **Custom Color List Text?** - when enabled the section list text color can be changed
* **Custom Color List Icon?** - when enabled the section list icon color can be changed
### Who is this course for Section

* **Use this section?** - when enabled, the [Who is this course for section ](/snap-course-page-templates/snap-information-sections/snap-course-information#who-is-this-course-for)will be shown
* **Custom Background Color?** - when enabled the background color can be changed
* **Custom Color Heading?** - when enabled the section heading color can be changed
* **Custom Color SubHeading?** - when enabled the section subheading color can be changed
* **Custom Color List Text?** - when enabled the section list text color can be changed
* **Custom Color List Icon?** - when enabled the section list icon color can be changed
### Curriculum Section

* **Use this section?** - when enabled, the Curriclumn section will be shown
* **Custom Color Heading?** - when enabled the section heading color can be changed
* **Curriculum List** - when enabled the section list text color can be changed
* **Curriculum Icon** - when enabled the section list icon color can be changed
### Instructor Section

* **Use this section?** - when enabled, the Instructor section will be shown
* **Custom Color Heading?** - when enabled the section heading color can be changed
* **Custom Color Summary?** - when enabled the section summary color can be changed
### Reviews Section

* **Use this section?** - when enabled, the Reviews section will be shown
### FAQ Section

* **Use this section?** - when enabled, the Instructor section will be shown
* **Custom Color Section Heading?** - when enabled the section heading color can be changed
* **Custom Color Section Question?** - when enabled the faq question color can be changed
* **Custom Color Answer?** - when enabled the faq answer color can be changed
# Support Options
### 1) Primary Support : Facebook Group
Here are some types of questions or problems to post inside the [**Super PowerUps Facebook group**](https://www.facebook.com/groups/superpowerups) **:**
* *How do I ....*
* *I can't seem to get this to work...*
* *I am confused by...*
* *I can't find....*
Basically for any trouble using the our PowerUps - please post a question [inside the Facebook Group](https://www.facebook.com/groups/superpowerups). This way everyone can leverage the information shared by us and possibly others can also provide input into how they are using their super powers.
#### When posting a "help me" type of message inside the Facebook group:
* [ ] Describe the steps you are taking to see the issue.
* [ ] Specify the PowerUp Name (and super section) you are using
* [ ] Detail "what you are trying to achieve" as well (so we know if you are using the correct super power)
* [ ] Provide a screen shot and even better a [Loom](https://www.loom.com/) screen recording
* [ ] Provide a link if possible
{% hint style="info" %}
Issue resolution starts with **clearly understanding your problem** or question. So the clearer and more precise you are in not only describing the issue, but also what exactly you are trying to achieve goes a long way into a quick resolution.
The best way to report issues is to share a screen recording video. This way you can actually describe and show at the same time. Plus it is much quicker for you as well, because you do not have to type a long message.
We love :heart\_eyes: screen recordings and issues that include them quickly go to the top of the priority list. Use [Loom](https://www.loom.com/) or other free tools, to quickly and easily share a screen recording.
{% endhint %}
If the issues needs to "move to support" because of access information or you would rather not reveal your site or issue - then we will continue the conversation as a [support ticket.](httpssupport.superpowerups.com://)
### 2) Support Tickets
Filing a [support ticket ](https://powerups.atlassian.net/servicedesk/customer/portal/1)should be used for the following types of issues
* Account problems (can't log in, unable to install or access purchased products)
* Billing questions
* Issues that require sharing sensitive information
As with posting an issue to the Facbeook group, we ask that you provide as much detail as possible when reporting the problem.
* Describe the steps you are taking to see the issue.
* Specify the PowerUp Name (and super section) you are using
* Detail "what you are trying to achieve" as well (so we know if you are using the correct super power)
* Provide a screen shot and even better a [Loom](https://www.loom.com/) screen recording
* Provide a link if possible
# Licensing
### If you purchased just this PowerUp (Stand alone version):
* You are entitled to install a just this PowerUp into one Thinkific site.
* If you uninstall this PowerUp app from your Thinkific site, you will not be able to reinstall it or move your license to another site without contacting support first.
### If you are a PowerPass member:
* You are entitled to all available PowerUp's as long as your subscription is current
* You are entitled to install any PowerUp into one Thinkific site.
* If you uninstall this PowerUp from your Thinkific site, you will not be able to reinstall it or move your license to another site without contacting support first.
* If you cancel your PowerPass subscription, you will still have access to any installed PowerUp from your Thinkific site as long as you have kept it installed. You will also receive future updates to the installed PowerUps going forward.
### If you have purchased an [Agency License](https://www.superpowerups.com/pages/for-agencies):
* You are entitled to all available PowerUp's as long as your subscription is current
* You are entitled to install a any PowerUp into unlimited Thinkific sites (yours or your clients).
* If you uninstall this PowerUp from your Thinkific site, you will be able to reinstall it or move your license to another site.
* If you cancel your Agency License subscription, you will still have access to any installed PowerUp from your Thinkific sites as long as you have kept it installed. You will also receive future updates to installed PowerUps going forward.
# Uninstalling
Please tell me it's not true - say it ain't so. **Do you really want to remove this super power** from your site? You realize you will lose all of that super power strength 🦸 that you once had, don't you?
Ok, well if you really really want to, the instructions are below 👇
## 🦹 Here is how to lose your super powers👇
Head over to your apps page inside of your site
* Locate the :boom: **PowerUp** and click the *nasty red trash can button to uninstall the app*
One more warning here - if you uninstall this PowerUp, you will not be able to reinstall it on another site unless you have purchased the PowerUps Agency License.

## 👋 So long 😭
If you are having "click remorse" right about now and realize you made a bad decision, then just [reach out to support](http://support.robgalvin.co/) with the details and we will see about getting your super powers restored 🦸
.png?alt=media&token=964e288a-34f6-4d23-ae0f-4ed323225891)

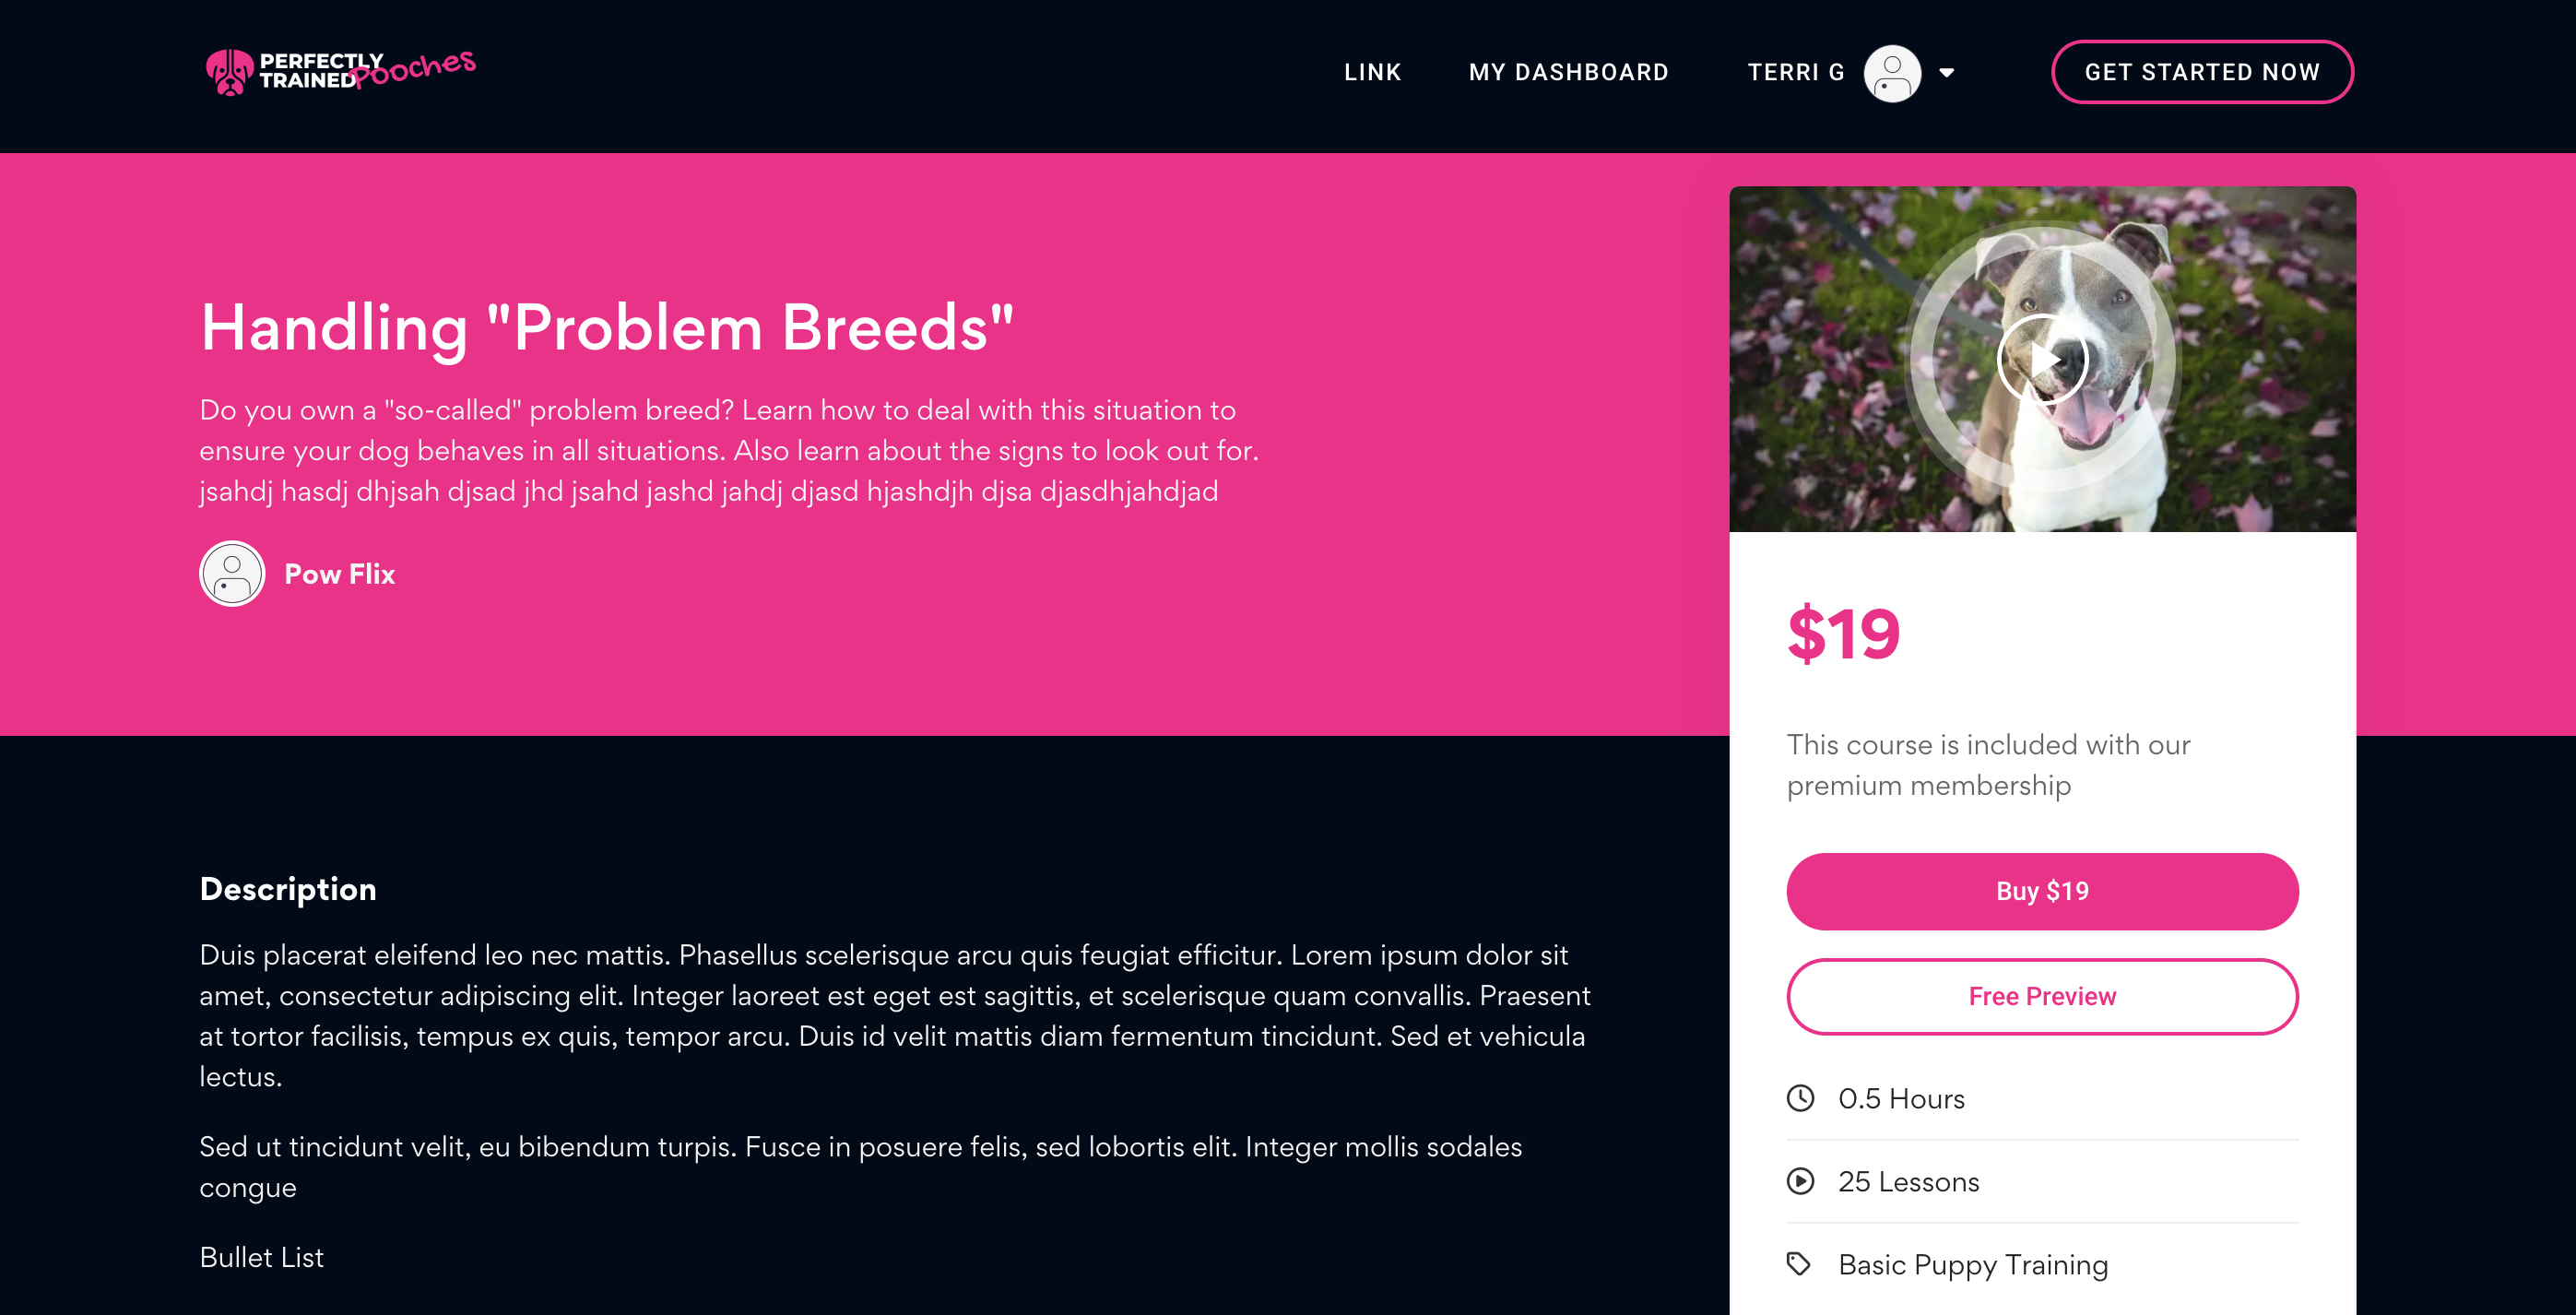
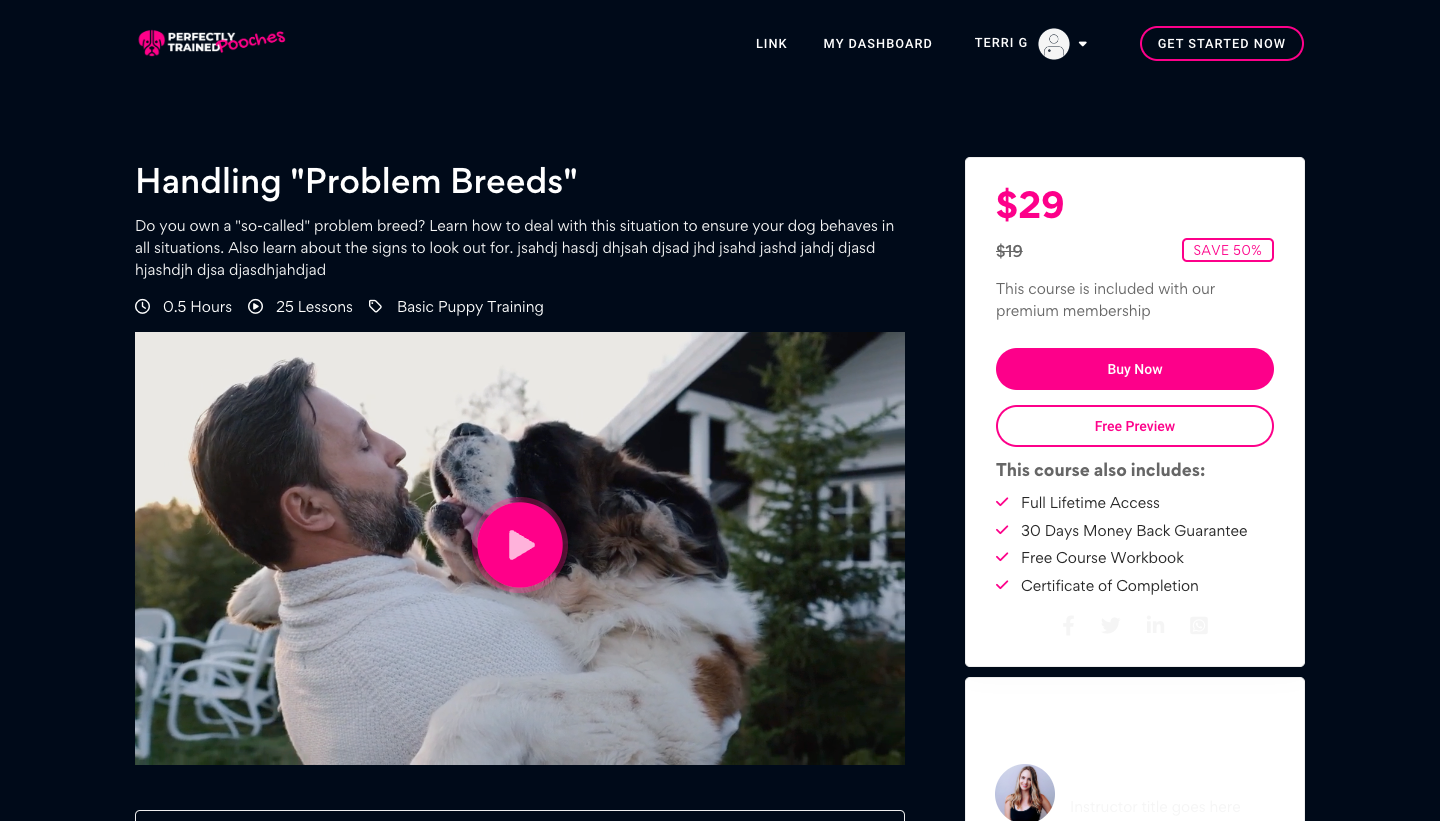

.png?alt=media&token=8ad2b505-9103-4935-bfa4-02df3945d2ae)
.jpg?alt=media&token=a606cb88-e858-446f-98d7-6fac5541df20)
.png?alt=media&token=964e288a-34f6-4d23-ae0f-4ed323225891)

.png?alt=media&token=1d81dd6a-6884-40d0-885e-1e5be1de1b7b)
.png?alt=media&token=a538d265-0596-4e76-a435-ad757b207d40)


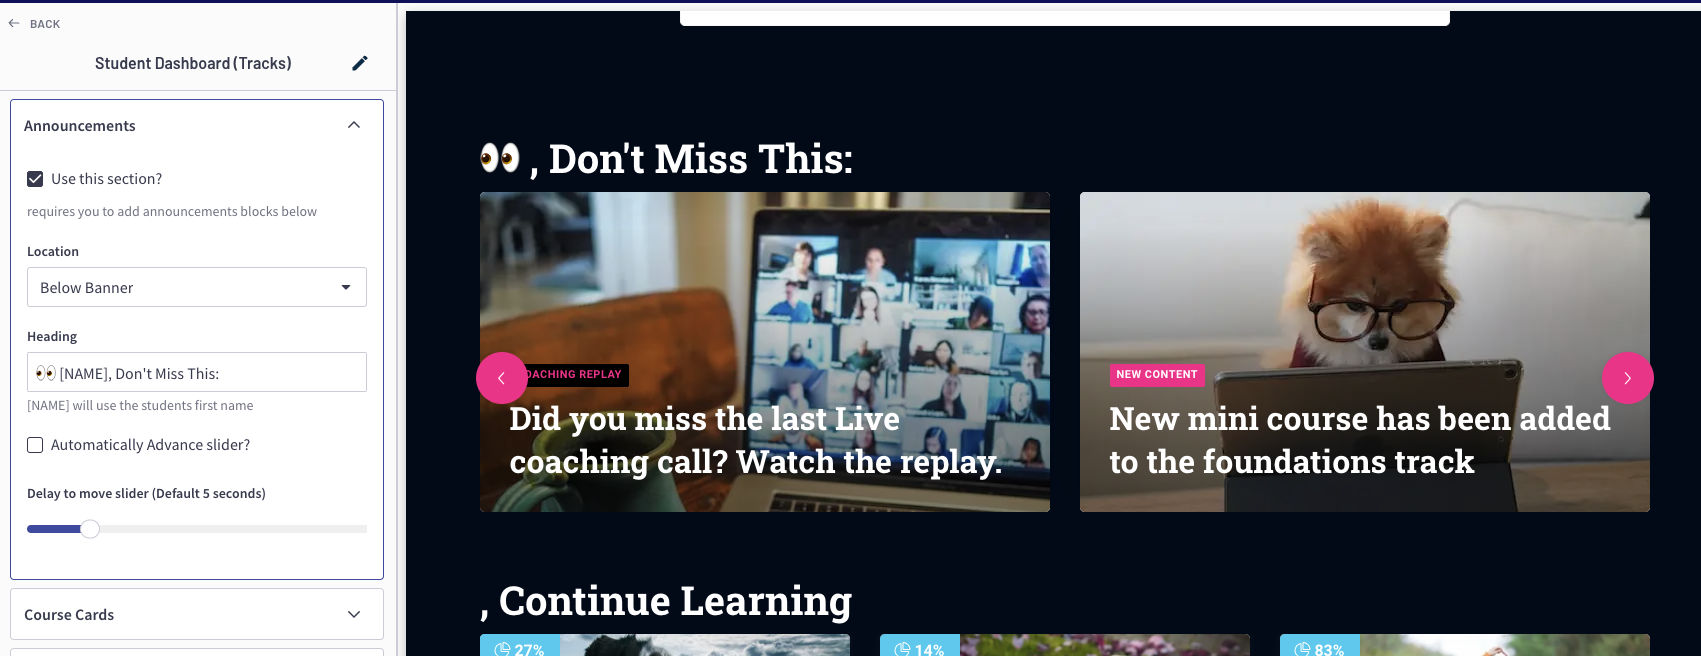

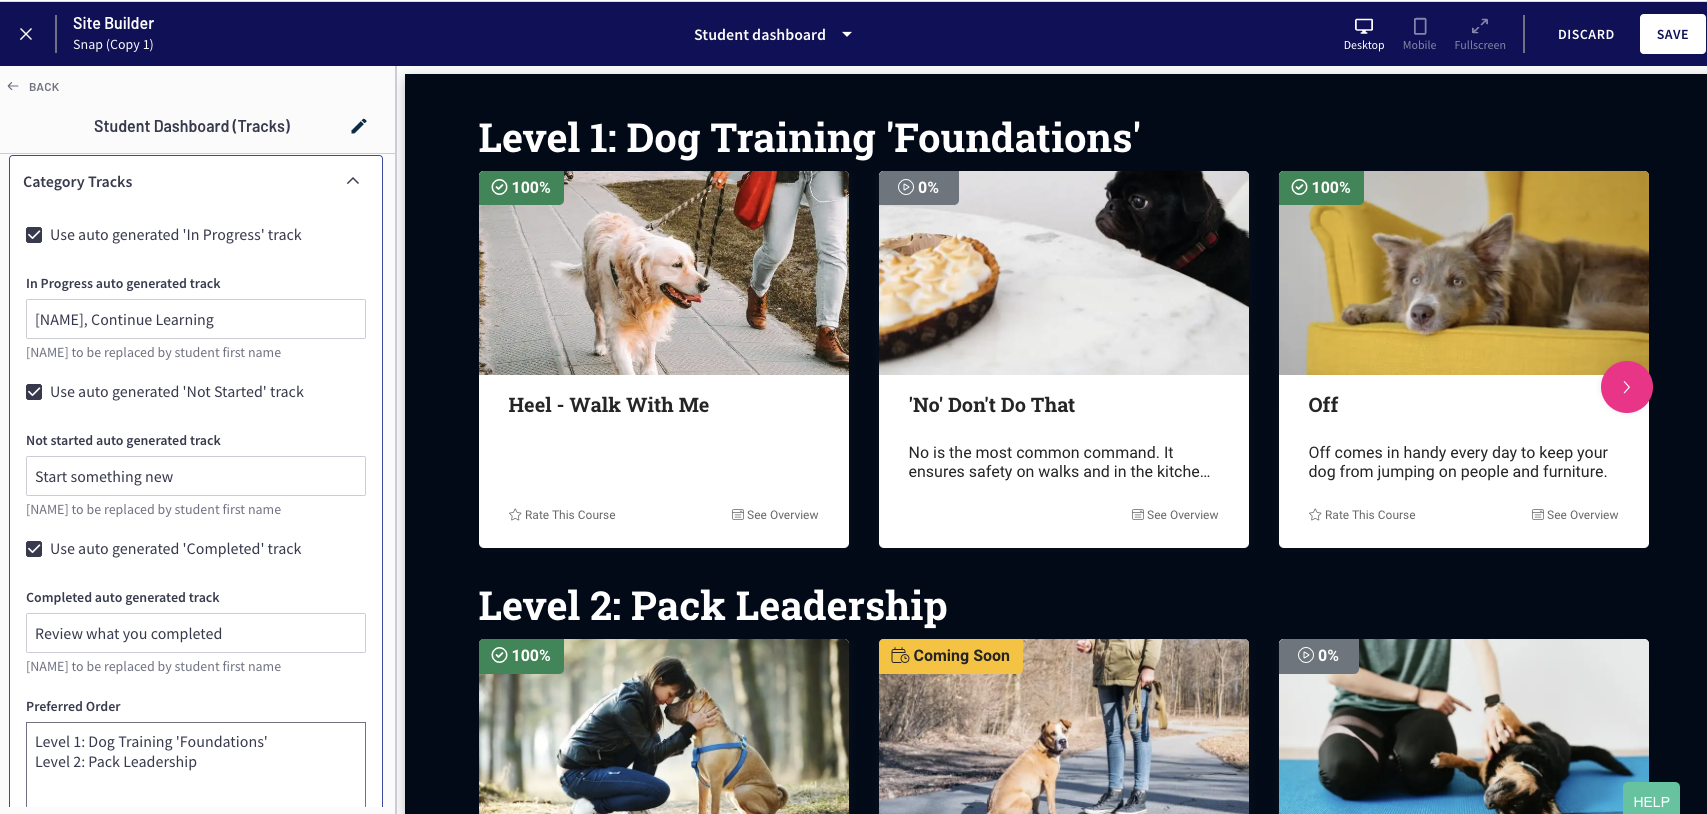
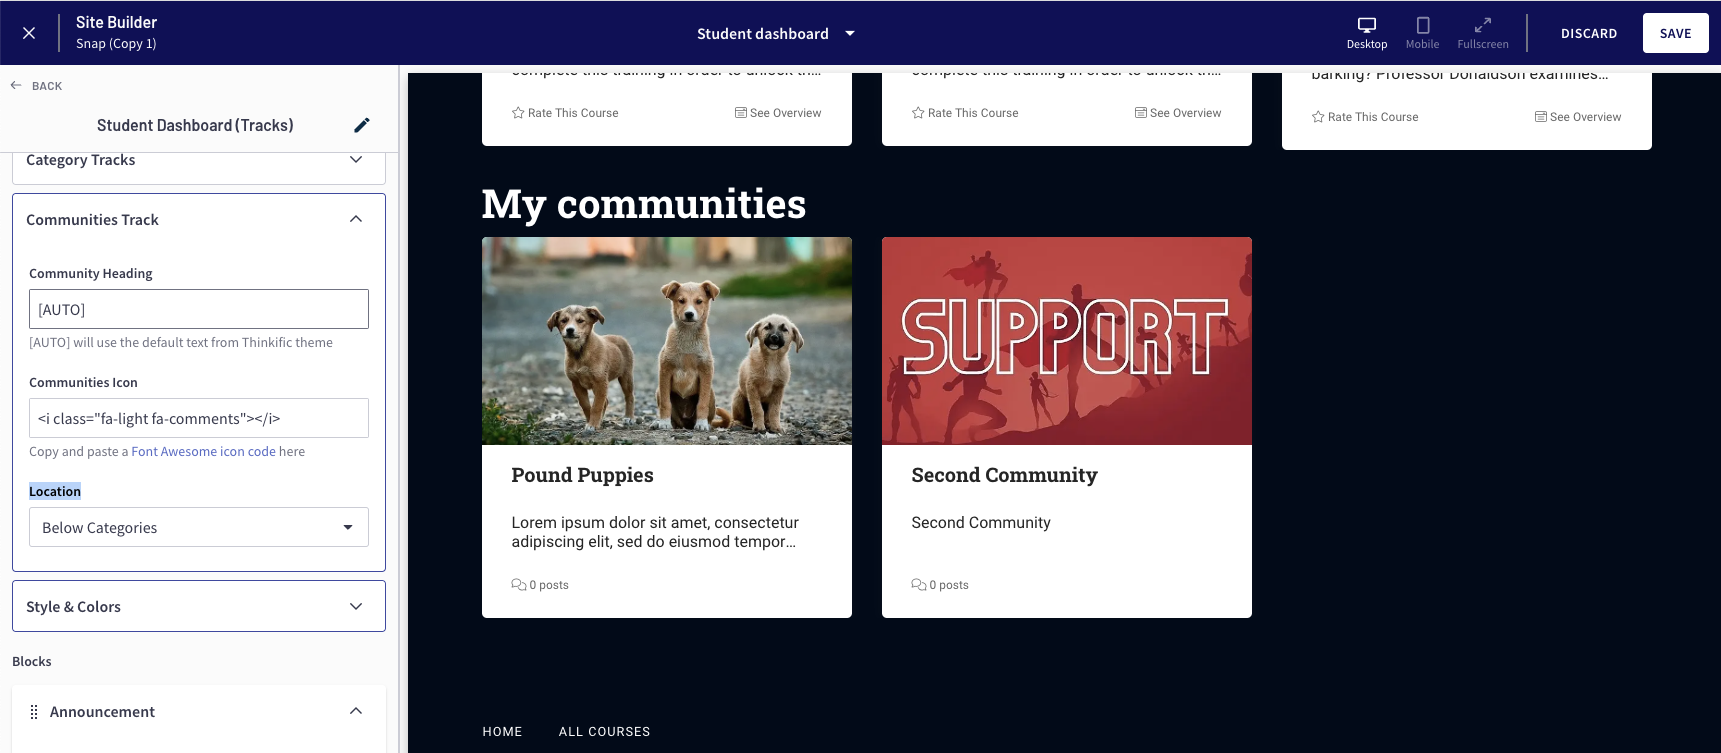
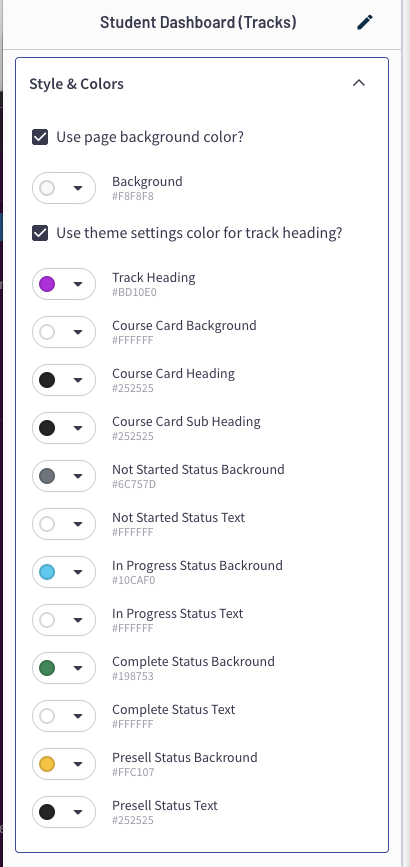


.jpg?alt=media&token=9781bf98-b720-4f1b-bccd-275a392ca79d)


 I do not have time for this? I tried this before? This will take too long? When do I see results
I still have questions, who can help me? Can I talk to someone about this?What is the "crazy named thing" you listed really do for me?
## How to use SNAP FAQ's
* [ ] Make sure you have the required [SNAP Course Overview](/snap-course-page-templates/snap-information-sections/snap-course-information) section on the page
* [ ] Add the SNAP FAQ section to the page and place it below the SNAP Course Overview section
* [ ] Add a FAQ block setting for each FAQ you wish to display
* [ ] Add a [SNAP Design Pag](/snap-course-page-templates/snap-design-templates)e template to the page and make sure the FAQ section is enabled
## SNAP FAQ's Settings

### Heading
This setting will control the text that is used for the FAQ Section

### Frequently asked question
Add a FAQ block for each FAQ you wish to display. You can drag and reorder the FAQ's as you wish
{% hint style="info" %}
The SNAP Page Design will control how the FAQ's are displayed. To change the style of this section,
{% endhint %}
# SNAP Instructors ✍
This section is optional (but recommended if you have multiple instructors for your course). Place this section above any SNAP Design section.
{% embed url="
I do not have time for this? I tried this before? This will take too long? When do I see results
I still have questions, who can help me? Can I talk to someone about this?What is the "crazy named thing" you listed really do for me?
## How to use SNAP FAQ's
* [ ] Make sure you have the required [SNAP Course Overview](/snap-course-page-templates/snap-information-sections/snap-course-information) section on the page
* [ ] Add the SNAP FAQ section to the page and place it below the SNAP Course Overview section
* [ ] Add a FAQ block setting for each FAQ you wish to display
* [ ] Add a [SNAP Design Pag](/snap-course-page-templates/snap-design-templates)e template to the page and make sure the FAQ section is enabled
## SNAP FAQ's Settings

### Heading
This setting will control the text that is used for the FAQ Section

### Frequently asked question
Add a FAQ block for each FAQ you wish to display. You can drag and reorder the FAQ's as you wish
{% hint style="info" %}
The SNAP Page Design will control how the FAQ's are displayed. To change the style of this section,
{% endhint %}
# SNAP Instructors ✍
This section is optional (but recommended if you have multiple instructors for your course). Place this section above any SNAP Design section.
{% embed url=" {% hint style="info" %}
When using background images - please be sure to not select any images where text is included. These images will automatically be cropped to fill the space provided. You will see different parts of the image on different size screens. Also, be sure to darken/lighten the image so that the text stand out.
{% endhint %}
* **Heading Size (Desktop), Heading Size (Mobile), SubHeading Size (Desktop), SubHeading Size (Mobile)** - this will control the size of the text used for the heading and subheadings in both desktop and mobile sizes
### Video Section

* **Video Type** - this setting will control the type of video that is used in the SNAP Design.
* *Inline* - will show the video within the content area
* *Popup* - will show the video in a popup when the play icon is clicked
{% hint style="info" %}
The video that is used is controlled by the [SNAP Course Information](/snap-course-page-templates/snap-information-sections/snap-course-information#video) setting. be sure to set this in order to enable this feature
{% endhint %}
### Overview Section

* **Use this section?** -when enabled the[ Course Overview section](/snap-course-page-templates/snap-information-sections/snap-course-information#course-overview) will be shown
* **Custom Color Heading?** - when enabled, a custom color will be used for the section heading
* **Custom Color SubHeading?** - when enabled a custom color will be used for the summary content. Any custom color used in the rich text editor will be used when specified

### What You Will Learn Section
* **Use this section?** - when enabled, the [What you will learn section](/snap-course-page-templates/snap-information-sections/snap-course-information#what-you-will-learn) will be shown
* **Custom Background Color?** - when enabled the background color can be changed
* **Custom Color Heading?** - when enabled the section heading color can be changed
* **Custom Color SubHeading?** - when enabled the section subheading color can be changed
* **Custom Color List Text?** - when enabled the section list text color can be changed
* **Custom Color List Icon?** - when enabled the section list icon color can be changed
### Requirements Section

* **Use this section?** - when enabled, the [Requirements section](/snap-course-page-templates/snap-information-sections/snap-course-information#requirements) will be shown
* **Custom Background Color?** - when enabled the background color can be changed
* **Custom Color Heading?** - when enabled the section heading color can be changed
* **Custom Color SubHeading?** - when enabled the section subheading color can be changed
* **Custom Color List Text?** - when enabled the section list text color can be changed
* **Custom Color List Icon?** - when enabled the section list icon color can be changed
### Who is this course for Section

* **Use this section?** - when enabled, the [Who is this course for section ](/snap-course-page-templates/snap-information-sections/snap-course-information#who-is-this-course-for)will be shown
* **Custom Background Color?** - when enabled the background color can be changed
* **Custom Color Heading?** - when enabled the section heading color can be changed
* **Custom Color SubHeading?** - when enabled the section subheading color can be changed
* **Custom Color List Text?** - when enabled the section list text color can be changed
* **Custom Color List Icon?** - when enabled the section list icon color can be changed
### Curriculum Section

* **Use this section?** - when enabled, the Curriclumn section will be shown
* **Custom Color Heading?** - when enabled the section heading color can be changed
* **Curriculum List** - when enabled the section list text color can be changed
* **Curriculum Icon** - when enabled the section list icon color can be changed
### Instructor Section

* **Use this section?** - when enabled, the Instructor section will be shown
* **Custom Color Heading?** - when enabled the section heading color can be changed
* **Custom Color Summary?** - when enabled the section summary color can be changed
### Reviews Section

* **Use this section?** - when enabled, the Reviews section will be shown
### FAQ Section

* **Use this section?** - when enabled, the Instructor section will be shown
* **Custom Color Section Heading?** - when enabled the section heading color can be changed
* **Custom Color Section Question?** - when enabled the faq question color can be changed
* **Custom Color Answer?** - when enabled the faq answer color can be changed
# SNAP Course Page (02) 🎨
Large Video - Instructor on the Side

## About This Section
This SNAP Course Page Template main feature is large embedded video that is front and center, but still has all of the important information on the side. The call to action section of the sidebar also sticks to the top, making it easy for website visitors to purchase
{% hint style="warning" %}
SNAP Design Page templates will use the information provided inside the SNAP Information sections. The settings in this section will allow you to change the default styles, hide sections and content and other design options\
\ **SNAP uses the default color settings that you have chosen with your Thinkific Theme Settings. In some cases there may be some "conflict" with colors in the design. If you see missing content or hard to see content, then adjust the Theme settings or set a custom color setting in this section. The setting will indicate what color setting is being used by default.**
{% endhint %}

## Settings
### Sidebar

* **Background** - this controls the color of the background for the sidebar
* **Custom Color Price?** - checking this box will enable the custom color option. By default, this color will be the Theme Button Background
* **Custom Color Savings?** - this controls the color of the savings area (when enabled)
* **Strike Price** - the price that is displayed with a strikethrough
* **Show includes list** - when enabled, this will show the includes section
* Includes List Heading - the color of the includes list heading
* Includes List Text - the color of the includes list text
* Custom Color Includes List Icon? - when enabled, you can change the default color that the list icon uses
* **Show social share icons** - when enabled, it will show the social share icons. These icons will trigger a social "share this page" popup on the social platform that was clicked
* **Stick Position From Top** - this will control the position from the top of the page that the sidebar will stick (Desktop only). This is really important when you have a sticky navigation bar. It also depend on the amount of content you may have inside the sidebar based on the options
### Banner Section

* **Custom Background Color Heading?** - when enabled this will use the custom color settings
* Background - the custom color used for the background
* **Custom Color Heading?** - when enabled, the heading color will change based on the color you choose
* **Custom Color SubHeading?** when enabled, the subheading color will change based on the color you choose
* **Show quick attributes** - when enabled, this will show the quick attributes section
* Attributes Text - color of the quick attributes text
* Attributes Icon - color of the quick attributes icon
* **Heading Size (Desktop), Heading Size (Mobile), SubHeading Size (Desktop), SubHeading Size (Mobile)** - this will control the size of the text used for the heading and subheadings in both desktop and mobile sizes
### Video Section

* **Video Type** - this setting will control the type of video that is used in the SNAP Design.
* *Inline* - will show the video within the content area
* *Popup* - will show the video in a popup when the play icon is clicked
{% hint style="info" %}
The video that is used is controlled by the [SNAP Course Information](/snap-course-page-templates/snap-information-sections/snap-course-information#video) setting. be sure to set this in order to enable this feature
{% endhint %}
### Overview Section

* **Use this section?** -when enabled the[ Course Overview section](/snap-course-page-templates/snap-information-sections/snap-course-information#course-overview) will be shown
* **Custom Color Heading?** - when enabled, a custom color will be used for the section heading
* **Custom Color SubHeading?** - when enabled a custom color will be used for the summary content. Any custom color used in the rich text editor will be used when specified
### What You Will Learn Section

* **Use this section?** - when enabled, the [What you will learn section](/snap-course-page-templates/snap-information-sections/snap-course-information#what-you-will-learn) will be shown
* **Custom Background Color?** - when enabled the background color can be changed
* **Custom Color Heading?** - when enabled the section heading color can be changed
* **Custom Color SubHeading?** - when enabled the section subheading color can be changed
* **Custom Color List Text?** - when enabled the section list text color can be changed
* **Custom Color List Icon?** - when enabled the section list icon color can be changed
### Requirements Section

* **Use this section?** - when enabled, the [Requirements section](/snap-course-page-templates/snap-information-sections/snap-course-information#requirements) will be shown
* **Custom Background Color?** - when enabled the background color can be changed
* **Custom Color Heading?** - when enabled the section heading color can be changed
* **Custom Color SubHeading?** - when enabled the section subheading color can be changed
* **Custom Color List Text?** - when enabled the section list text color can be changed
* **Custom Color List Icon?** - when enabled the section list icon color can be changed
### Who is this course for Section

* **Use this section?** - when enabled, the [Who is this course for section ](/snap-course-page-templates/snap-information-sections/snap-course-information#who-is-this-course-for)will be shown
* **Custom Background Color?** - when enabled the background color can be changed
* **Custom Color Heading?** - when enabled the section heading color can be changed
* **Custom Color SubHeading?** - when enabled the section subheading color can be changed
* **Custom Color List Text?** - when enabled the section list text color can be changed
* **Custom Color List Icon?** - when enabled the section list icon color can be changed
### Curriculum Section

* **Use this section?** - when enabled, the Curriclumn section will be shown
* **Custom Color Heading?** - when enabled the section heading color can be changed
* **Curriculum List** - when enabled the section list text color can be changed
* **Curriculum Icon** - when enabled the section list icon color can be changed
### Instructor Section

* **Use this section?** - when enabled, the Instructor section will be shown
* **Custom Color Heading?** - when enabled the section heading color can be changed
* **Custom Color Summary?** - when enabled the section summary color can be changed
### Reviews Section

* **Use this section?** - when enabled, the Reviews section will be shown
### FAQ Section

* **Use this section?** - when enabled, the Instructor section will be shown
* **Custom Color Section Heading?** - when enabled the section heading color can be changed
* **Custom Color Section Question?** - when enabled the faq question color can be changed
* **Custom Color Answer?** - when enabled the faq answer color can be changed
# SNAP Course Page (03) 🎨
Banner CTA and Video

## About This Section
In this SNAP Design Page Template, we have placed the video in the main banner section that spans across the full width of the page. The pricing and CTA buttons have also been moved to the banner. The main content area then follows below splitting the page with the small sidebar that contains the quick attributes for the course.
{% hint style="warning" %}
SNAP Design Page templates will use the information provided inside the SNAP Information sections. The settings in this section will allow you to change the default styles, hide sections and content and other design options\
\ **SNAP uses the default color settings that you have chosen with your Thinkific Theme Settings. In some cases there may be some "conflict" with colors in the design. If you see missing content or hard to see content, then adjust the Theme settings or set a custom color setting in this section. The setting will indicate what color setting is being used by default.**
{% endhint %}

## Settings
### Sidebar

* **Background** - this controls the color of the background for the sidebar
* **Show quick attributes** - when enabled, this will show the quick attributes section
* Attributes Text - color of the quick attributes text
* Attributes Icon - color of the quick attributes icon
* **Show includes list** - when enabled, this will show the includes section
* Includes List Heading - the color of the includes list heading
* Includes List Text - the color of the includes list text
* Custom Color Includes List Icon? - when enabled, you can change the default color that the list icon uses
* **Show social share icons** - when enabled, it will show the social share icons. These icons will trigger a social "share this page" popup on the social platform that was clicked
* **Stick Position From Top** - this will control the position from the top of the page that the sidebar will stick (Desktop only). This is really important when you have a sticky navigation bar. It also depend on the amount of content you may have inside the sidebar based on the options
### Banner Section

* **Custom Background Color Heading?** - when enabled this will use the custom color settings
* Background - the custom color used for the background
* **Custom Color Heading?** - when enabled, the heading color will change based on the color you choose
* **Custom Color SubHeading?** when enabled, the subheading color will change based on the color you choose
* **Custom Color Price?** - checking this box will enable the custom color option. By default, this color will be the Theme Button Background
* **Custom Color Savings?** - this controls the color of the savings area (when enabled)
* **Strike Price** - the price that is displayed with a strikethrough
* **Use SNAP Course Information Banner Image?** - when checked this will enable the background image provided in the [SNAP Course Information banner](/snap-course-page-templates/snap-information-sections/snap-course-information#banner-settings-group) instead of the background color. You can also set the Image Focal Point to position the image properly

{% hint style="info" %}
When using background images - please be sure to not select any images where text is included. These images will automatically be cropped to fill the space provided. You will see different parts of the image on different size screens. Also, be sure to darken/lighten the image so that the text stand out.
{% endhint %}
* **Heading Size (Desktop), Heading Size (Mobile), SubHeading Size (Desktop), SubHeading Size (Mobile)** - this will control the size of the text used for the heading and subheadings in both desktop and mobile sizes
### Video Section

* **Video Type** - this setting will control the type of video that is used in the SNAP Design.
* *Inline* - will show the video within the content area
* *Popup* - will show the video in a popup when the play icon is clicked
{% hint style="info" %}
The video that is used is controlled by the [SNAP Course Information](/snap-course-page-templates/snap-information-sections/snap-course-information#video) setting. be sure to set this in order to enable this feature
{% endhint %}
### Overview Section

* **Use this section?** -when enabled the[ Course Overview section](/snap-course-page-templates/snap-information-sections/snap-course-information#course-overview) will be shown
* **Custom Color Heading?** - when enabled, a custom color will be used for the section heading
* **Custom Color SubHeading?** - when enabled a custom color will be used for the summary content. Any custom color used in the rich text editor will be used when specified
### What You Will Learn Section

* **Use this section?** - when enabled, the [What you will learn section](/snap-course-page-templates/snap-information-sections/snap-course-information#what-you-will-learn) will be shown
* **Custom Background Color?** - when enabled the background color can be changed
* **Custom Color Heading?** - when enabled the section heading color can be changed
* **Custom Color SubHeading?** - when enabled the section subheading color can be changed
* **Custom Color List Text?** - when enabled the section list text color can be changed
* **Custom Color List Icon?** - when enabled the section list icon color can be changed
### Requirements Section

* **Use this section?** - when enabled, the [Requirements section](/snap-course-page-templates/snap-information-sections/snap-course-information#requirements) will be shown
* **Custom Background Color?** - when enabled the background color can be changed
* **Custom Color Heading?** - when enabled the section heading color can be changed
* **Custom Color SubHeading?** - when enabled the section subheading color can be changed
* **Custom Color List Text?** - when enabled the section list text color can be changed
* **Custom Color List Icon?** - when enabled the section list icon color can be changed
### Who is this course for Section

* **Use this section?** - when enabled, the [Who is this course for section ](/snap-course-page-templates/snap-information-sections/snap-course-information#who-is-this-course-for)will be shown
* **Custom Background Color?** - when enabled the background color can be changed
* **Custom Color Heading?** - when enabled the section heading color can be changed
* **Custom Color SubHeading?** - when enabled the section subheading color can be changed
* **Custom Color List Text?** - when enabled the section list text color can be changed
* **Custom Color List Icon?** - when enabled the section list icon color can be changed
### Curriculum Section

* **Use this section?** - when enabled, the Curriclumn section will be shown
* **Custom Color Heading?** - when enabled the section heading color can be changed
* **Curriculum List** - when enabled the section list text color can be changed
* **Curriculum Icon** - when enabled the section list icon color can be changed
### Instructor Section

* **Use this section?** - when enabled, the Instructor section will be shown
* **Custom Color Heading?** - when enabled the section heading color can be changed
* **Custom Color Summary?** - when enabled the section summary color can be changed
### Reviews Section

* **Use this section?** - when enabled, the Reviews section will be shown
### FAQ Section

* **Use this section?** - when enabled, the Instructor section will be shown
* **Custom Color Section Heading?** - when enabled the section heading color can be changed
* **Custom Color Section Question?** - when enabled the faq question color can be changed
* **Custom Color Answer?** - when enabled the faq answer color can be changed
# SNAP Course Page (04) 🎨
Tabbed Content
.png?alt=media\&token=8ad2b505-9103-4935-bfa4-02df3945d2ae)
## About This Section
This SNAP Design Page Template is just like the Sticky Sidebar version, except the main content is grouped into tabs. This creates less "scroll" and causes the user to interact with the page in order to see some of the content..
{% hint style="warning" %}
SNAP Design Page templates will use the information provided inside the SNAP Information sections. The settings in this section will allow you to change the default styles, hide sections and content and other design options\
\ **SNAP uses the default color settings that you have chosen with your Thinkific Theme Settings. In some cases there may be some "conflict" with colors in the design. If you see missing content or hard to see content, then adjust the Theme settings or set a custom color setting in this section. The setting will indicate what color setting is being used by default.**
{% endhint %}

## Settings
### Sidebar

* **Background** - this controls the color of the background for the sidebar
* **Custom Color Price?** - checking this box will enable the custom color option. By default, this color will be the Theme Button Background
* **Custom Color Savings?** - this controls the color of the savings area (when enabled)
* **Strike Price** - the price that is displayed with a strikethrough
* **Show quick attributes** - when enabled, this will show the quick attributes section
* Attributes Text - color of the quick attributes text
* Attributes Icon - color of the quick attributes icon
* **Show includes list** - when enabled, this will show the includes section
* Includes List Heading - the color of the includes list heading
* Includes List Text - the color of the includes list text
* Custom Color Includes List Icon? - when enabled, you can change the default color that the list icon uses
* **Show social share icons** - when enabled, it will show the social share icons. These icons will trigger a social "share this page" popup on the social platform that was clicked
* **Stick Position From Top** - this will control the position from the top of the page that the sidebar will stick (Desktop only). This is really important when you have a sticky navigation bar. It also depend on the amount of content you may have inside the sidebar based on the options
### Banner Section

* **Custom Background Color Heading?** - when enabled this will use the custom color settings
* Background - the custom color used for the background
* **Custom Color Heading?** - when enabled, the heading color will change based on the color you choose
* **Custom Color SubHeading?** when enabled, the subheading color will change based on the color you choose
* **Show Instructor?** - when enabled, the instructor will be shown in the banner section
* **Heading Size (Desktop), Heading Size (Mobile), SubHeading Size (Desktop), SubHeading Size (Mobile)** - this will control the size of the text used for the heading and subheadings in both desktop and mobile sizes
### Video Section

* **Video Type** - this setting will control the type of video that is used in the SNAP Design.
* *Inline* - will show the video within the content area
* *Popup* - will show the video in a popup when the play icon is clicked
{% hint style="info" %}
The video that is used is controlled by the [SNAP Course Information](/snap-course-page-templates/snap-information-sections/snap-course-information#video) setting. be sure to set this in order to enable this feature
{% endhint %}
### Tabs

* Background of Tab Bar - controls the background color of the tab bar
* Text (Not Selected) - the color of the tab heading that is not selected
* Custom Color Active Tab - when enabled this will change the color of the active tab background and text
{% hint style="info" %}
The Tabs are not clickable inside of Site Builder due to Site Builder limitations. You will have to preview the actual page after saving outside of Site Builder.
{% endhint %}
### Overview Section

* **Use this section?** -when enabled the[ Course Overview section](/snap-course-page-templates/snap-information-sections/snap-course-information#course-overview) will be shown
* **Custom Color Heading?** - when enabled, a custom color will be used for the section heading
* **Custom Color SubHeading?** - when enabled a custom color will be used for the summary content. Any custom color used in the rich text editor will be used when specified
### What You Will Learn Section

* **Use this section?** - when enabled, the [What you will learn section](/snap-course-page-templates/snap-information-sections/snap-course-information#what-you-will-learn) will be shown
* **Custom Background Color?** - when enabled the background color can be changed
* **Custom Color Heading?** - when enabled the section heading color can be changed
* **Custom Color SubHeading?** - when enabled the section subheading color can be changed
* **Custom Color List Text?** - when enabled the section list text color can be changed
* **Custom Color List Icon?** - when enabled the section list icon color can be changed
### Requirements Section

* **Use this section?** - when enabled, the [Requirements section](/snap-course-page-templates/snap-information-sections/snap-course-information#requirements) will be shown
* **Custom Background Color?** - when enabled the background color can be changed
* **Custom Color Heading?** - when enabled the section heading color can be changed
* **Custom Color SubHeading?** - when enabled the section subheading color can be changed
* **Custom Color List Text?** - when enabled the section list text color can be changed
* **Custom Color List Icon?** - when enabled the section list icon color can be changed
### Who is this course for Section

* **Use this section?** - when enabled, the [Who is this course for section ](/snap-course-page-templates/snap-information-sections/snap-course-information#who-is-this-course-for)will be shown
* **Custom Background Color?** - when enabled the background color can be changed
* **Custom Color Heading?** - when enabled the section heading color can be changed
* **Custom Color SubHeading?** - when enabled the section subheading color can be changed
* **Custom Color List Text?** - when enabled the section list text color can be changed
* **Custom Color List Icon?** - when enabled the section list icon color can be changed
### Curriculum Section
.png?alt=media\&token=c2081890-f237-4912-9aea-7e40a7d94c98)
This is contained in the second tab and can only be viewed on the actual course page.
* **Use this section?** - when enabled, the Curriclumn section will be shown
* **Custom Color Heading?** - when enabled the section heading color can be changed
* **Curriculum List** - when enabled the section list text color can be changed
* **Curriculum Icon** - when enabled the section list icon color can be changed
### Instructor Section
.png?alt=media\&token=012c925d-4340-465e-8b93-ec95d20f65d8)
* **Use this section?** - when enabled, the Instructor section will be shown
* **Custom Color Heading?** - when enabled the section heading color can be changed
* **Custom Color Summary?** - when enabled the section summary color can be changed
### Reviews Section

* **Use this section?** - when enabled, the Reviews section will be shown
### FAQ Section

* **Use this section?** - when enabled, the Instructor section will be shown
* **Add this to the Tabs?** - when enabled this will move the FAQ section to be a tab instead of showing in the overview section
* **Custom Color Section Heading?** - when enabled the section heading color can be changed
* **Custom Color Section Question?** - when enabled the faq question color can be changed
* **Custom Color Answer?** - when enabled the faq answer color can be changed
# SNAP Course Page (05) 🎨
Large Video - Instructor on the Side

## About This Section
This SNAP Course Page Template is just like SNAP Course page (02) with it's extra large video section front and center, but it moves the curriculum section over to the sidebar and below the sticky CTA section
{% hint style="warning" %}
SNAP Design Page templates will use the information provided inside the SNAP Information sections. The settings in this section will allow you to change the default styles, hide sections and content and other design options\
\ **SNAP uses the default color settings that you have chosen with your Thinkific Theme Settings. In some cases there may be some "conflict" with colors in the design. If you see missing content or hard to see content, then adjust the Theme settings or set a custom color setting in this section. The setting will indicate what color setting is being used by default.**
{% endhint %}

## Settings
### Sidebar

* **Background** - this controls the color of the background for the sidebar
* **Custom Color Price?** - checking this box will enable the custom color option. By default, this color will be the Theme Button Background
* **Custom Color Savings?** - this controls the color of the savings area (when enabled)
* **Strike Price** - the price that is displayed with a strikethrough
* **Show quick attributes** - when enabled, this will show the quick attributes section
* Attributes Text - color of the quick attributes text
* Attributes Icon - color of the quick attributes icon
* **Show includes list** - when enabled, this will show the includes section
* Includes List Heading - the color of the includes list heading
* Includes List Text - the color of the includes list text
* Custom Color Includes List Icon? - when enabled, you can change the default color that the list icon uses
* **Show social share icons** - when enabled, it will show the social share icons. These icons will trigger a social "share this page" popup on the social platform that was clicked
* **Stick Position From Top** - this will control the position from the top of the page that the sidebar will stick (Desktop only). This is really important when you have a sticky navigation bar. It also depend on the amount of content you may have inside the sidebar based on the options
### Banner Section

* **Custom Background Color Heading?** - when enabled this will use the custom color settings
* Background - the custom color used for the background
* **Custom Color Heading?** - when enabled, the heading color will change based on the color you choose
* **Custom Color SubHeading?** when enabled, the subheading color will change based on the color you choose
* **Show Instructor?** - when enabled, the instructor will be shown in the banner section
* **Heading Size (Desktop), Heading Size (Mobile), SubHeading Size (Desktop), SubHeading Size (Mobile)** - this will control the size of the text used for the heading and subheadings in both desktop and mobile sizes
### Video Section

* **Video Type** - this setting will control the type of video that is used in the SNAP Design.
* *Inline* - will show the video within the content area
* *Popup* - will show the video in a popup when the play icon is clicked
{% hint style="info" %}
The video that is used is controlled by the [SNAP Course Information](/snap-course-page-templates/snap-information-sections/snap-course-information#video) setting. be sure to set this in order to enable this feature
{% endhint %}
### Overview Section

* **Use this section?** -when enabled the[ Course Overview section](/snap-course-page-templates/snap-information-sections/snap-course-information#course-overview) will be shown
* **Custom Color Heading?** - when enabled, a custom color will be used for the section heading
* **Custom Color SubHeading?** - when enabled a custom color will be used for the summary content. Any custom color used in the rich text editor will be used when specified
### What You Will Learn Section

* **Use this section?** - when enabled, the [What you will learn section](/snap-course-page-templates/snap-information-sections/snap-course-information#what-you-will-learn) will be shown
* **Custom Background Color?** - when enabled the background color can be changed
* **Custom Color Heading?** - when enabled the section heading color can be changed
* **Custom Color SubHeading?** - when enabled the section subheading color can be changed
* **Custom Color List Text?** - when enabled the section list text color can be changed
* **Custom Color List Icon?** - when enabled the section list icon color can be changed
### Requirements Section

* **Use this section?** - when enabled, the [Requirements section](/snap-course-page-templates/snap-information-sections/snap-course-information#requirements) will be shown
* **Custom Background Color?** - when enabled the background color can be changed
* **Custom Color Heading?** - when enabled the section heading color can be changed
* **Custom Color SubHeading?** - when enabled the section subheading color can be changed
* **Custom Color List Text?** - when enabled the section list text color can be changed
* **Custom Color List Icon?** - when enabled the section list icon color can be changed
### Who is this course for Section

* **Use this section?** - when enabled, the [Who is this course for section ](/snap-course-page-templates/snap-information-sections/snap-course-information#who-is-this-course-for)will be shown
* **Custom Background Color?** - when enabled the background color can be changed
* **Custom Color Heading?** - when enabled the section heading color can be changed
* **Custom Color SubHeading?** - when enabled the section subheading color can be changed
* **Custom Color List Text?** - when enabled the section list text color can be changed
* **Custom Color List Icon?** - when enabled the section list icon color can be changed
### Curriculum Section

* **Use this section?** - when enabled, the Curriclumn section will be shown
* **Custom Color Heading?** - when enabled the section heading color can be changed
* **Curriculum List** - when enabled the section list text color can be changed
* **Curriculum Icon** - when enabled the section list icon color can be changed
### Instructor Section

* **Use this section?** - when enabled, the Instructor section will be shown
* **Custom Color Heading?** - when enabled the section heading color can be changed
* **Custom Color Summary?** - when enabled the section summary color can be changed
### Reviews Section

* **Use this section?** - when enabled, the Reviews section will be shown
### FAQ Section

* **Use this section?** - when enabled, the Instructor section will be shown
* **Custom Color Section Heading?** - when enabled the section heading color can be changed
* **Custom Color Section Question?** - when enabled the faq question color can be changed
* **Custom Color Answer?** - when enabled the faq answer color can be changed
# Support Options
### 1) Primary Support : Facebook Group
Here are some types of questions or problems to post inside the [**Super PowerUps Facebook group**](https://www.facebook.com/groups/superpowerups) **:**
* *How do I ....*
* *I can't seem to get this to work...*
* *I am confused by...*
* *I can't find....*
Basically for any trouble using the our PowerUps - please post a question [inside the Facebook Group](https://www.facebook.com/groups/superpowerups). This way everyone can leverage the information shared by us and possibly others can also provide input into how they are using their super powers.
#### When posting a "help me" type of message inside the Facebook group:
* [ ] Describe the steps you are taking to see the issue.
* [ ] Specify the PowerUp Name (and super section) you are using
* [ ] Detail "what you are trying to achieve" as well (so we know if you are using the correct super power)
* [ ] Provide a screen shot and even better a [Loom](https://www.loom.com/) screen recording
* [ ] Provide a link if possible
{% hint style="info" %}
Issue resolution starts with **clearly understanding your problem** or question. So the clearer and more precise you are in not only describing the issue, but also what exactly you are trying to achieve goes a long way into a quick resolution.
The best way to report issues is to share a screen recording video. This way you can actually describe and show at the same time. Plus it is much quicker for you as well, because you do not have to type a long message.
We love :heart\_eyes: screen recordings and issues that include them quickly go to the top of the priority list. Use [Loom](https://www.loom.com/) or other free tools, to quickly and easily share a screen recording.
{% endhint %}
If the issues needs to "move to support" because of access information or you would rather not reveal your site or issue - then we will continue the conversation as a [support ticket.](httpssupport.superpowerups.com://)
### 2) Support Tickets
Filing a [support ticket ](https://powerups.atlassian.net/servicedesk/customer/portal/1)should be used for the following types of issues
* Account problems (can't log in, unable to install or access purchased products)
* Billing questions
* Issues that require sharing sensitive information
As with posting an issue to the Facbeook group, we ask that you provide as much detail as possible when reporting the problem.
* Describe the steps you are taking to see the issue.
* Specify the PowerUp Name (and super section) you are using
* Detail "what you are trying to achieve" as well (so we know if you are using the correct super power)
* Provide a screen shot and even better a [Loom](https://www.loom.com/) screen recording
* Provide a link if possible
# Licensing
### If you purchased just this PowerUp (Stand alone version):
* You are entitled to install a just this PowerUp into one Thinkific site.
* If you uninstall this PowerUp app from your Thinkific site, you will not be able to reinstall it or move your license to another site without contacting support first.
### If you are a PowerPass member:
* You are entitled to all available PowerUp's as long as your subscription is current
* You are entitled to install any PowerUp into one Thinkific site.
* If you uninstall this PowerUp from your Thinkific site, you will not be able to reinstall it or move your license to another site without contacting support first.
* If you cancel your PowerPass subscription, you will still have access to any installed PowerUp from your Thinkific site as long as you have kept it installed. You will also receive future updates to the installed PowerUps going forward.
### If you have purchased an [Agency License](https://www.superpowerups.com/pages/for-agencies):
* You are entitled to all available PowerUp's as long as your subscription is current
* You are entitled to install a any PowerUp into unlimited Thinkific sites (yours or your clients).
* If you uninstall this PowerUp from your Thinkific site, you will be able to reinstall it or move your license to another site.
* If you cancel your Agency License subscription, you will still have access to any installed PowerUp from your Thinkific sites as long as you have kept it installed. You will also receive future updates to installed PowerUps going forward.
# Uninstalling
Please tell me it's not true - say it ain't so. **Do you really want to remove this super power** from your site? You realize you will lose all of that super power strength 🦸 that you once had, don't you?
Ok, well if you really really want to, the instructions are below 👇
## 🦹 Here is how to lose your super powers👇
Head over to your apps page inside of your site
* Locate the :boom: **PowerUp** and click the *nasty red trash can button to uninstall the app*
One more warning here - if you uninstall this PowerUp, you will not be able to reinstall it on another site unless you have purchased the PowerUps Agency License.

## 👋 So long 😭
If you are having "click remorse" right about now and realize you made a bad decision, then just [reach out to support](http://support.robgalvin.co/) with the details and we will see about getting your super powers restored 🦸
{% hint style="info" %}
When using background images - please be sure to not select any images where text is included. These images will automatically be cropped to fill the space provided. You will see different parts of the image on different size screens. Also, be sure to darken/lighten the image so that the text stand out.
{% endhint %}
* **Heading Size (Desktop), Heading Size (Mobile), SubHeading Size (Desktop), SubHeading Size (Mobile)** - this will control the size of the text used for the heading and subheadings in both desktop and mobile sizes
### Video Section

* **Video Type** - this setting will control the type of video that is used in the SNAP Design.
* *Inline* - will show the video within the content area
* *Popup* - will show the video in a popup when the play icon is clicked
{% hint style="info" %}
The video that is used is controlled by the [SNAP Course Information](/snap-course-page-templates/snap-information-sections/snap-course-information#video) setting. be sure to set this in order to enable this feature
{% endhint %}
### Overview Section

* **Use this section?** -when enabled the[ Course Overview section](/snap-course-page-templates/snap-information-sections/snap-course-information#course-overview) will be shown
* **Custom Color Heading?** - when enabled, a custom color will be used for the section heading
* **Custom Color SubHeading?** - when enabled a custom color will be used for the summary content. Any custom color used in the rich text editor will be used when specified

### What You Will Learn Section
* **Use this section?** - when enabled, the [What you will learn section](/snap-course-page-templates/snap-information-sections/snap-course-information#what-you-will-learn) will be shown
* **Custom Background Color?** - when enabled the background color can be changed
* **Custom Color Heading?** - when enabled the section heading color can be changed
* **Custom Color SubHeading?** - when enabled the section subheading color can be changed
* **Custom Color List Text?** - when enabled the section list text color can be changed
* **Custom Color List Icon?** - when enabled the section list icon color can be changed
### Requirements Section

* **Use this section?** - when enabled, the [Requirements section](/snap-course-page-templates/snap-information-sections/snap-course-information#requirements) will be shown
* **Custom Background Color?** - when enabled the background color can be changed
* **Custom Color Heading?** - when enabled the section heading color can be changed
* **Custom Color SubHeading?** - when enabled the section subheading color can be changed
* **Custom Color List Text?** - when enabled the section list text color can be changed
* **Custom Color List Icon?** - when enabled the section list icon color can be changed
### Who is this course for Section

* **Use this section?** - when enabled, the [Who is this course for section ](/snap-course-page-templates/snap-information-sections/snap-course-information#who-is-this-course-for)will be shown
* **Custom Background Color?** - when enabled the background color can be changed
* **Custom Color Heading?** - when enabled the section heading color can be changed
* **Custom Color SubHeading?** - when enabled the section subheading color can be changed
* **Custom Color List Text?** - when enabled the section list text color can be changed
* **Custom Color List Icon?** - when enabled the section list icon color can be changed
### Curriculum Section

* **Use this section?** - when enabled, the Curriclumn section will be shown
* **Custom Color Heading?** - when enabled the section heading color can be changed
* **Curriculum List** - when enabled the section list text color can be changed
* **Curriculum Icon** - when enabled the section list icon color can be changed
### Instructor Section

* **Use this section?** - when enabled, the Instructor section will be shown
* **Custom Color Heading?** - when enabled the section heading color can be changed
* **Custom Color Summary?** - when enabled the section summary color can be changed
### Reviews Section

* **Use this section?** - when enabled, the Reviews section will be shown
### FAQ Section

* **Use this section?** - when enabled, the Instructor section will be shown
* **Custom Color Section Heading?** - when enabled the section heading color can be changed
* **Custom Color Section Question?** - when enabled the faq question color can be changed
* **Custom Color Answer?** - when enabled the faq answer color can be changed
# SNAP Course Page (02) 🎨
Large Video - Instructor on the Side

## About This Section
This SNAP Course Page Template main feature is large embedded video that is front and center, but still has all of the important information on the side. The call to action section of the sidebar also sticks to the top, making it easy for website visitors to purchase
{% hint style="warning" %}
SNAP Design Page templates will use the information provided inside the SNAP Information sections. The settings in this section will allow you to change the default styles, hide sections and content and other design options\
\ **SNAP uses the default color settings that you have chosen with your Thinkific Theme Settings. In some cases there may be some "conflict" with colors in the design. If you see missing content or hard to see content, then adjust the Theme settings or set a custom color setting in this section. The setting will indicate what color setting is being used by default.**
{% endhint %}

## Settings
### Sidebar

* **Background** - this controls the color of the background for the sidebar
* **Custom Color Price?** - checking this box will enable the custom color option. By default, this color will be the Theme Button Background
* **Custom Color Savings?** - this controls the color of the savings area (when enabled)
* **Strike Price** - the price that is displayed with a strikethrough
* **Show includes list** - when enabled, this will show the includes section
* Includes List Heading - the color of the includes list heading
* Includes List Text - the color of the includes list text
* Custom Color Includes List Icon? - when enabled, you can change the default color that the list icon uses
* **Show social share icons** - when enabled, it will show the social share icons. These icons will trigger a social "share this page" popup on the social platform that was clicked
* **Stick Position From Top** - this will control the position from the top of the page that the sidebar will stick (Desktop only). This is really important when you have a sticky navigation bar. It also depend on the amount of content you may have inside the sidebar based on the options
### Banner Section

* **Custom Background Color Heading?** - when enabled this will use the custom color settings
* Background - the custom color used for the background
* **Custom Color Heading?** - when enabled, the heading color will change based on the color you choose
* **Custom Color SubHeading?** when enabled, the subheading color will change based on the color you choose
* **Show quick attributes** - when enabled, this will show the quick attributes section
* Attributes Text - color of the quick attributes text
* Attributes Icon - color of the quick attributes icon
* **Heading Size (Desktop), Heading Size (Mobile), SubHeading Size (Desktop), SubHeading Size (Mobile)** - this will control the size of the text used for the heading and subheadings in both desktop and mobile sizes
### Video Section

* **Video Type** - this setting will control the type of video that is used in the SNAP Design.
* *Inline* - will show the video within the content area
* *Popup* - will show the video in a popup when the play icon is clicked
{% hint style="info" %}
The video that is used is controlled by the [SNAP Course Information](/snap-course-page-templates/snap-information-sections/snap-course-information#video) setting. be sure to set this in order to enable this feature
{% endhint %}
### Overview Section

* **Use this section?** -when enabled the[ Course Overview section](/snap-course-page-templates/snap-information-sections/snap-course-information#course-overview) will be shown
* **Custom Color Heading?** - when enabled, a custom color will be used for the section heading
* **Custom Color SubHeading?** - when enabled a custom color will be used for the summary content. Any custom color used in the rich text editor will be used when specified
### What You Will Learn Section

* **Use this section?** - when enabled, the [What you will learn section](/snap-course-page-templates/snap-information-sections/snap-course-information#what-you-will-learn) will be shown
* **Custom Background Color?** - when enabled the background color can be changed
* **Custom Color Heading?** - when enabled the section heading color can be changed
* **Custom Color SubHeading?** - when enabled the section subheading color can be changed
* **Custom Color List Text?** - when enabled the section list text color can be changed
* **Custom Color List Icon?** - when enabled the section list icon color can be changed
### Requirements Section

* **Use this section?** - when enabled, the [Requirements section](/snap-course-page-templates/snap-information-sections/snap-course-information#requirements) will be shown
* **Custom Background Color?** - when enabled the background color can be changed
* **Custom Color Heading?** - when enabled the section heading color can be changed
* **Custom Color SubHeading?** - when enabled the section subheading color can be changed
* **Custom Color List Text?** - when enabled the section list text color can be changed
* **Custom Color List Icon?** - when enabled the section list icon color can be changed
### Who is this course for Section

* **Use this section?** - when enabled, the [Who is this course for section ](/snap-course-page-templates/snap-information-sections/snap-course-information#who-is-this-course-for)will be shown
* **Custom Background Color?** - when enabled the background color can be changed
* **Custom Color Heading?** - when enabled the section heading color can be changed
* **Custom Color SubHeading?** - when enabled the section subheading color can be changed
* **Custom Color List Text?** - when enabled the section list text color can be changed
* **Custom Color List Icon?** - when enabled the section list icon color can be changed
### Curriculum Section

* **Use this section?** - when enabled, the Curriclumn section will be shown
* **Custom Color Heading?** - when enabled the section heading color can be changed
* **Curriculum List** - when enabled the section list text color can be changed
* **Curriculum Icon** - when enabled the section list icon color can be changed
### Instructor Section

* **Use this section?** - when enabled, the Instructor section will be shown
* **Custom Color Heading?** - when enabled the section heading color can be changed
* **Custom Color Summary?** - when enabled the section summary color can be changed
### Reviews Section

* **Use this section?** - when enabled, the Reviews section will be shown
### FAQ Section

* **Use this section?** - when enabled, the Instructor section will be shown
* **Custom Color Section Heading?** - when enabled the section heading color can be changed
* **Custom Color Section Question?** - when enabled the faq question color can be changed
* **Custom Color Answer?** - when enabled the faq answer color can be changed
# SNAP Course Page (03) 🎨
Banner CTA and Video

## About This Section
In this SNAP Design Page Template, we have placed the video in the main banner section that spans across the full width of the page. The pricing and CTA buttons have also been moved to the banner. The main content area then follows below splitting the page with the small sidebar that contains the quick attributes for the course.
{% hint style="warning" %}
SNAP Design Page templates will use the information provided inside the SNAP Information sections. The settings in this section will allow you to change the default styles, hide sections and content and other design options\
\ **SNAP uses the default color settings that you have chosen with your Thinkific Theme Settings. In some cases there may be some "conflict" with colors in the design. If you see missing content or hard to see content, then adjust the Theme settings or set a custom color setting in this section. The setting will indicate what color setting is being used by default.**
{% endhint %}

## Settings
### Sidebar

* **Background** - this controls the color of the background for the sidebar
* **Show quick attributes** - when enabled, this will show the quick attributes section
* Attributes Text - color of the quick attributes text
* Attributes Icon - color of the quick attributes icon
* **Show includes list** - when enabled, this will show the includes section
* Includes List Heading - the color of the includes list heading
* Includes List Text - the color of the includes list text
* Custom Color Includes List Icon? - when enabled, you can change the default color that the list icon uses
* **Show social share icons** - when enabled, it will show the social share icons. These icons will trigger a social "share this page" popup on the social platform that was clicked
* **Stick Position From Top** - this will control the position from the top of the page that the sidebar will stick (Desktop only). This is really important when you have a sticky navigation bar. It also depend on the amount of content you may have inside the sidebar based on the options
### Banner Section

* **Custom Background Color Heading?** - when enabled this will use the custom color settings
* Background - the custom color used for the background
* **Custom Color Heading?** - when enabled, the heading color will change based on the color you choose
* **Custom Color SubHeading?** when enabled, the subheading color will change based on the color you choose
* **Custom Color Price?** - checking this box will enable the custom color option. By default, this color will be the Theme Button Background
* **Custom Color Savings?** - this controls the color of the savings area (when enabled)
* **Strike Price** - the price that is displayed with a strikethrough
* **Use SNAP Course Information Banner Image?** - when checked this will enable the background image provided in the [SNAP Course Information banner](/snap-course-page-templates/snap-information-sections/snap-course-information#banner-settings-group) instead of the background color. You can also set the Image Focal Point to position the image properly

{% hint style="info" %}
When using background images - please be sure to not select any images where text is included. These images will automatically be cropped to fill the space provided. You will see different parts of the image on different size screens. Also, be sure to darken/lighten the image so that the text stand out.
{% endhint %}
* **Heading Size (Desktop), Heading Size (Mobile), SubHeading Size (Desktop), SubHeading Size (Mobile)** - this will control the size of the text used for the heading and subheadings in both desktop and mobile sizes
### Video Section

* **Video Type** - this setting will control the type of video that is used in the SNAP Design.
* *Inline* - will show the video within the content area
* *Popup* - will show the video in a popup when the play icon is clicked
{% hint style="info" %}
The video that is used is controlled by the [SNAP Course Information](/snap-course-page-templates/snap-information-sections/snap-course-information#video) setting. be sure to set this in order to enable this feature
{% endhint %}
### Overview Section

* **Use this section?** -when enabled the[ Course Overview section](/snap-course-page-templates/snap-information-sections/snap-course-information#course-overview) will be shown
* **Custom Color Heading?** - when enabled, a custom color will be used for the section heading
* **Custom Color SubHeading?** - when enabled a custom color will be used for the summary content. Any custom color used in the rich text editor will be used when specified
### What You Will Learn Section

* **Use this section?** - when enabled, the [What you will learn section](/snap-course-page-templates/snap-information-sections/snap-course-information#what-you-will-learn) will be shown
* **Custom Background Color?** - when enabled the background color can be changed
* **Custom Color Heading?** - when enabled the section heading color can be changed
* **Custom Color SubHeading?** - when enabled the section subheading color can be changed
* **Custom Color List Text?** - when enabled the section list text color can be changed
* **Custom Color List Icon?** - when enabled the section list icon color can be changed
### Requirements Section

* **Use this section?** - when enabled, the [Requirements section](/snap-course-page-templates/snap-information-sections/snap-course-information#requirements) will be shown
* **Custom Background Color?** - when enabled the background color can be changed
* **Custom Color Heading?** - when enabled the section heading color can be changed
* **Custom Color SubHeading?** - when enabled the section subheading color can be changed
* **Custom Color List Text?** - when enabled the section list text color can be changed
* **Custom Color List Icon?** - when enabled the section list icon color can be changed
### Who is this course for Section

* **Use this section?** - when enabled, the [Who is this course for section ](/snap-course-page-templates/snap-information-sections/snap-course-information#who-is-this-course-for)will be shown
* **Custom Background Color?** - when enabled the background color can be changed
* **Custom Color Heading?** - when enabled the section heading color can be changed
* **Custom Color SubHeading?** - when enabled the section subheading color can be changed
* **Custom Color List Text?** - when enabled the section list text color can be changed
* **Custom Color List Icon?** - when enabled the section list icon color can be changed
### Curriculum Section

* **Use this section?** - when enabled, the Curriclumn section will be shown
* **Custom Color Heading?** - when enabled the section heading color can be changed
* **Curriculum List** - when enabled the section list text color can be changed
* **Curriculum Icon** - when enabled the section list icon color can be changed
### Instructor Section

* **Use this section?** - when enabled, the Instructor section will be shown
* **Custom Color Heading?** - when enabled the section heading color can be changed
* **Custom Color Summary?** - when enabled the section summary color can be changed
### Reviews Section

* **Use this section?** - when enabled, the Reviews section will be shown
### FAQ Section

* **Use this section?** - when enabled, the Instructor section will be shown
* **Custom Color Section Heading?** - when enabled the section heading color can be changed
* **Custom Color Section Question?** - when enabled the faq question color can be changed
* **Custom Color Answer?** - when enabled the faq answer color can be changed
# SNAP Course Page (04) 🎨
Tabbed Content
.png?alt=media\&token=8ad2b505-9103-4935-bfa4-02df3945d2ae)
## About This Section
This SNAP Design Page Template is just like the Sticky Sidebar version, except the main content is grouped into tabs. This creates less "scroll" and causes the user to interact with the page in order to see some of the content..
{% hint style="warning" %}
SNAP Design Page templates will use the information provided inside the SNAP Information sections. The settings in this section will allow you to change the default styles, hide sections and content and other design options\
\ **SNAP uses the default color settings that you have chosen with your Thinkific Theme Settings. In some cases there may be some "conflict" with colors in the design. If you see missing content or hard to see content, then adjust the Theme settings or set a custom color setting in this section. The setting will indicate what color setting is being used by default.**
{% endhint %}

## Settings
### Sidebar

* **Background** - this controls the color of the background for the sidebar
* **Custom Color Price?** - checking this box will enable the custom color option. By default, this color will be the Theme Button Background
* **Custom Color Savings?** - this controls the color of the savings area (when enabled)
* **Strike Price** - the price that is displayed with a strikethrough
* **Show quick attributes** - when enabled, this will show the quick attributes section
* Attributes Text - color of the quick attributes text
* Attributes Icon - color of the quick attributes icon
* **Show includes list** - when enabled, this will show the includes section
* Includes List Heading - the color of the includes list heading
* Includes List Text - the color of the includes list text
* Custom Color Includes List Icon? - when enabled, you can change the default color that the list icon uses
* **Show social share icons** - when enabled, it will show the social share icons. These icons will trigger a social "share this page" popup on the social platform that was clicked
* **Stick Position From Top** - this will control the position from the top of the page that the sidebar will stick (Desktop only). This is really important when you have a sticky navigation bar. It also depend on the amount of content you may have inside the sidebar based on the options
### Banner Section

* **Custom Background Color Heading?** - when enabled this will use the custom color settings
* Background - the custom color used for the background
* **Custom Color Heading?** - when enabled, the heading color will change based on the color you choose
* **Custom Color SubHeading?** when enabled, the subheading color will change based on the color you choose
* **Show Instructor?** - when enabled, the instructor will be shown in the banner section
* **Heading Size (Desktop), Heading Size (Mobile), SubHeading Size (Desktop), SubHeading Size (Mobile)** - this will control the size of the text used for the heading and subheadings in both desktop and mobile sizes
### Video Section

* **Video Type** - this setting will control the type of video that is used in the SNAP Design.
* *Inline* - will show the video within the content area
* *Popup* - will show the video in a popup when the play icon is clicked
{% hint style="info" %}
The video that is used is controlled by the [SNAP Course Information](/snap-course-page-templates/snap-information-sections/snap-course-information#video) setting. be sure to set this in order to enable this feature
{% endhint %}
### Tabs

* Background of Tab Bar - controls the background color of the tab bar
* Text (Not Selected) - the color of the tab heading that is not selected
* Custom Color Active Tab - when enabled this will change the color of the active tab background and text
{% hint style="info" %}
The Tabs are not clickable inside of Site Builder due to Site Builder limitations. You will have to preview the actual page after saving outside of Site Builder.
{% endhint %}
### Overview Section

* **Use this section?** -when enabled the[ Course Overview section](/snap-course-page-templates/snap-information-sections/snap-course-information#course-overview) will be shown
* **Custom Color Heading?** - when enabled, a custom color will be used for the section heading
* **Custom Color SubHeading?** - when enabled a custom color will be used for the summary content. Any custom color used in the rich text editor will be used when specified
### What You Will Learn Section

* **Use this section?** - when enabled, the [What you will learn section](/snap-course-page-templates/snap-information-sections/snap-course-information#what-you-will-learn) will be shown
* **Custom Background Color?** - when enabled the background color can be changed
* **Custom Color Heading?** - when enabled the section heading color can be changed
* **Custom Color SubHeading?** - when enabled the section subheading color can be changed
* **Custom Color List Text?** - when enabled the section list text color can be changed
* **Custom Color List Icon?** - when enabled the section list icon color can be changed
### Requirements Section

* **Use this section?** - when enabled, the [Requirements section](/snap-course-page-templates/snap-information-sections/snap-course-information#requirements) will be shown
* **Custom Background Color?** - when enabled the background color can be changed
* **Custom Color Heading?** - when enabled the section heading color can be changed
* **Custom Color SubHeading?** - when enabled the section subheading color can be changed
* **Custom Color List Text?** - when enabled the section list text color can be changed
* **Custom Color List Icon?** - when enabled the section list icon color can be changed
### Who is this course for Section

* **Use this section?** - when enabled, the [Who is this course for section ](/snap-course-page-templates/snap-information-sections/snap-course-information#who-is-this-course-for)will be shown
* **Custom Background Color?** - when enabled the background color can be changed
* **Custom Color Heading?** - when enabled the section heading color can be changed
* **Custom Color SubHeading?** - when enabled the section subheading color can be changed
* **Custom Color List Text?** - when enabled the section list text color can be changed
* **Custom Color List Icon?** - when enabled the section list icon color can be changed
### Curriculum Section
.png?alt=media\&token=c2081890-f237-4912-9aea-7e40a7d94c98)
This is contained in the second tab and can only be viewed on the actual course page.
* **Use this section?** - when enabled, the Curriclumn section will be shown
* **Custom Color Heading?** - when enabled the section heading color can be changed
* **Curriculum List** - when enabled the section list text color can be changed
* **Curriculum Icon** - when enabled the section list icon color can be changed
### Instructor Section
.png?alt=media\&token=012c925d-4340-465e-8b93-ec95d20f65d8)
* **Use this section?** - when enabled, the Instructor section will be shown
* **Custom Color Heading?** - when enabled the section heading color can be changed
* **Custom Color Summary?** - when enabled the section summary color can be changed
### Reviews Section

* **Use this section?** - when enabled, the Reviews section will be shown
### FAQ Section

* **Use this section?** - when enabled, the Instructor section will be shown
* **Add this to the Tabs?** - when enabled this will move the FAQ section to be a tab instead of showing in the overview section
* **Custom Color Section Heading?** - when enabled the section heading color can be changed
* **Custom Color Section Question?** - when enabled the faq question color can be changed
* **Custom Color Answer?** - when enabled the faq answer color can be changed
# SNAP Course Page (05) 🎨
Large Video - Instructor on the Side

## About This Section
This SNAP Course Page Template is just like SNAP Course page (02) with it's extra large video section front and center, but it moves the curriculum section over to the sidebar and below the sticky CTA section
{% hint style="warning" %}
SNAP Design Page templates will use the information provided inside the SNAP Information sections. The settings in this section will allow you to change the default styles, hide sections and content and other design options\
\ **SNAP uses the default color settings that you have chosen with your Thinkific Theme Settings. In some cases there may be some "conflict" with colors in the design. If you see missing content or hard to see content, then adjust the Theme settings or set a custom color setting in this section. The setting will indicate what color setting is being used by default.**
{% endhint %}

## Settings
### Sidebar

* **Background** - this controls the color of the background for the sidebar
* **Custom Color Price?** - checking this box will enable the custom color option. By default, this color will be the Theme Button Background
* **Custom Color Savings?** - this controls the color of the savings area (when enabled)
* **Strike Price** - the price that is displayed with a strikethrough
* **Show quick attributes** - when enabled, this will show the quick attributes section
* Attributes Text - color of the quick attributes text
* Attributes Icon - color of the quick attributes icon
* **Show includes list** - when enabled, this will show the includes section
* Includes List Heading - the color of the includes list heading
* Includes List Text - the color of the includes list text
* Custom Color Includes List Icon? - when enabled, you can change the default color that the list icon uses
* **Show social share icons** - when enabled, it will show the social share icons. These icons will trigger a social "share this page" popup on the social platform that was clicked
* **Stick Position From Top** - this will control the position from the top of the page that the sidebar will stick (Desktop only). This is really important when you have a sticky navigation bar. It also depend on the amount of content you may have inside the sidebar based on the options
### Banner Section

* **Custom Background Color Heading?** - when enabled this will use the custom color settings
* Background - the custom color used for the background
* **Custom Color Heading?** - when enabled, the heading color will change based on the color you choose
* **Custom Color SubHeading?** when enabled, the subheading color will change based on the color you choose
* **Show Instructor?** - when enabled, the instructor will be shown in the banner section
* **Heading Size (Desktop), Heading Size (Mobile), SubHeading Size (Desktop), SubHeading Size (Mobile)** - this will control the size of the text used for the heading and subheadings in both desktop and mobile sizes
### Video Section

* **Video Type** - this setting will control the type of video that is used in the SNAP Design.
* *Inline* - will show the video within the content area
* *Popup* - will show the video in a popup when the play icon is clicked
{% hint style="info" %}
The video that is used is controlled by the [SNAP Course Information](/snap-course-page-templates/snap-information-sections/snap-course-information#video) setting. be sure to set this in order to enable this feature
{% endhint %}
### Overview Section

* **Use this section?** -when enabled the[ Course Overview section](/snap-course-page-templates/snap-information-sections/snap-course-information#course-overview) will be shown
* **Custom Color Heading?** - when enabled, a custom color will be used for the section heading
* **Custom Color SubHeading?** - when enabled a custom color will be used for the summary content. Any custom color used in the rich text editor will be used when specified
### What You Will Learn Section

* **Use this section?** - when enabled, the [What you will learn section](/snap-course-page-templates/snap-information-sections/snap-course-information#what-you-will-learn) will be shown
* **Custom Background Color?** - when enabled the background color can be changed
* **Custom Color Heading?** - when enabled the section heading color can be changed
* **Custom Color SubHeading?** - when enabled the section subheading color can be changed
* **Custom Color List Text?** - when enabled the section list text color can be changed
* **Custom Color List Icon?** - when enabled the section list icon color can be changed
### Requirements Section

* **Use this section?** - when enabled, the [Requirements section](/snap-course-page-templates/snap-information-sections/snap-course-information#requirements) will be shown
* **Custom Background Color?** - when enabled the background color can be changed
* **Custom Color Heading?** - when enabled the section heading color can be changed
* **Custom Color SubHeading?** - when enabled the section subheading color can be changed
* **Custom Color List Text?** - when enabled the section list text color can be changed
* **Custom Color List Icon?** - when enabled the section list icon color can be changed
### Who is this course for Section

* **Use this section?** - when enabled, the [Who is this course for section ](/snap-course-page-templates/snap-information-sections/snap-course-information#who-is-this-course-for)will be shown
* **Custom Background Color?** - when enabled the background color can be changed
* **Custom Color Heading?** - when enabled the section heading color can be changed
* **Custom Color SubHeading?** - when enabled the section subheading color can be changed
* **Custom Color List Text?** - when enabled the section list text color can be changed
* **Custom Color List Icon?** - when enabled the section list icon color can be changed
### Curriculum Section

* **Use this section?** - when enabled, the Curriclumn section will be shown
* **Custom Color Heading?** - when enabled the section heading color can be changed
* **Curriculum List** - when enabled the section list text color can be changed
* **Curriculum Icon** - when enabled the section list icon color can be changed
### Instructor Section

* **Use this section?** - when enabled, the Instructor section will be shown
* **Custom Color Heading?** - when enabled the section heading color can be changed
* **Custom Color Summary?** - when enabled the section summary color can be changed
### Reviews Section

* **Use this section?** - when enabled, the Reviews section will be shown
### FAQ Section

* **Use this section?** - when enabled, the Instructor section will be shown
* **Custom Color Section Heading?** - when enabled the section heading color can be changed
* **Custom Color Section Question?** - when enabled the faq question color can be changed
* **Custom Color Answer?** - when enabled the faq answer color can be changed
# Support Options
### 1) Primary Support : Facebook Group
Here are some types of questions or problems to post inside the [**Super PowerUps Facebook group**](https://www.facebook.com/groups/superpowerups) **:**
* *How do I ....*
* *I can't seem to get this to work...*
* *I am confused by...*
* *I can't find....*
Basically for any trouble using the our PowerUps - please post a question [inside the Facebook Group](https://www.facebook.com/groups/superpowerups). This way everyone can leverage the information shared by us and possibly others can also provide input into how they are using their super powers.
#### When posting a "help me" type of message inside the Facebook group:
* [ ] Describe the steps you are taking to see the issue.
* [ ] Specify the PowerUp Name (and super section) you are using
* [ ] Detail "what you are trying to achieve" as well (so we know if you are using the correct super power)
* [ ] Provide a screen shot and even better a [Loom](https://www.loom.com/) screen recording
* [ ] Provide a link if possible
{% hint style="info" %}
Issue resolution starts with **clearly understanding your problem** or question. So the clearer and more precise you are in not only describing the issue, but also what exactly you are trying to achieve goes a long way into a quick resolution.
The best way to report issues is to share a screen recording video. This way you can actually describe and show at the same time. Plus it is much quicker for you as well, because you do not have to type a long message.
We love :heart\_eyes: screen recordings and issues that include them quickly go to the top of the priority list. Use [Loom](https://www.loom.com/) or other free tools, to quickly and easily share a screen recording.
{% endhint %}
If the issues needs to "move to support" because of access information or you would rather not reveal your site or issue - then we will continue the conversation as a [support ticket.](httpssupport.superpowerups.com://)
### 2) Support Tickets
Filing a [support ticket ](https://powerups.atlassian.net/servicedesk/customer/portal/1)should be used for the following types of issues
* Account problems (can't log in, unable to install or access purchased products)
* Billing questions
* Issues that require sharing sensitive information
As with posting an issue to the Facbeook group, we ask that you provide as much detail as possible when reporting the problem.
* Describe the steps you are taking to see the issue.
* Specify the PowerUp Name (and super section) you are using
* Detail "what you are trying to achieve" as well (so we know if you are using the correct super power)
* Provide a screen shot and even better a [Loom](https://www.loom.com/) screen recording
* Provide a link if possible
# Licensing
### If you purchased just this PowerUp (Stand alone version):
* You are entitled to install a just this PowerUp into one Thinkific site.
* If you uninstall this PowerUp app from your Thinkific site, you will not be able to reinstall it or move your license to another site without contacting support first.
### If you are a PowerPass member:
* You are entitled to all available PowerUp's as long as your subscription is current
* You are entitled to install any PowerUp into one Thinkific site.
* If you uninstall this PowerUp from your Thinkific site, you will not be able to reinstall it or move your license to another site without contacting support first.
* If you cancel your PowerPass subscription, you will still have access to any installed PowerUp from your Thinkific site as long as you have kept it installed. You will also receive future updates to the installed PowerUps going forward.
### If you have purchased an [Agency License](https://www.superpowerups.com/pages/for-agencies):
* You are entitled to all available PowerUp's as long as your subscription is current
* You are entitled to install a any PowerUp into unlimited Thinkific sites (yours or your clients).
* If you uninstall this PowerUp from your Thinkific site, you will be able to reinstall it or move your license to another site.
* If you cancel your Agency License subscription, you will still have access to any installed PowerUp from your Thinkific sites as long as you have kept it installed. You will also receive future updates to installed PowerUps going forward.
# Uninstalling
Please tell me it's not true - say it ain't so. **Do you really want to remove this super power** from your site? You realize you will lose all of that super power strength 🦸 that you once had, don't you?
Ok, well if you really really want to, the instructions are below 👇
## 🦹 Here is how to lose your super powers👇
Head over to your apps page inside of your site
* Locate the :boom: **PowerUp** and click the *nasty red trash can button to uninstall the app*
One more warning here - if you uninstall this PowerUp, you will not be able to reinstall it on another site unless you have purchased the PowerUps Agency License.

## 👋 So long 😭
If you are having "click remorse" right about now and realize you made a bad decision, then just [reach out to support](http://support.robgalvin.co/) with the details and we will see about getting your super powers restored 🦸